How to Enable or Disable Built-in Administrator Account Lockout in Windows 11
The “Allow administrator account lockout” policy in Windows 11 determines if the built-in administrator account locks itself after too many incorrect password tries.
This security setting prevents someone from guessing your administrator password repeatedly. If the policy is on, and someone guesses the password incorrectly too many times, the account will temporarily lock, stopping further attempts.
Enabling this lockout feature adds an extra layer of security to your PC. It’s a good idea to understand how this policy works and how you can change it.
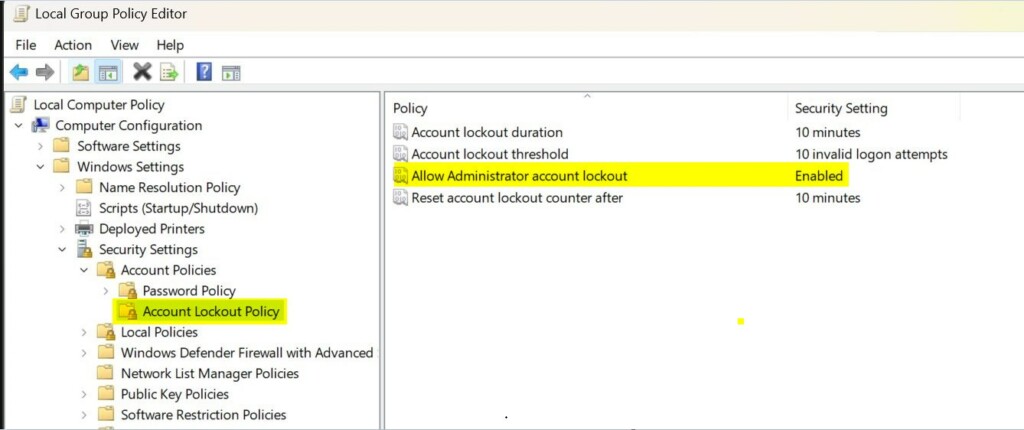
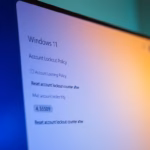
Open Local Security Policy by searching for secpol.msc. Navigate to Account Policies, then Account Lockout Policy. Double-click “Allow Administrator account lockout” and select Enabled or Disabled to control the setting. You need administrator privileges to modify this.
Why Account Lockout Matters
Account lockout stops hackers who try to guess your password by locking your Windows 11 account after too many wrong password attempts. This security feature protects your personal information from unauthorized access. Account lockout is a key part of keeping your Windows 11 PC safe from unwanted access.
The Account Lockout Policy in Windows manages user account locking. This policy prevents hackers from guessing passwords by blocking an account after a predetermined number of wrong login attempts, for example, 5 attempts.
Understanding the Settings
Windows 11 account lockout settings are like a security guard for your computer, temporarily blocking access if too many wrong passwords are typed. You can control how long an account stays locked and when the password attempt counter resets. Understanding these settings helps you manage your PC’s security and prevent unauthorized access.
Account lockout duration is the number of minutes a Windows 11 account remains locked before automatically unlocking. An administrator can also manually unlock the account at any time.
Reset account lockout counter after: This is how many minutes must pass before the failed login counter resets to zero.
Administrator account lockout in Windows 11: This setting determines if the special Administrator account on your computer can be temporarily blocked from use. Blocking the Administrator account prevents anyone from accessing it after too many incorrect password attempts, adding a security layer.
The Security Trade-off
Limiting failed login attempts stops most hacking. However, a bad actor could lock out all user accounts at once. This action is a denial-of-service attack.
New Default Settings
Windows 11 now has new default account lockout rules to boost security, starting with update build 22528. Your account locks after 10 incorrect password attempts and stays locked for 10 minutes. The built-in administrator account lockout is also active by default, making it harder for unauthorized users to access your system.
- Account lockout threshold: 10 failed attempts
- Account lockout duration: 10 minutes
- Allow Administrator account lockout: Enabled
- Reset account lockout counter after: 10 minutes
References:
Account Lockout Policy – Windows 10
Describes the Account Lockout Policy settings and links to information about each policy setting.
KB5020282—Account lockout available for built-in local administrators – Microsoft Support
Important Requirements
How to Enable or Disable Administrator Account Lockout
You can enable or disable the built-in administrator account lockout in Windows 11 using the Local Security Policy tool. To open it, press the Windows key, type ‘secpol.msc’, and then press Enter. This tool lets you adjust security settings, including how account lockouts are managed for administrator accounts.- [Admin Required] Open Local Security Policy. Press the Windows key and search for
secpol.msc, then press Enter. - In the left pane, click on Account Policies to expand it. Then click on Account Lockout Policy.
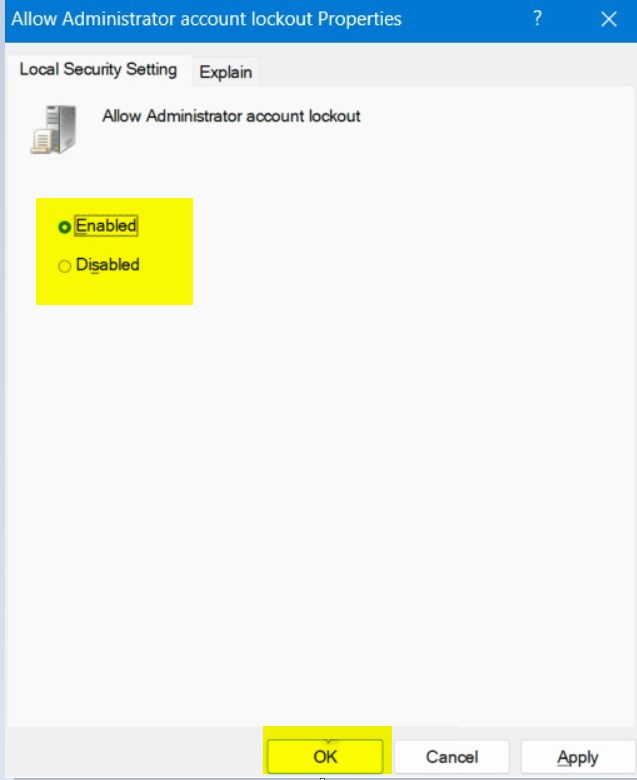
- In the right pane, double-click on Allow Administrator account lockout to open its settings.
- Note: The Account lockout threshold policy must be enabled first to change this setting.
- Select Enabled (the default) or Disabled for what you want. Then click OK.
- If you want, you can also change the Account lockout threshold, Account lockout duration, and Reset account lockout counter after settings.
- When you’re done, you can close the Local Security Policy window.
Summary
How to enable or disable the built-in Administrator account in 🪟 Windows 11?
Command Prompt (All Editions): Run net user Administrator /active:yes to enable or /active:no to disable the built-in Administrator account in Windows 11. PowerShell (All Editions): Use Enable-LocalUser -Name “Administrator” or Disable-LocalUser -Name “Administrator” in an elevated session.
Is it safe to disable the built-in admin?
Is it safe to disable the built-in admin? Yes—in most environments, disabling it is a recommended hardening step because it removes a predictable, high-privilege target. Ensure you have at least one other approved admin account (local or domain) available before disabling it.
Was this guide helpful?

About the Author
Richard
Tech Writer, IT Professional
Richard, a writer for Geek Rewind, is a tech enthusiast who loves breaking down complex IT topics into simple, easy-to-understand ideas. With years of hands-on experience in system administration and enterprise IT operations, he’s developed a knack for offering practical tips and solutions. Richard aims to make technology more accessible and actionable. He's deeply committed to the Geek Rewind community, always ready to answer questions and engage in discussions.

No comments yet — be the first to share your thoughts!