How to Add or Remove Bluetooth Notification Icon on Taskbar in Windows 11

Managing the Bluetooth notification icon on your Windows 11 taskbar is a common task. This guide covers three ways to add or remove it, from the quickest to the one that needs administrator rights.
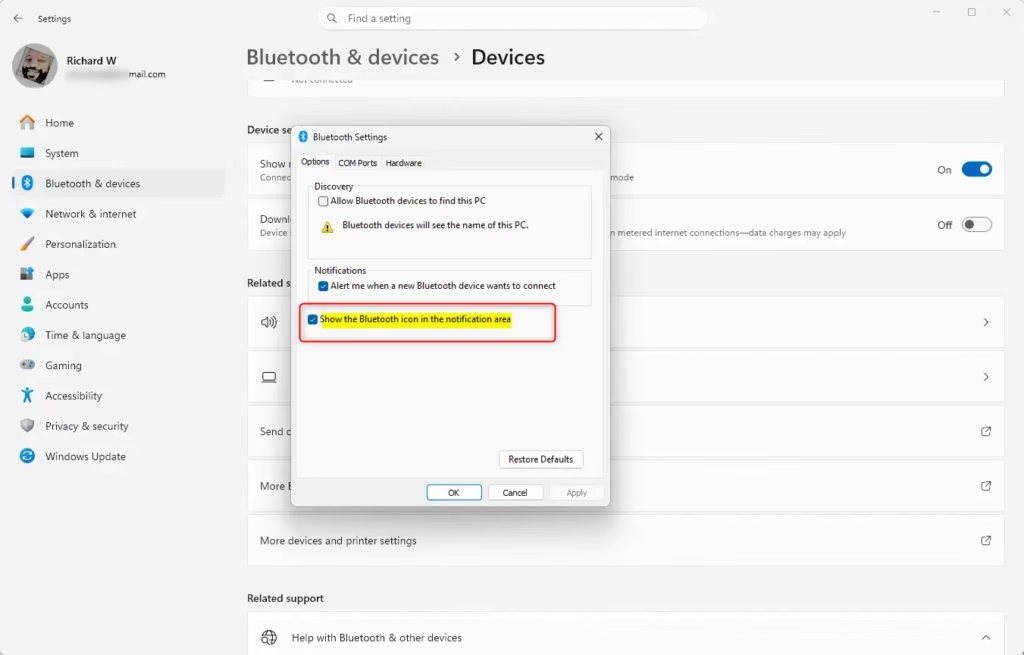
Open Settings, go to Bluetooth & devices, click Devices, scroll down to More Bluetooth settings, then check or uncheck Show the Bluetooth icon in the notification area . The icon appears or disappears on the taskbar immediately.
What is Bluetooth?
Wireless accessories like mice, keyboards, and headphones rely on Bluetooth (a short-range radio link for cable-free data sharing) to communicate with your PC. Connecting cable-free devices like mobile phones, wireless headsets, speakers, and fitness trackers requires this technology. Typical devices include:
- Mobile phones
- Wireless headsets
- Speakers
- Fitness trackers
- Mouse and keyboard
When Bluetooth is active in Windows 11, its icon appears in the taskbar corner, giving you a visual cue. The icon disappears from the taskbar corner when you turn off the Bluetooth feature, indicating its inactive status.
The icon can also be tucked away. If you don’t see it, click the small up arrow (Show hidden icons) next to the system tray . The icon may be sitting in that overflow area.
Option 1Remove the Icon Quickly
This is the fastest way to remove the icon. It works only while the icon is visible, so if Bluetooth is off or the icon is hidden, use the second method instead.
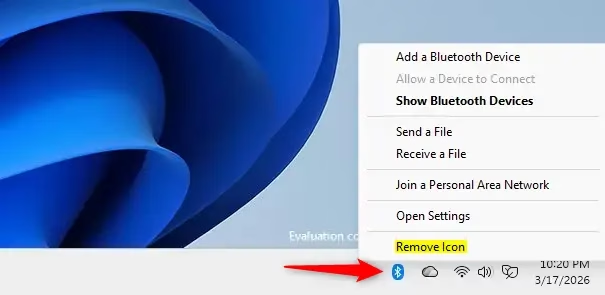
- Look for the Bluetooth icon in the taskbar corner (bottom right of your screen). If it isn’t there, click Show hidden icons to check the overflow area.
- Click on the Bluetooth icon. A small menu opens. If nothing happens, try a right-click instead.
- Click on Remove Icon. The icon disappears from the taskbar corner straight away.
Your paired devices keep working. To get the icon back, use the Settings method below.
Option 2Add or Remove the Icon Using Settings
Windows 11 also lets you toggle this icon directly from the main system settings. Use this method to add the icon back after removing it, or to remove it if you can’t see it on the taskbar .
- Open Settings by pressing Win+I on your keyboard. The Settings window opens.
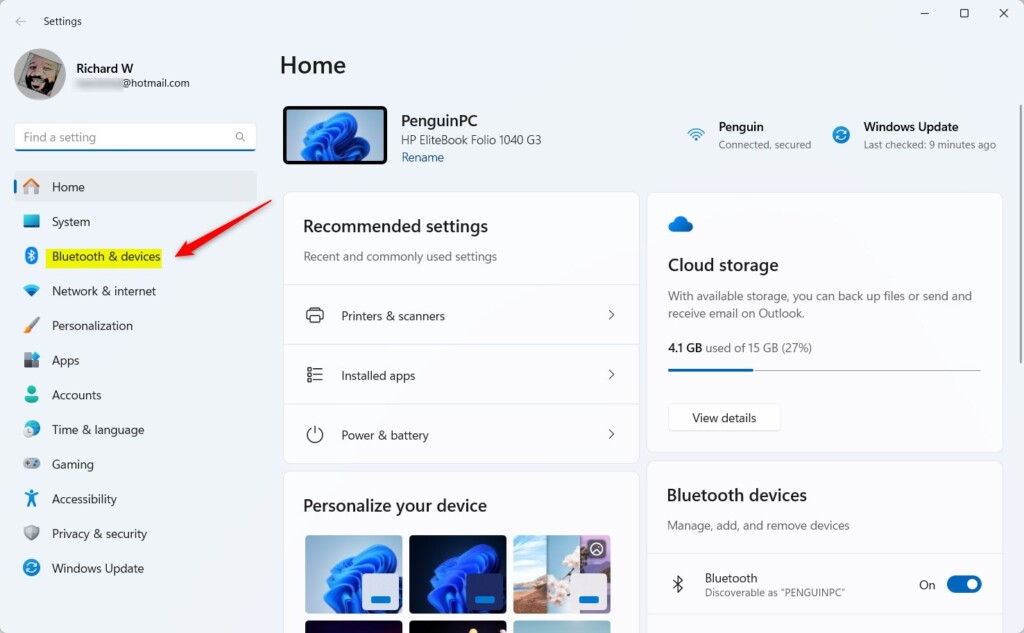
- Click on Bluetooth & devices on the left side.
- Click on Devices on the right side. You will see your paired devices listed.
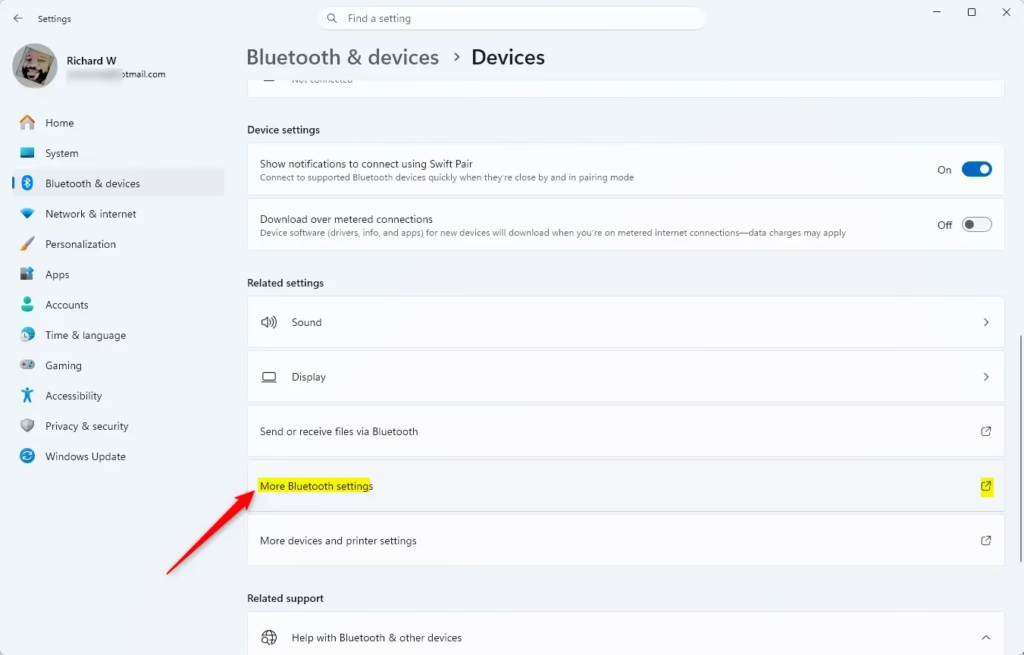
- Scroll down and click on More Bluetooth settings under Related settings. A small Bluetooth Settings window opens.
- In the Options tab, check the box next to Show the Bluetooth icon in the notification area to add the icon. Uncheck it to remove the icon.
- Click OK. The change applies right away.
- You can now close Settings.
If you can't find More Bluetooth settings, the PC probably has no Bluetooth adapter, or the adapter is disabled or missing its driver. Check that the Bluetooth toggle appears under Bluetooth & devices first. Also, the link's exact position can shift slightly between Windows 11 versions, so scroll the whole page before giving up.
Option 3Add or Remove the Icon Using Registry Editor
⚠️ Administrator permissions are required
On a work or school PC, your organisation may block it. In that case, ask your IT department.
To add the Bluetooth icon:
reg add "HKEY_CURRENT_USER\Control Panel\Bluetooth" /v "Notification Area Icon" /t REG_DWORD /d 1 /fTo remove the Bluetooth icon:
reg add "HKEY_CURRENT_USER\Control Panel\Bluetooth" /v "Notification Area Icon" /t REG_DWORD /d 0 /fSummary
If the icon doesn't change right after you apply either option, sign out and back in, or restart the PC. To undo the change, follow the opposite option above.
This guide has shown you how to manage the Bluetooth icon on your Windows 11 taskbar using different methods. For everyday use, the taskbar menu or the Settings checkbox is all you need. Keep the administrator method for cases where those two don't work.
Have a question about this guide?
Answered by AI from this guide. Good questions may be added to this page — please don't include personal details.
Did this guide fix your problem?

About the Author
Richard
Tech Writer, IT Professional
Richard is a writer at Geek Rewind who turns complex IT tasks into clear, step-by-step guides. He draws on years of hands-on experience in system administration and enterprise IT operations, focusing on Windows, Linux and WordPress: the problems people actually run into, and the fixes that work. His server and WordPress guides come from systems he runs himself. Richard builds and maintains the platform behind Geek Rewind, from its Ubuntu servers and Nginx configuration to its custom WordPress plugins. Many new tutorials start with readers' questions, and he's always glad to answer them in the comments.
No comments yet — be the first to share your thoughts!