How to Set Active Hours for Windows 11
Windows 11 helps keep your computer secure by downloading updates behind the scenes. Sometimes, these updates need a restart to finish. When your computer restarts while you’re working, it’s a real pain. You can use Windows 11 active hours to tell your computer when you are busy. Windows will then avoid restarting during those times.
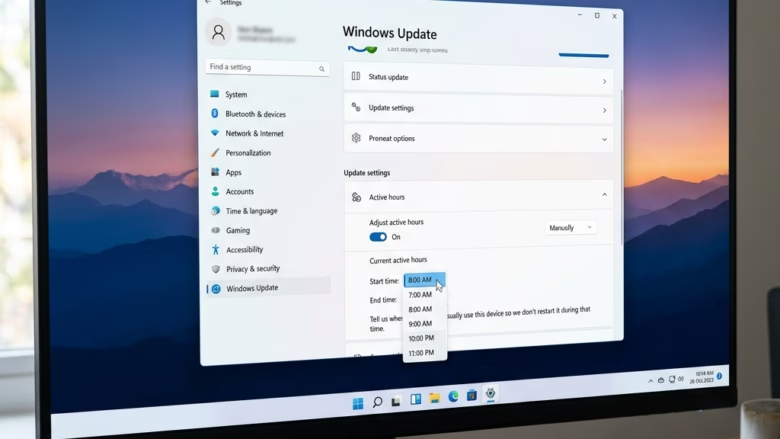
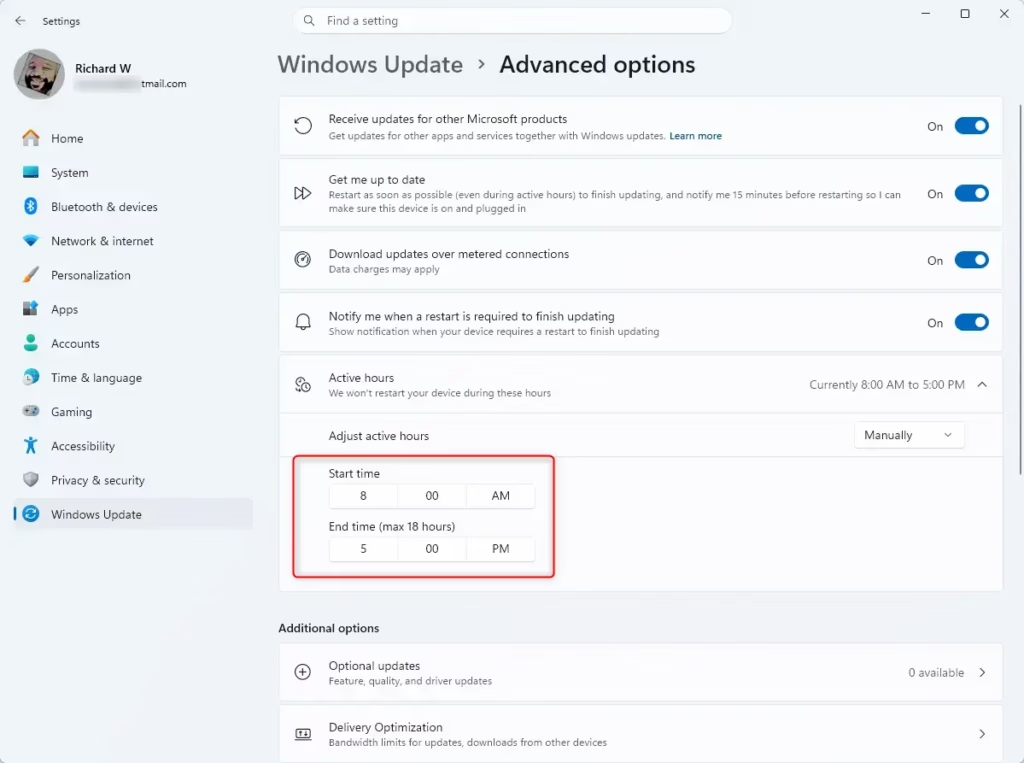
Set active hours in Windows 11 Settings by going to Windows Update > Advanced options > Active hours. Choose “Automatically” or set your preferred “Manually” start and end times to prevent unexpected restarts.
Why use Active Hours?
Setting active hours means your computer won’t reboot in the middle of something important. This keeps your work flowing smoothly while still keeping your system secure.
What happens when done?
Once you set these hours, Windows will consider that time ‘busy.’ It will wait until outside of those hours to perform any necessary restarts for updates.
Reference: Keep your PC up to date with active hours – Microsoft Support
Option 1Set Active Hours in Settings
Setting your Windows 11 active hours is simple and can be done right in the Settings app to control when your PC restarts for updates.- Open Settings (press ⊞ Win+I).
- Click Windows Update on the left, then click Advanced options. Open Advanced options settings

- Click Active hours to expand the menu.
- Choose Automatically or Manually from the drop-down menu.
- If you choose Manually, pick your preferred start and end times, then click the check mark to save.

Troubleshooting: Why 🪟 Windows 11 Ignores Active Hours
If Windows 11 ignores your active hours and restarts unexpectedly, it’s usually because of critical updates or if the PC hasn’t restarted in a while.
🪟 Windows 11 Pro vs Home Limitations
Windows 11 Home users have fewer options for controlling updates. Pro, Enterprise, and Education users can use the Group Policy Object (GPO), a tool that lets administrators manage settings across multiple computers, to enforce stricter restart policies. Home users are mostly limited to the standard Settings menu.
Option 2Set Active Hours in Registry Editor
Note: This requires administrator privileges.
- Open Registry Editor (regedit.exe).
- Go to:
HKEY_LOCAL_MACHINE\SOFTWARE\Microsoft\WindowsUpdate\UX\Settings
Change SmartActiveHoursState to 0 to set it manually, or 1 for automatic. Adjust ActiveHoursStart and ActiveHoursEnd using decimal values in 24-hour format.

Option 3Set Active Hours via Local Group Policy
Note: Requires administrator privileges. Only for Pro/Enterprise/Education.
- Open Local Group Policy Editor (gpedit.msc).
- Navigate to:
Computer Configuration\Administrative Templates\Windows Components\Windows Update\Manage end user experience

- Double-click Turn off auto-restart for updates during active hours.
- Select Enabled to set your custom times.

Summary
Active hours stop unexpected restarts from happening. You can set them via Settings, Registry, or GPO. If you face issues, check your Windows Update Service status or your metered connection settings.
Why does 🪟 Windows 11 ignore my active hours?
Windows may ignore active hours if an update is marked as critical or if the system has been waiting to restart for an extended period. Ensure your device is not set to a metered connection, as this can sometimes interfere with how Windows handles update restart policies and scheduling.
Can I set active hours for more than 18 hours?
By default, Windows 11 limits the manual active hours range to 18 hours. This is a built-in design choice to ensure that the system eventually finds a window to install necessary security updates. You cannot extend this range beyond 18 hours through standard user settings or simple registry tweaks.
Does sleep mode affect active hours?
Sleep mode can affect your Windows 11 active hours because your PC can’t restart if it’s asleep, but it will respect your set times once it wakes up.
Was this guide helpful?

About the Author
Richard
Tech Writer, IT Professional
Richard, a writer for Geek Rewind, is a tech enthusiast who loves breaking down complex IT topics into simple, easy-to-understand ideas. With years of hands-on experience in system administration and enterprise IT operations, he’s developed a knack for offering practical tips and solutions. Richard aims to make technology more accessible and actionable. He's deeply committed to the Geek Rewind community, always ready to answer questions and engage in discussions.


No comments yet — be the first to share your thoughts!