What to Do When Windows 11 Keeps Asking for a PIN After Every Reboot

Windows 11 asking for a PIN after every reboot usually happens because the system security files inside your computer are broken or corrupted. This frustrating glitch forces you to type your login numbers repeatedly on startup even though your settings are correct.
You can fix the loop in a few minutes by deleting the bad files inside the 📁C:\
When Windows 11 keeps asking for a PIN after every reboot, you can fix the issue by deleting your current PIN and creating a brand new one through the Settings app under Accounts and Sign-in options, or by clearing out the damaged files inside the Ngc system folder.
Understanding the 🪟 Windows 11 PIN Prompt Problem
Windows 11 keeps asking for a PIN after every reboot because the core security folder storing your sign-in details is damaged or corrupted. This frustrating loop often happens after a system update fails to save your credentials properly, or when a background security service stops running as it should during startup.
Sometimes, a recent Windows 11 software update changes your security settings without your knowledge. Other times, your Microsoft account settings get out of sync with your physical computer. When this happens, Windows 11 plays it safe. The operating system forces you to create a new PIN or type your old PIN in every time you turn on your machine.
You do not need any technical background to fix the Windows 11 PIN bug that forces you to sign in after every single reboot. Most people can solve the repeating login prompt in less than 5 minutes by following the simple step-by-step instructions below.
Method 1Remove and Recreate Your PIN
Recreate your PIN to stop Windows 11 from asking for it after every restart. Deleting the current sign-in code and setting up a fresh one clears out any broken system data that causes the annoying verification loop every time you turn on your PC.
- Click the Start button at the bottom of your screen and open the Settings app (the gear icon).
- Click on Accounts in the left-hand menu.
- Select Sign-in options from the list on the right side.
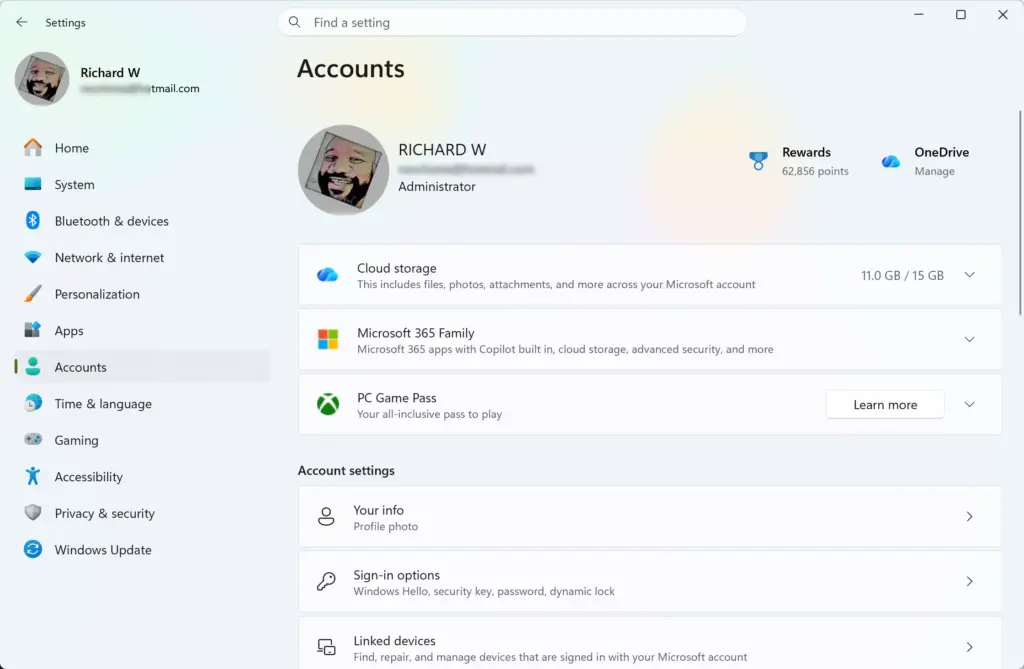
Settings › Accounts - Click on PIN (Windows Hello) to expand the menu.
- Click the Remove button. Windows will ask you to confirm your Microsoft account password for security reasons. (Note: This step requires administrator privileges.)
- Once the PIN is removed, click the Add button next to PIN (Windows Hello).
- Follow the on-screen instructions to create a new PIN. Type it in, confirm it, and click OK.
- Restart your computer to see if the problem goes away.
Method 2Clear and Reset the NGC Folder
Resetting the Ngc folder clears out broken sign-in data that triggers constant PIN prompts. Resetting this folder forces your computer to rebuild a fresh, working copy of your security files from scratch so it stops asking for a PIN.
- Open your File Explorer by clicking the folder icon on your taskbar.
Settings > Advanced - Navigate to the following folder path: C:\Windows\ServiceProfiles\LocalService\AppData\Local\Microsoft\Ngc. (Note: You may need administrator privileges and permission to access this folder.)
- Select all the files and folders inside the Ngc folder and delete them. Do not delete the Ngc folder itself, just the contents inside it.
- Go back to the Settings app, click Accounts, and select Sign-in options.
- Click Add to set up a brand new PIN.
- Restart your PC. Windows will now use a fresh, clean folder to remember your PIN.
Method 3Check Your Windows Hello Sign-In Requirements
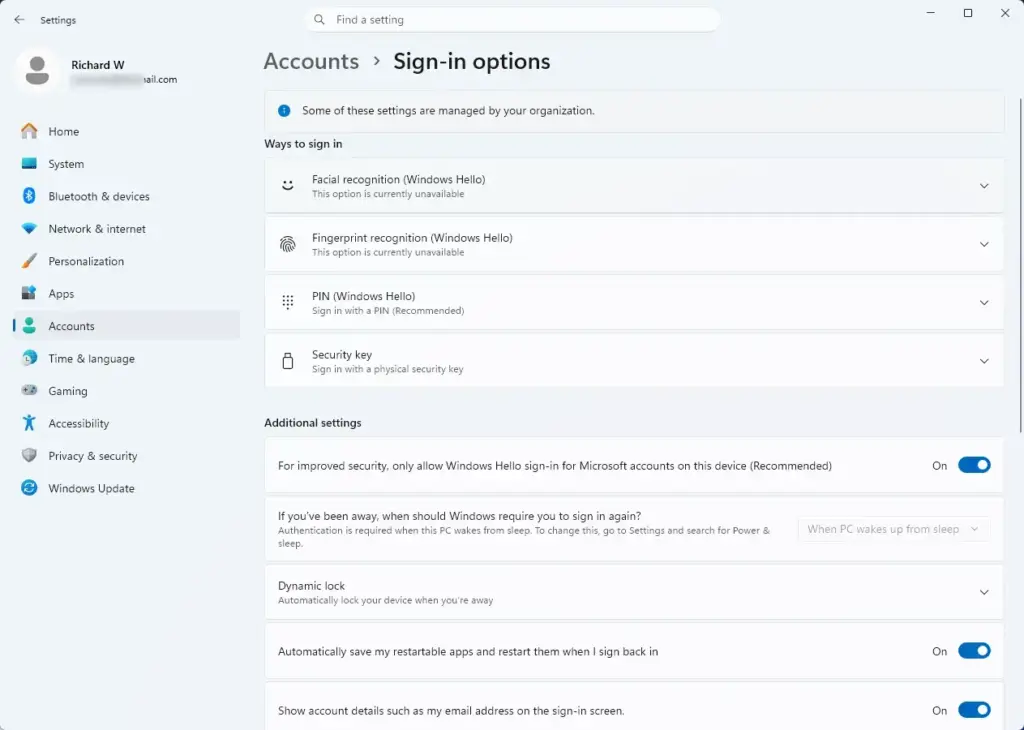
Checking your Windows Hello sign-in requirements ensures your computer uses your preferred security method instead of defaulting to a Microsoft account password after a reboot. Turning off the strict security toggle stops Windows from resetting your login choices and demanding a PIN every time you start your computer.
- Open the Settings app and click on Accounts.

Settings - Select Sign-in options.
- Look for the section titled "For improved security, only allow Windows Hello sign-in for Microsoft accounts on this device."
- Turn this toggle switch to Off, wait a few moments, and then turn it back to On.
Toggling this switch forces Windows to recheck sign-in preferences and stop demanding extra verifications.
Method 4Fix Microsoft Account Sync Issues
Fixing Microsoft account sync issues stops Windows 11 from forgetting your PIN when your computer fails to connect properly to online servers during startup. Reconnecting your user profile to your main account clears out communication errors and helps your computer save your sign-in state correctly every single time.
- Open the Settings app and select Accounts.
- Click on Your info.
- Look for an option that says Sign in with a local account instead. Click it and follow the prompts. (Note: This step requires administrator privileges.)
- Once you switch to a local account, restart your computer.
- Go back to Settings Accounts Your info and click Sign in with a Microsoft account instead.
- Enter your email address (for example, user@example.com) and password to link your account back up.
Expert Tip: Check Group Policy Settings (Advanced)
Checking Group Policy settings helps you fix a Windows 11 PIN prompt problem if a strict network rule forces your computer to ask for sign-in credentials. If your computer connects to a work or school network, a system policy might override your local login choices and require manual verification after every reboot.
- Click the Start button, type Local Group Policy Editor into the search bar, and open it. (Note: This tool requires administrator privileges and is available in Windows Pro and Enterprise editions.)
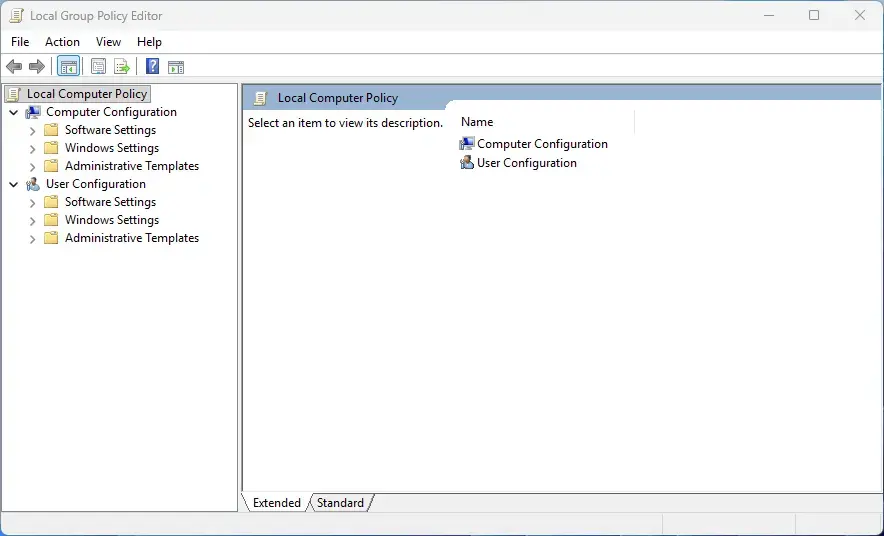
Group Policy Editor - Use the left sidebar to navigate through the menus. Click on Computer Configuration, then Administrative Templates, then System, and finally Logon.
- Look for a setting named "Turn on convenience PIN sign-in" in the list on the right.
- Double-click the setting and make sure it is set to Enabled. Click Apply and OK.
Unique Angle: Clearing Cached Credentials and Startup Repair
Clearing cached credentials and running a startup repair gives your operating system a clean slate by removing leftover broken login tokens that trigger the PIN prompt. Deleting these old saved passwords stops your computer from getting stuck in a repeated verification loop after every reboot.
- Click the Start button, type Credential Manager, and open it.
- Click on Windows Credentials.
- Look for any items that mention your Microsoft account or generic login tokens. Click on them and select Remove. (Note: This step requires administrator privileges.)
- Restart your computer immediately after clearing these credentials.
By wiping these old tokens, you force Windows to make brand-new, healthy login tokens the next time you turn on your machine.
Summary
Stopping Windows 11 from asking for your PIN after every reboot is easy once you fix corrupted security folders, reset your sign-in options, or reconnect your Microsoft account. Walking through these simple troubleshooting steps restores your computer's memory and lets you log in smoothly every single time you turn on your PC.
Start with the simplest solution by removing and recreating your PIN in the Settings app. If that does not work, clear out the Ngc folder or refresh your account connection. Take control of your Windows 11 experience today and enjoy a smooth, hassle-free startup every time you turn on your PC.
Was this guide helpful?

About the Author
Richard
Tech Writer, IT Professional
Richard is a writer at Geek Rewind who turns complex IT tasks into clear, step-by-step guides. He draws on years of hands-on experience in system administration and enterprise IT operations, focusing on Windows, Linux and WordPress: the problems people actually run into, and the fixes that work. His server and WordPress guides come from systems he runs himself. Richard builds and maintains the platform behind Geek Rewind, from its Ubuntu servers and Nginx configuration to its custom WordPress plugins. Many new tutorials start with readers' questions, and he's always glad to answer them in the comments.


No comments yet — be the first to share your thoughts!