Should You Enable Advanced Crash Dump Logging In Windows 11 Advanced System Settings

Advanced crash dump logging in Windows 11 is a diagnostic setting. When your PC crashes with a blue screen, Windows saves a copy of what was in memory to a file on your drive. A support technician or developer can read that file to work out which driver or component failed. How much gets saved depends on the dump type you choose. A small memory dump is tiny, usually a couple of megabytes at most, and goes into the 📁C:\
No, you should not enable advanced crash dump logging unless a support technician specifically asks for it. Windows 11 defaults to Automatic memory dump, which captures enough diagnostic data for most troubleshooting without wasting drive space. Only change the setting in Startup and Recovery if someone helping you diagnose a persistent blue screen requests a more detailed dump file.
Windows 11 normally ships with the dump type set to Automatic memory dump, and most people should leave it there. Changing it only makes sense when someone who is helping you with a stubborn blue screen asks for a more detailed file. The exact error codes and memory contents in a larger dump can solve problems that a small dump cannot.
Here is what each option does:
- Small memory dump: This saves a tiny file with only the most important details about the crash. It takes up very little drive space and often gives enough information to track down a common driver problem. These files are written to the Minidump folder, so you can keep a history of several crashes.
- Automatic memory dump: This is the default in Windows 11. Windows saves the same kind of data as a kernel memory dump and manages the size of the paging file for you. It also keeps a small dump after each crash. It gives you enough data for most troubleshooting without using much space.
- Kernel memory dump: This saves everything running in the core part of Windows, called the kernel, when the crash happens. It is bigger than a small memory dump and includes more data about drivers and background system tasks. It leaves out the memory used by your ordinary programs.
- Complete memory dump: This saves everything that was in your computer’s memory at the moment of the crash. On a PC with a lot of RAM, the file will be huge and can take up many gigabytes.
The drop-down menu may also offer Active memory dump and (none). Active memory dump is a trimmed-down version of a complete dump. You will rarely need either one.
How to Access and Modify Startup and Recovery Settings
The crash dump settings live in the Advanced system settings window. The quickest way to open it is to type sysdm.cpl into the Start menu search bar , or to search for View advanced system settings as shown below. This panel controls how your PC behaves after a blue screen or system crash. You need an administrator account to change any of these options. It works the same way on Windows 11 Home and Pro.
Find the crash dump options with these steps:
- Click the Start button on your taskbar and type View advanced system settings into the search box. You should see a matching result at the top of the list.

Taskbar - Click the result named View advanced system settings, which has a Control Panel icon next to it. This step needs administrator privileges. If a window asks for permission, click Yes or type your administrator password. If you are on a standard account and have no password to enter, ask the person who manages the PC to do this.
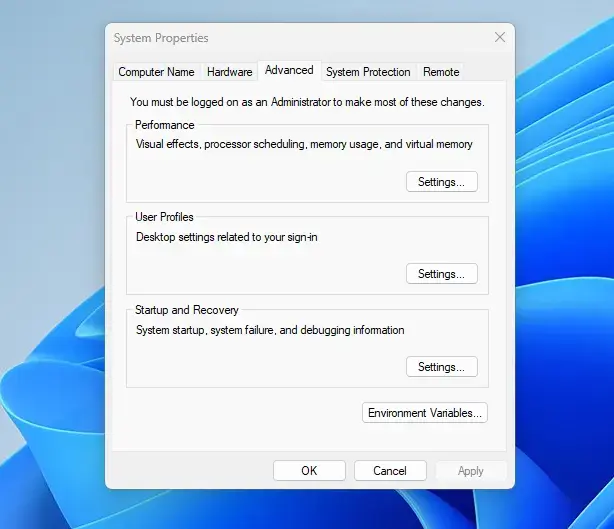
System Properties - Look at the small window that opens, called System Properties. It should open on the Advanced tab. If it does not, click that tab.
- Find the section labeled Startup and Recovery near the bottom of the window.
- Click the Settings… button inside that section. A new window titled Startup and Recovery opens.
- Look near the bottom of that window for the section labeled Write debugging information.
- Click the drop-down menu under Write debugging information to see your choices, including Small memory dump, Automatic memory dump, Kernel memory dump, and Complete memory dump. If the box is greyed out, you are not running with administrator rights, so close the window and reopen it from an administrator account.
- Pick the option you want and check that the dump file path is correct. By default it points to your main Windows folder. Windows will also tick or untick options such as Overwrite any existing file depending on the type you choose. Then click OK.
- Click OK on the main System Properties window to save your changes. If Windows tells you it needs to restart, that is because of a paging file change, so restart before testing.
To undo any of this, go back to the same drop-down and select Automatic memory dump again.
Should You Enable Advanced Crash Dump Logging?
Everyday users do not need it. A complete memory dump can use gigabytes of drive space on every crash, and it only helps with deep system faults. Stay with the default Automatic memory dump setting, or Small memory dump if you want the smallest files.
There are a few good reasons to keep the defaults:
- Disk space conservation: A complete memory dump needs a paging file at least as big as your physical RAM, plus a little extra. If you have 32 gigabytes of RAM, the dump file can take up around 32 gigabytes of drive space each time the PC crashes. Older dumps can pile up quickly if you have turned off the overwrite option.
- Performance and privacy: Writing that much data during a crash makes the PC slower to come back up. A complete dump is also a snapshot of everything in memory, which can include private information such as open documents or passwords. Do not send one to anyone you do not trust, and delete it once the problem is solved.
- Everyday needs: Most crashes come from a bad video card driver or a small software fault. A small or automatic memory dump has all the details a technician or repair tool needs for those.
You might also do it if technical support or a software engineer specifically asks for a full dump to track down a rare hardware bug. If you do, change it back to the default as soon as the problem is fixed. Then delete the large dump file so it stops taking up space.
Important Prerequisites and System Requirements for Advanced Dumps
Advanced crash dumps need two things: enough free space on your system drive, and a paging file large enough to hold what you are saving. For a complete memory dump, that means a paging file on your 📁C:\
First, make sure the system drive, usually 📁C:\
Second, for a complete memory dump, the paging file, also called virtual memory, must be large enough to hold all the data in your physical RAM. If Windows manages the paging file automatically, it usually handles this for you. PCs with a very large amount of RAM, or with the paging file moved to another drive or limited by hand, may need the virtual memory settings adjusted manually. Changing the paging file size requires a restart to take effect.
Troubleshooting Common Crash Scenarios
If your PC crashes a lot, changing the dump settings is only part of the fix. The dump file helps you find the cause, but it does not stop the crashes. The next steps are the practical ones to try first.
1Check for Windows Updates and System Errors
Checking for Windows updates is the easiest way to stop random crashes without touching advanced settings. Updates replace buggy system files and drivers with fixed versions, and many blue screen problems are solved this way.
- Open the Start menu and select Settings, which has a gear icon.
- Click Windows Update in the menu on the left side. The update page opens on the right.
- Click Check for updates and install everything it offers. To see optional driver updates, open Advanced options and then Optional updates, and install those too.
- Restart your computer if Windows asks you to. Updates are not finished until the restart is done.
2Test Your Computer Memory
Testing your memory for errors helps you find a faulty RAM stick, a common cause of random blue screens. Windows has a built-in tool for this called Windows Memory Diagnostic. It runs before the desktop loads, so save your work first.
- Click the Start button, type Windows Memory Diagnostic, and select the app from the search results. This step requires administrator privileges.
- Choose Restart now and check for problems (recommended). The PC restarts right away.
- Wait while the test runs on a blue diagnostic screen. This can take several minutes. When it finishes, the PC restarts and boots into Windows. The results appear as a notification after you sign in. If you miss it, you can look for them in Event Viewer.
If the test reports errors, a RAM stick is likely failing. Try testing one stick at a time to find the bad one.
3Check Your Graphics Card and Drivers
If the PC crashes just as you start a game or a heavy graphics program, the graphics card or its driver is the likely cause. Download the newest driver directly from the maker of your graphics card, rather than from a third-party site. If the crashes began right after a driver update, installing an older driver from the same maker is worth trying.
Summary
Crash dump logging is a built-in Windows 11 feature that saves diagnostic files to your drive when the PC suffers a blue screen or other sudden system failure. Advanced logging records everything in your RAM, which is useful for experts but costs a lot of disk space. Everyday users should stay with the default Automatic memory dump setting, or switch to Small memory dump to save space.
Have a question about this guide?
Answered by AI from this guide. Good questions may be added to this page — please don't include personal details.
Did this guide fix your problem?

About the Author
Richard
Tech Writer, IT Professional
Richard is a writer at Geek Rewind who turns complex IT tasks into clear, step-by-step guides. He draws on years of hands-on experience in system administration and enterprise IT operations, focusing on Windows, Linux and WordPress: the problems people actually run into, and the fixes that work. His server and WordPress guides come from systems he runs himself. Richard builds and maintains the platform behind Geek Rewind, from its Ubuntu servers and Nginx configuration to its custom WordPress plugins. Many new tutorials start with readers' questions, and he's always glad to answer them in the comments.
No comments yet — be the first to share your thoughts!