How to Optimize Microsoft Defender CPU Usage in Windows 11

Microsoft Defender’s CPU usage in Windows 11 can slow down your PC, but you can optimize it.
Microsoft Defender is Windows 11’s free antivirus that runs in the background to protect your computer. It scans for viruses and other threats automatically.
These scans are important for security, but sometimes Defender uses a lot of your computer’s processing power (CPU). This can make your PC feel sluggish, especially when running demanding tasks.
This guide shows you simple ways to control how much CPU Defender uses. You can tell Defender to skip certain files or programs it scans, which frees up resources for other applications. Optimizing Defender’s scans helps your PC run better without sacrificing security.
Adjust Microsoft Defender’s CPU usage by opening PowerShell as administrator and using the `Set-MpPreference -ScanAvgCPULoadFactor ` command. Alternatively, for Pro/Enterprise editions, use the Local Group Policy Editor under Windows Components.
What is Microsoft Defender Antivirus?
Microsoft Defender Antivirus is Windows 11’s built-in security tool. It protects your PC from viruses and malware by scanning files.
Microsoft Defender scans sometimes use 50% of your CPU. Lowering this percentage reduces CPU use, preventing a slow PC. However, a very low percentage might make scans take more time.
Why Would You Want to Change This?
Lowering CPU usage helps your PC run smoother while Defender scans. You can still work on other things without everything getting slow.
How to Change CPU Usage During Scans
Here are a few ways to adjust how much CPU Defender uses during scans:
1Using PowerShell (Easy for Everyone)
Microsoft Defender’s CPU usage can be controlled with PowerShell, a tool built into Windows. This method lets you set limits on how much processing power Defender uses during scans. These limits can help your computer run faster and offer a manageable way to control resource use.
Step 2: Check your current CPU limit
Copy and paste this command and press Enter:
Get-MpPreference | select ScanAvgCPULoadFactorA number showing the current CPU limit will appear (usually 50).
Step 3: Set a new CPU limit
Use this command. Replace <percentage> with a number between 0 and 100:
Set-MpPreference -ScanAvgCPULoadFactor <percentage>Example: To limit Defender to use only 30% CPU, run:
Set-MpPreference -ScanAvgCPULoadFactor 30Step 4: Restart your computer
Restart to apply the new setting.
2Using Local Group Policy Editor (For 🪟 Windows 11 Pro or Enterprise)
For Windows 11 Pro and Enterprise users, Microsoft Defender’s CPU usage can be limited with the Local Group Policy Editor. This tool allows direct changes to system settings, controlling Defender’s resource use and helping to lessen its impact on PC performance during scans. The Local Group Policy Editor offers a visual way to manage these Defender settings.
Step 1: Open Local Group Policy Editor
Press Windows key + R, type gpedit.msc, and press Enter. [ADMIN REQUIRED]
Step 2: Navigate to the Scan folder
Go to this location:
Computer Configuration → Administrative Templates → Windows Components → Microsoft Defender Antivirus → Scan
Step 3: Find and edit the CPU setting
Select the Scan folder on the left. Then double-click “Specify the maximum percentage of CPU utilization during a scan” on the right.
Step 4: Enable and set your percentage
Select Enabled. Then enter the CPU percentage you want (0 to 100).
Step 5: Apply changes
Click Apply and OK.
Step 6: Restart your computer
Restart to make the changes take effect.

3Using Windows Registry Editor (If Group Policy Editor is not available)
When Group Policy Editor isn’t available on your Windows version, the Registry Editor can be used to reduce Microsoft Defender’s CPU usage. This tool allows direct changes to system settings, controlling Defender’s resource use and helping to lessen its impact on PC performance during scans.
Step 1: Open Registry Editor
Press Windows key + R, type regedit, and press Enter. [ADMIN REQUIRED]
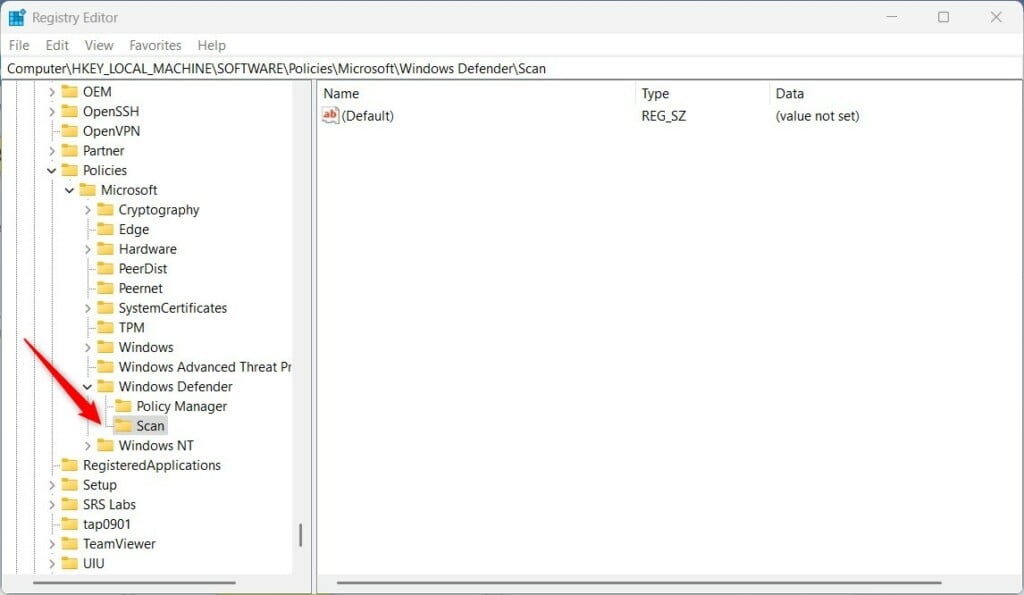
Step 2: Navigate to the Defender Scan folder
Go to this location:
HKEY_LOCAL_MACHINE\SOFTWARE\Policies\Microsoft\Windows Defender\ScanStep 3: Create the Scan folder if it doesn’t exist
To create a new setting for Microsoft Defender, first locate the Windows Security application. Then, right-click on its name, select “New,” then “Key,” and name this new key “Scan.” This action creates a specific folder for Defender’s scanning preferences.
Step 4: Create a new value
To reduce Microsoft Defender’s CPU usage on Windows 11, open the Scan folder. Then, right-click in the empty space on the right side of the window. From the menu that appears, select New and then DWORD (32-bit) Value. Name this new item AvgCPULoadFactor.
Step 5: Set the CPU percentage
The Windows Registry editor allows setting Microsoft Defender’s CPU usage percentage. Select ‘Decimal’ for whole numbers. Enter a number between 0 and 100. For example, setting it to 25 limits Defender to 25 percent of your computer’s processing power. The default setting is 50.
Step 6: Save and close
Click OK and close the Registry Editor.
Step 7: Restart your computer
Restart to apply changes.
What Happens When You Lower CPU Usage?
Your computer will feel faster during Defender scans. Other programs and tasks will run smoother. The trade-off: Defender scans might take longer to complete.
Summary
Optimizing Microsoft Defender CPU usage in Windows 11 can make your PC run faster. Methods include using PowerShell, the Local Group Policy Editor (for Pro/Enterprise versions), or the Registry Editor. Each method helps control how much processing power Defender uses, potentially improving your PC’s speed.
Adjusting the CPU usage is possible. Consider using PowerShell, the Local Group Policy Editor, or the Registry Editor. Choose the method that works best for you.
Lowering CPU usage helps your PC run smoother during scans. But scans might take a bit longer.
Always restart your PC after changing settings. This ensures the changes take effect.
For more official information, see Configure scanning options for Microsoft Defender.
Questions and tips about optimizing Microsoft Defender CPU usage in Windows 11 can be shared in the comments section at the bottom of this article. Sharing provides useful feedback for other users facing similar performance issues on their Windows 11 computers.
Does Windows Defender full scan use a lot of CPU?
Yes, a Windows Defender full scan can use a lot of CPU, potentially up to 100%, especially if CPU throttling is turned off, which can make your PC slow or even overheat.
Was this guide helpful?

About the Author
Richard
Tech Writer, IT Professional
Richard, a writer for Geek Rewind, is a tech enthusiast who loves breaking down complex IT topics into simple, easy-to-understand ideas. With years of hands-on experience in system administration and enterprise IT operations, he’s developed a knack for offering practical tips and solutions. Richard aims to make technology more accessible and actionable. He's deeply committed to the Geek Rewind community, always ready to answer questions and engage in discussions.


No comments yet — be the first to share your thoughts!