How to Enable/Disable Screenshots in Microsoft Edge


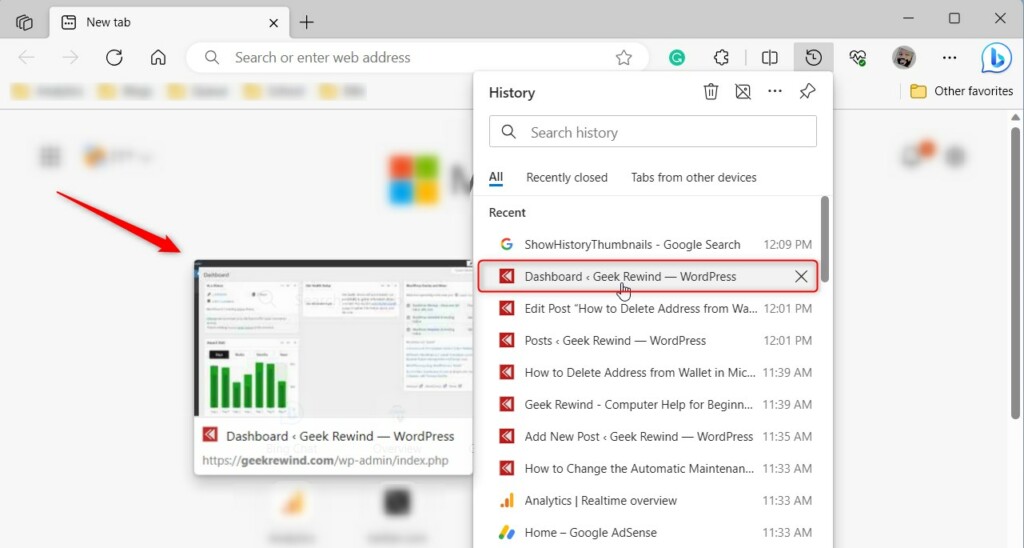
Screenshots in Microsoft Edge are small thumbnail previews of the websites you visit, shown in your browsing history. Microsoft Edge version 88 and newer captures these page snapshots automatically, so you can spot a site by its picture when you open your history with Ctrl+H.
Turning the feature off stops Microsoft Edge from saving these images to your device. Your history then goes back to plain text links for each site you open. Turning it back on is just as quick, and this guide covers both directions.
Go to Settings Privacy, search, and services. Under Services, find “Save screenshots of site for History” and toggle the switch to On to enable, or Off to disable.
Enable or disable Save screenshots for site History in Edge
The Microsoft Edge screenshot setting controls whether the browser saves thumbnail previews of the sites you visit for your history. For one user, the easiest way is the browser’s own Settings page. You open Microsoft Edge, click the three-dot menu in the top-right corner, choose Settings, and find the toggle for saving site screenshots in the privacy and services options.
If you want to force the setting for every user on the PC, or the toggle is missing or locked, use the Registry Editor method later in this guide. Both methods lead to the same result.
Here is how to turn the feature on or off from the Edge settings. You do not need administrator rights for this method.
- Open Microsoft Edge. The browser window opens on your start page or your last session.
- Press Alt+F, or click the three horizontal dots in the top-right corner of the window, then select Settings. The Settings page opens in a new tab.

- On the Settings page, click the
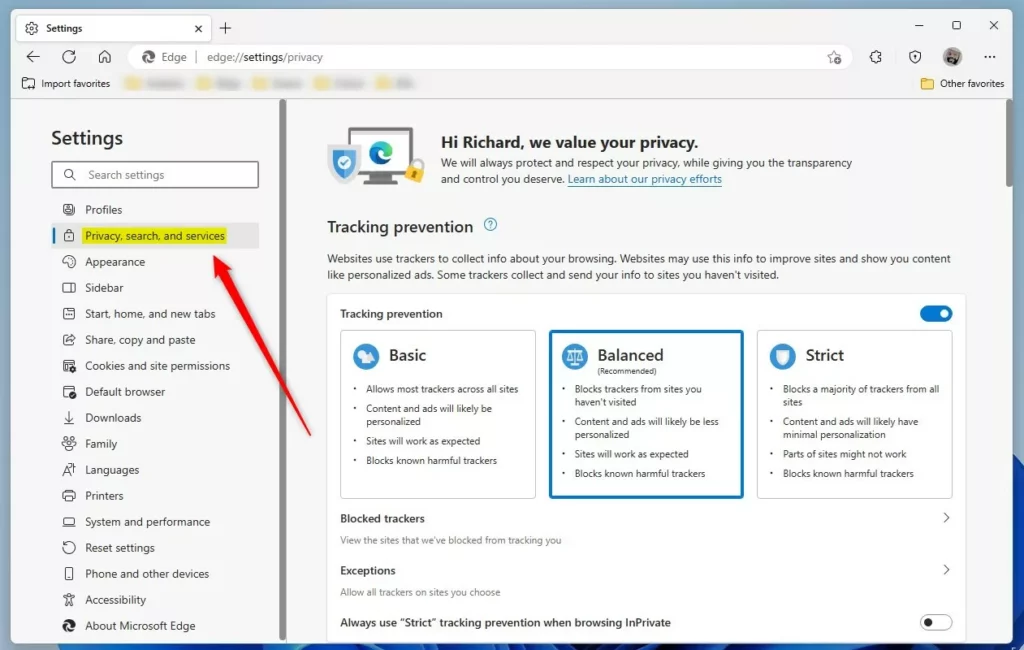
Privacy, search, and servicesbutton in the left panel. If you can’t see the left panel, make the Edge window wider and it should appear. The matching options then show on the right.
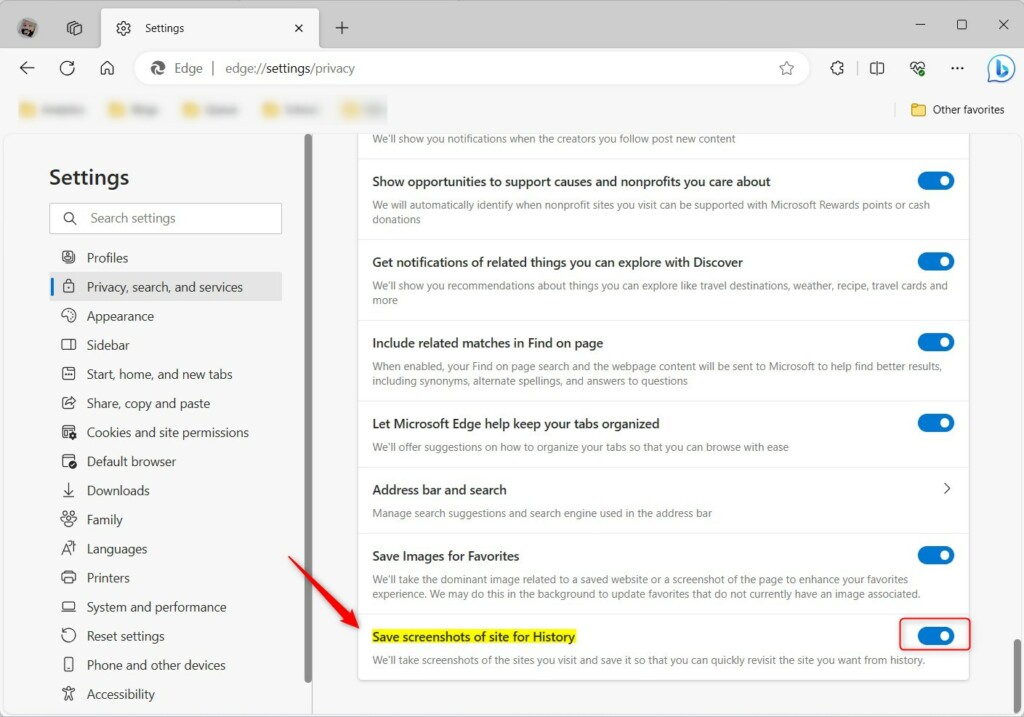
- On the right side, scroll down to the Services section. Find the “Save screenshots of site for History” tile. Toggle the switch to the
Onposition to enable it.
If you don’t see this tile, your copy of Edge is probably older than version 88, so update the browser first. If the tile is there but greyed out, or Edge says some settings are managed by your organization, a policy is controlling it. In that case, check the registry value described in the next method.
- To turn the feature off, toggle the switch to the
Offposition. Edge stops saving new screenshots from that point on.
- Close the Settings tab when you are finished. Edge applies the toggle as soon as you change it, so there is nothing to save. To undo the change, come back to the same tile and flip the switch the other way.
Turn On or Off Save screenshots of site for History in Microsoft Edge via the Registry Editor
You can also control this feature with Registry Editor, an advanced tool that stores Windows and app settings in a database. You do this by adding a policy value for Edge. A policy set this way applies to every user on the computer and overrides the toggle in Edge's own settings. The key is HKEY_LOCAL_MACHINE\SOFTWARE\Policies\Microsoft\Edge, and the value goes inside it.
This method works on Windows 11 Home and Pro, but you need an administrator account. A wrong edit in the registry can cause problems, so make a backup first. In Registry Editor, use File Export to save a copy, or create a restore point.
- Open Registry Editor. Search for it in the Start menu and choose Run as administrator. Approve the User Account Control prompt if it appears.
- In the left pane, expand the keys until you reach the
HKEY_LOCAL_MACHINE\SOFTWARE\Policies\Microsoft\Edgefolder key. This is where Edge reads its policies.
HKEY_LOCAL_MACHINE\SOFTWARE\Policies\Microsoft\Edge
- If the '
Edge' folder key is missing, right-click the 'Microsoft' parent key and choose New Key. Name the new subkey 'Edge.' Then click it so it is selected.

- In the right pane of the 'Edge' folder key, right-click an empty area and select New DWORD (32-bit) Value. Name the new item ShowHistoryThumbnails. If a value with this name already exists, skip creating it and edit the existing one.
- Double-click ShowHistoryThumbnails. The Edit DWORD (32-bit) Value box opens. Set its Value data as follows, then click OK:
- To always save screenshots of site for History in Microsoft Edge, type 1.
- To not save screenshots of site for History, type 0, or delete the ShowHistoryThumbnails value so Edge goes back to its default behavior. Deleting the value is also the way to undo this policy completely.

- Close Registry Editor, then restart your computer for the change to take effect. After you sign back in, open Edge and check the setting under Settings. If a policy is now controlling it, Edge will show that the setting is managed.
If something on your PC looks different from the steps above, or you have a tip that helped, leave a note in the comments. Mention your Windows edition and Edge version so others can compare.
Conclusion:
- In this article, you learned how to enable or disable the "Save screenshots for site History" feature in Microsoft Edge, giving you more control over your browsing experience.
- Using the step-by-step instructions, you can manage whether Microsoft Edge captures and saves thumbnails of the sites you visit. This makes it easier to recognize and reopen pages from your browsing history. Use the Settings toggle for a single user, or the registry policy for the whole PC.
- If you run into any differences or have something to add, use the comments section for further discussion and help.
Was this guide helpful?

About the Author
Richard
Tech Writer, IT Professional
Richard is a writer at Geek Rewind who turns complex IT tasks into clear, step-by-step guides. He draws on years of hands-on experience in system administration and enterprise IT operations, focusing on Windows, Linux and WordPress: the problems people actually run into, and the fixes that work. His server and WordPress guides come from systems he runs himself. Richard builds and maintains the platform behind Geek Rewind, from its Ubuntu servers and Nginx configuration to its custom WordPress plugins. Many new tutorials start with readers' questions, and he's always glad to answer them in the comments.


No comments yet — be the first to share your thoughts!