How to Enable or Disable Visual Search in Microsoft Edge


Visual Search in Microsoft Edge lets you scan photos directly from any webpage to find similar images and related information. You can turn this feature on or off in Microsoft Edge version 92 and newer. It controls the search icon that appears when you hover over images.
There are two ways to change it. The quick way is the browser settings: open Settings in Microsoft Edge, go to Appearance, and find the context menu options. The second way is the Windows Registry, which is useful if the setting is missing or if you manage several PCs. If you prefer a clean browsing experience without pop-up search tools, turn Visual Search off.
Open Microsoft Edge, click Settings and more (three dots), select Settings, click Appearance, scroll to Hover menu under Context menu , and toggle Show hover menu on image hover on or off. The change takes effect immediately.
Why Use Visual Search?
Visual Search helps you find online content related to the images you come across while browsing. With it on, you can find similar products, learn details about a photograph, or explore related topics much faster. You don’t have to save the image and upload it to a separate search page.
The trade-off is the extra icon. It can get in the way if you often hover over pictures to read, copy or drag them. If that annoys you, turning the feature off is a reasonable choice.
Method 1Turn Visual Search On or Off Using Browser Settings
Microsoft Edge Visual Search settings control whether a search button appears when you hover over images online. You can switch it on or off in the browser settings, in the Appearance section, under the hover menu options. Turning it off stops the search icon from popping up every time you look at a picture.
It also needs no changes outside the browser. Follow the steps in order.
- Open Microsoft Edge. Microsoft Edge browser
- Click the
Settings and morebutton. This is the icon with 3 horizontal dots in the top right corner. Alternatively, pressAlt+Fon your keyboard. A menu opens below the button.

- Select
Settingsfrom the menu that appears. Settings opens in a new tab.
- Click
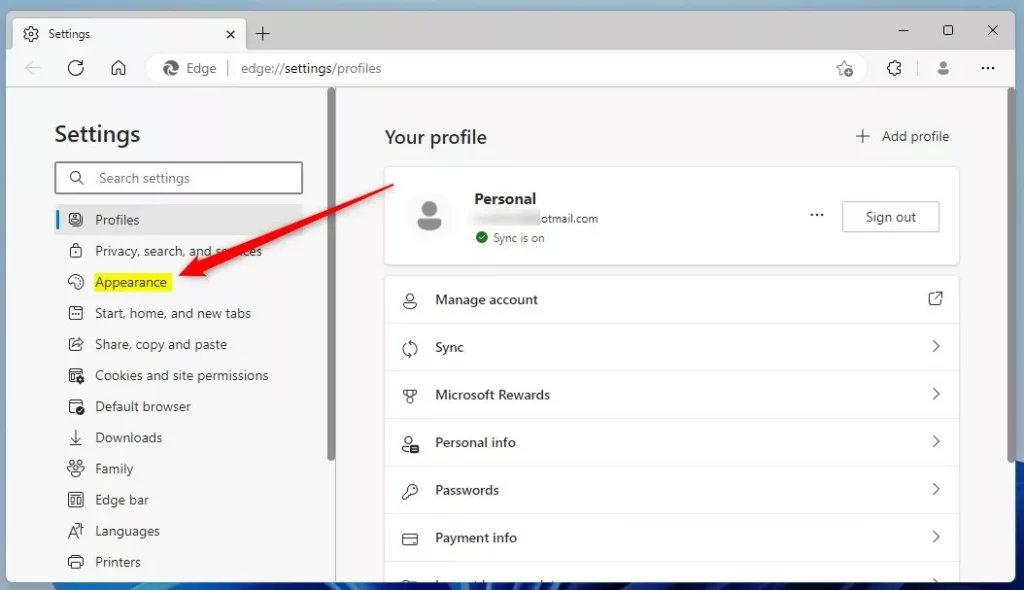
Appearanceon the left side panel. The appearance options now fill the right side of the page.
- Scroll down and locate the
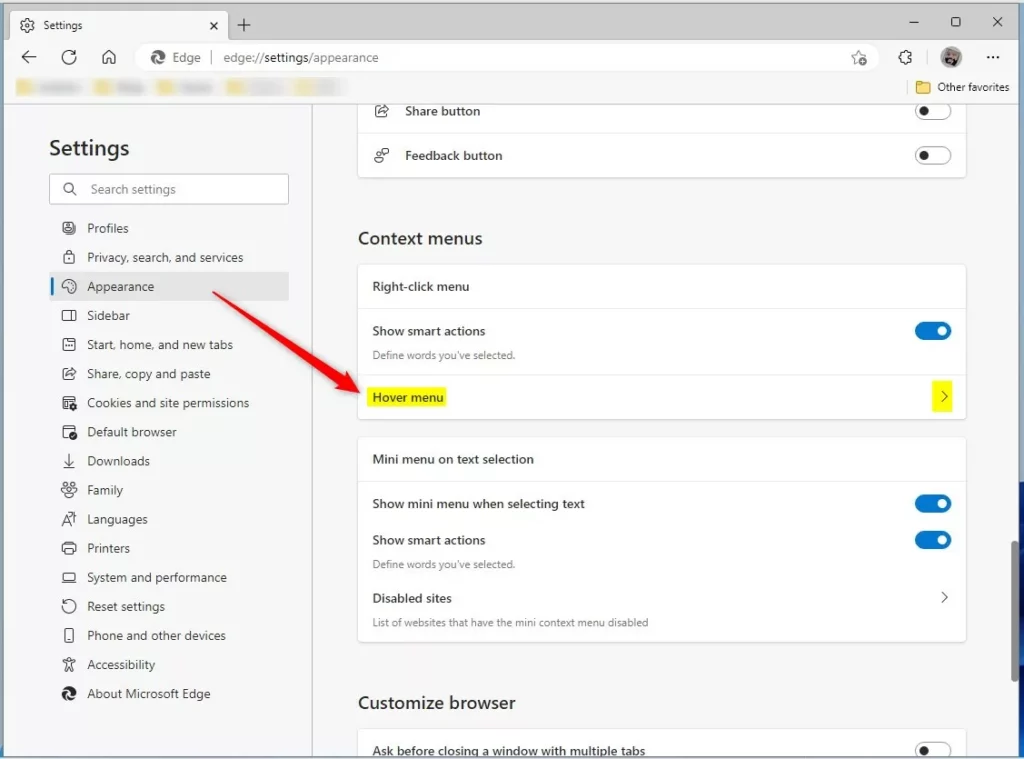
Hover menusection under Context menu. Click on it to expand the options.
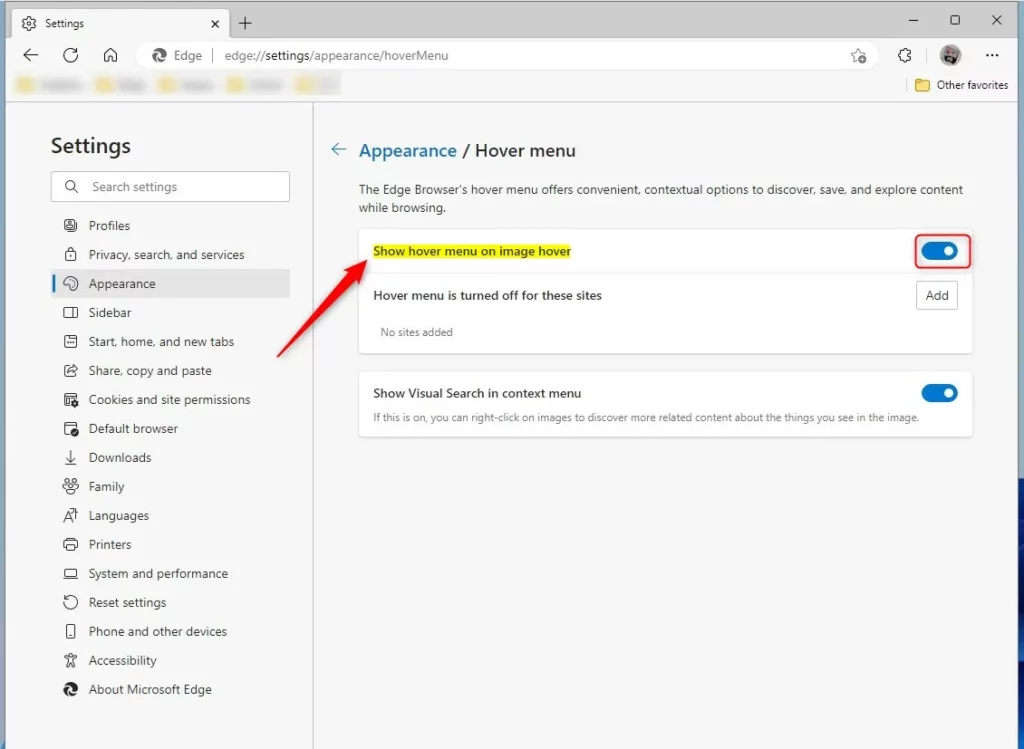
- Find the toggle switch labeled
Show hover menu on image hover. It appears in the expanded options. - Flip the toggle to the blue On position to activate the feature. Moving the toggle back to the left turns it gray and stops the browser from analyzing pictures for searches.
If the toggle is greyed out, or the page says your browser is managed by your organization, a policy is controlling the setting. That includes a registry value set earlier with the second method below. Change or remove that value, then check the setting again. If your PC is managed by a workplace, ask your IT team. If you can't find the option at all, make sure Edge is up to date, because older builds don't have it.
- Check that the change has applied. It takes effect immediately, but closing and reopening Microsoft Edge confirms it is working. Then hover over an image on any webpage to see whether the search icon appears.
To undo the change, return to the same toggle and flip it back.
Method 2Turn Visual Search On or Off Using Windows Registry
You can also turn Microsoft Edge Visual Search on or off by editing the Windows Registry, a central database for system settings. This method needs administrator permissions. You change the VisualSearchEnabled value directly, and the setting applies without you opening the browser interface. It works on Home as well as Pro, since it does not rely on Group Policy tools.
Proceed with this method only when comfortable working with system registries. A wrong change in the wrong place can cause problems. Before you start, back up the registry in the Registry Editor with File Export, so you can restore it if needed.
- Open the Windows Registry. Typing
regeditinto the Windows search bar and pressing Enter launches the tool. Click Yes if User Account Control asks for permission.
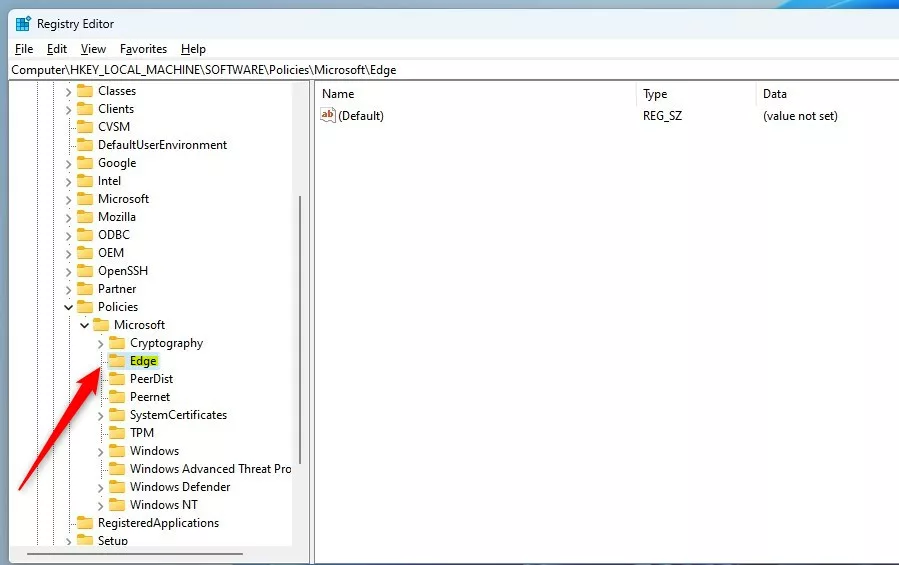
- Navigate to this folder path. You can expand the keys in the left pane one at a time or paste the path into the address bar at the top of the window.
HKEY_LOCAL_MACHINE\SOFTWARE\Policies\Microsoft\Edge- Check whether the final subkey in that path exists. If the designated subkey is missing, right-click the parent key, select New, and then Key to create it. Name the new key
Edge. The new key appears in the left pane.
- Right-click inside the right-hand pane of the
Edgefolder. - Select
Newand thenDWORD (32-bit) Value. A new value appears in the right pane with its name ready to edit.
- Type the name:
VisualSearchEnabled. Press Enter to confirm it.
- Double-click the newly created
VisualSearchEnableditem. An edit window opens.
- Confirm the
Baseis set toDecimal. Then modify theValue datafield to match what you want:
To turn Visual Search ON: Type 1
To turn Visual Search OFF: Type 0
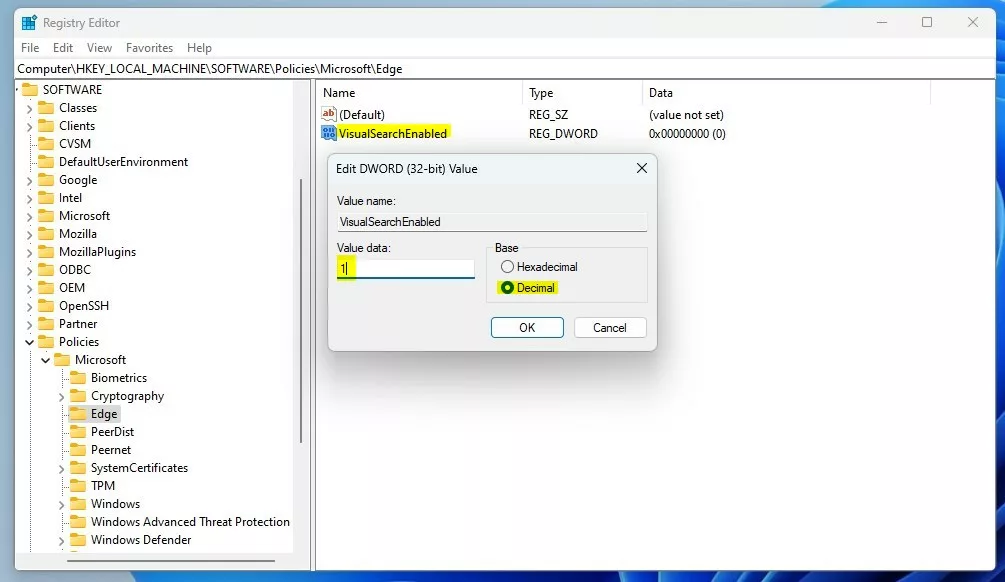
- Click
OKto save the modification. The new value now shows in the right pane.
- Restart the computer for changes to take effect. After you sign back in, open Microsoft Edge and hover over an image to check the result.
To undo the change, open the same value and enter the opposite number. You can also right-click the value and choose Delete to remove it. Edge then goes back to using the setting in its own menus. If you set this value on a PC that Edge treats as managed, the browser setting may stay greyed out until you delete it.
Summary
Microsoft Edge Visual Search helps you explore web images by showing a search button when you hover over them. You can manage it through the browser appearance settings. If you prefer a system-level fix, you can change the VisualSearchEnabled value in the Windows Registry instead.
- Using Browser Settings: Go to Settings, click Appearance, find the context menu options, and toggle the switch. This is the easiest method for most users. It takes effect immediately and needs no administrator rights.
- Using Windows Registry: Edit the registry to change the VisualSearchEnabled value to 1 (on) or 0 (off). This method requires administrator access and is best for advanced users or IT professionals. Restart the PC afterward.
Both methods give the same result. Pick the one you are comfortable with. Browser changes apply at once. Registry changes apply after a system restart. Whichever you choose, you can reverse it later with the same steps.
Have a question about this guide?
Answered by AI from this guide. Good questions may be added to this page — please don't include personal details.
Did this guide fix your problem?

About the Author
Richard
Tech Writer, IT Professional
Richard is a writer at Geek Rewind who turns complex IT tasks into clear, step-by-step guides. He draws on years of hands-on experience in system administration and enterprise IT operations, focusing on Windows, Linux and WordPress: the problems people actually run into, and the fixes that work. His server and WordPress guides come from systems he runs himself. Richard builds and maintains the platform behind Geek Rewind, from its Ubuntu servers and Nginx configuration to its custom WordPress plugins. Many new tutorials start with readers' questions, and he's always glad to answer them in the comments.
No comments yet — be the first to share your thoughts!