How to Enable or Disable Windows Hypervisor Platform in Windows 11

- 22 steps
- Needs administrator rights
- Hyper-V needs Windows 11 Pro, Enterprise or Education
- Includes a restart or sign-out
You can turn on Windows Hypervisor Platform in Windows 11 from the Windows Features dialog. Search Start for Turn Windows features on or off, check Windows Hypervisor Platform, click OK and restart. Newer builds also have a switch in Settings, and you can use Command Prompt or PowerShell instead.
Windows Hypervisor Platform (WHP) is an optional Windows feature. It gives third-party virtualization software access to the same hypervisor that Windows uses itself. Tools such as VMware Workstation, VirtualBox and some Android emulators can then run virtual machines (isolated environments that act like separate computers) alongside your normal applications.
With the feature on, Windows and the virtual machine software share CPU and memory resources through one hypervisor instead of competing for them. That generally keeps virtual machines running smoothly while your main apps stay responsive.
Before you start, make sure virtualization is turned on in your PC’s BIOS or UEFI firmware. The setting is usually called Intel VT-x, AMD-V or SVM Mode. If it is off, the feature may install but virtual machines will not start. To check without rebooting, open Task Manager and look at the Performance tab. Under CPU, the Virtualization line should read Enabled. Windows Hypervisor Platform is available in both Windows 11 Home and Pro.
Open Settings System Advanced Virtual Workspaces and toggle Windows Hypervisor Platform On, then restart your PC. Alternatively, search for “Turn Windows features on or off,” check Windows Hypervisor Platform, click OK, and restart. The feature lets virtualization software like VMware and VirtualBox run virtual machines efficiently alongside your normal applications.
Turn On Windows Hypervisor Platform Using the Settings App
Recent builds of Windows 11 include a toggle for this feature in Settings. If you can’t find it there, use the Windows Features method further down, which works on every build. These steps turn on Windows Hypervisor Platform from Settings:
- Press Win+I to open Settings. You can also click the Start button and select Settings.
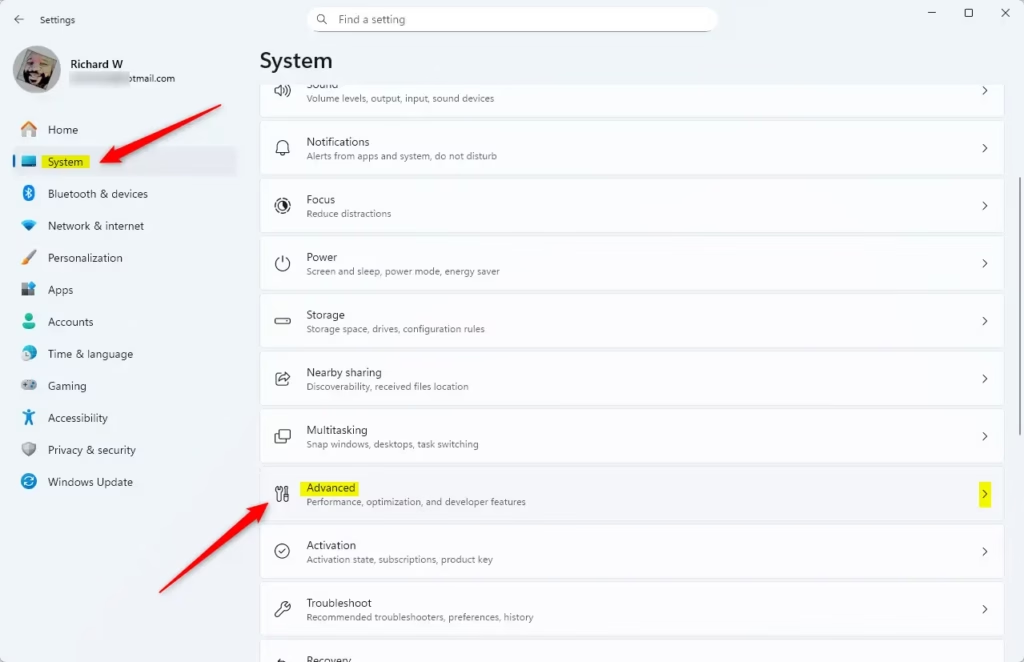
- Click System on the left side. The system options appear on the right.
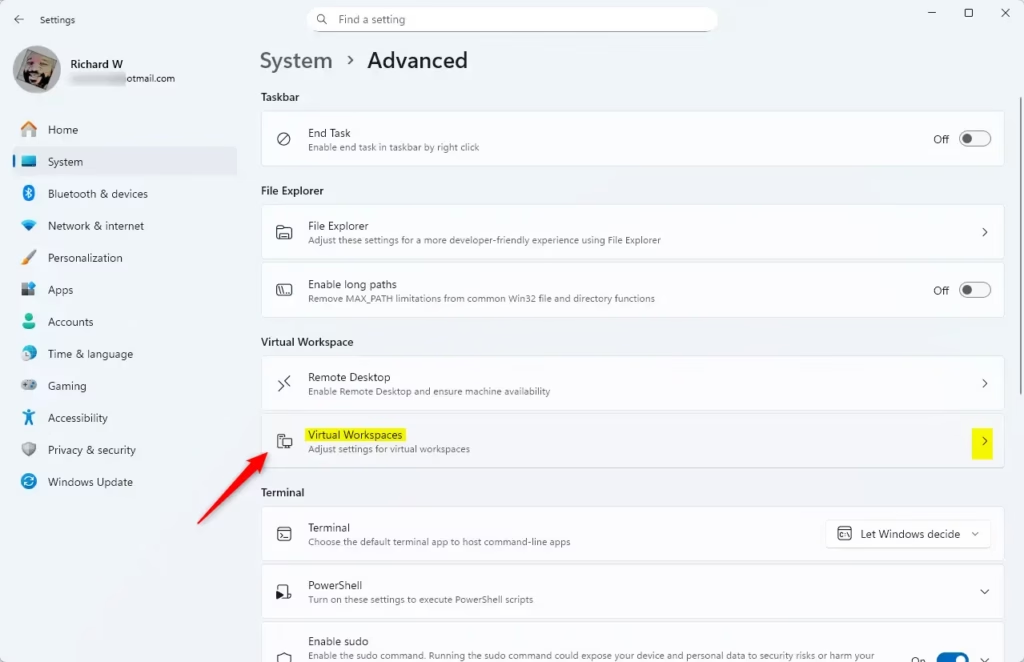
- Click Advanced on the right side. If you don’t see it, your build of Windows 11 is probably too old, so skip to the Windows Features method.
- Click Virtual Workspaces to open it. A page with virtualization-related switches appears.
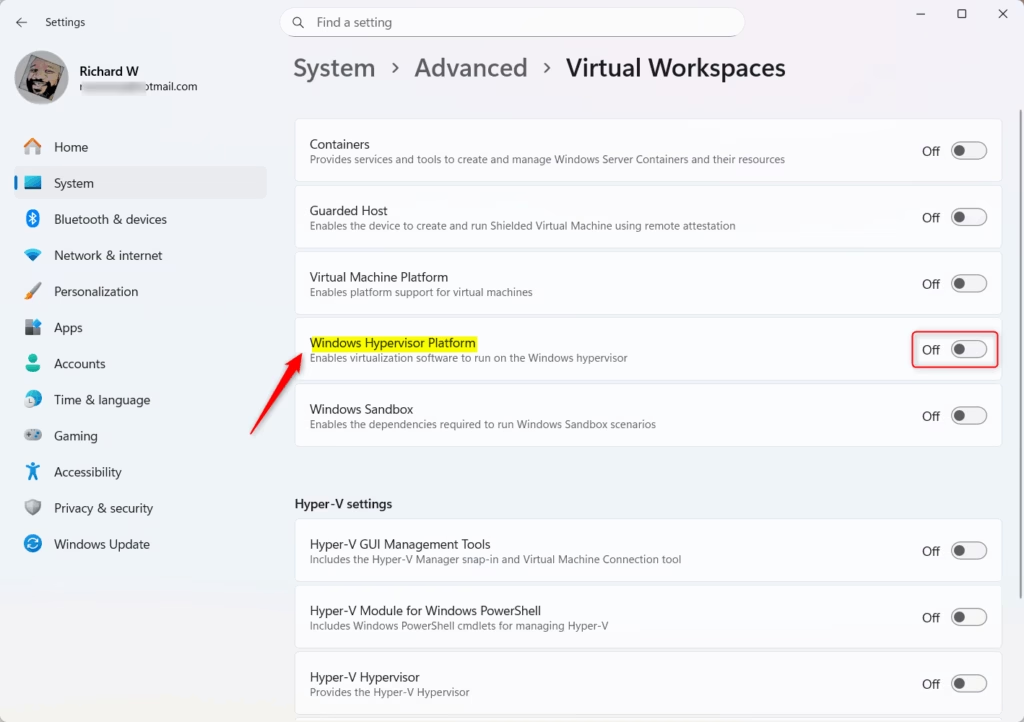
- Turn the Windows Hypervisor Platform switch On. Windows may ask you to confirm, and it may ask for a restart.
- Close Settings. Restart the PC if Windows asked you to, because the feature is not active until you do.
To undo the change, return to the same page and turn the switch Off. Restart again afterwards.
Turn On Windows Hypervisor Platform Using Control Panel
The classic Windows Features dialog is the most dependable way to do this through the interface. It works on all current builds of Windows 11, Home and Pro. These steps turn on Windows Hypervisor Platform from that dialog:
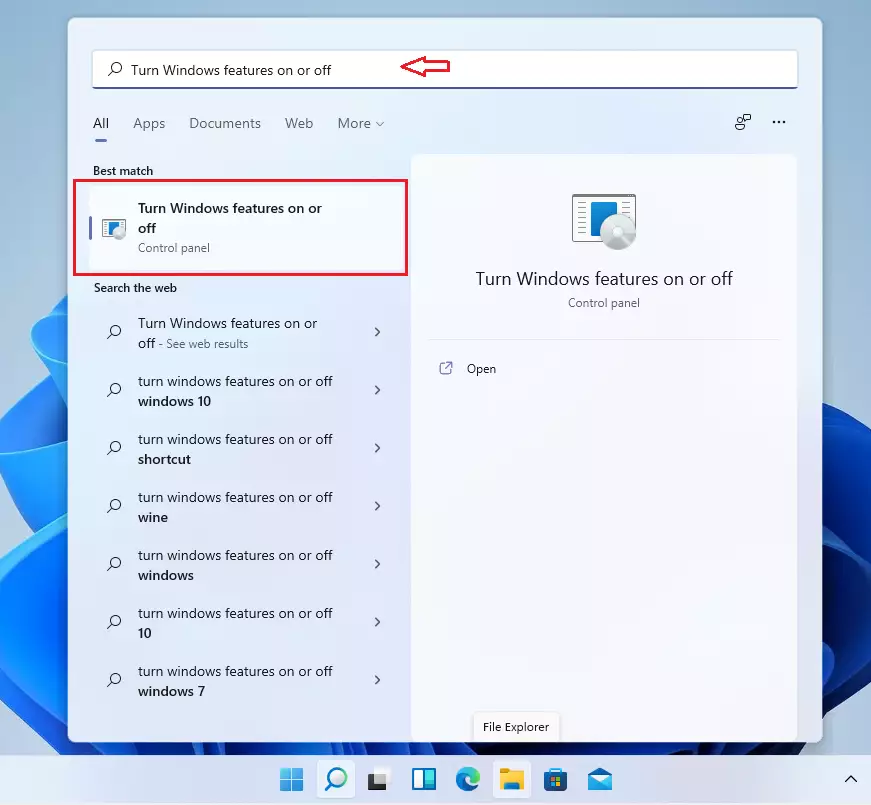
- Click Start and type Turn Windows features on or off. Click the matching result, and the Windows Features window opens with a list of optional components.
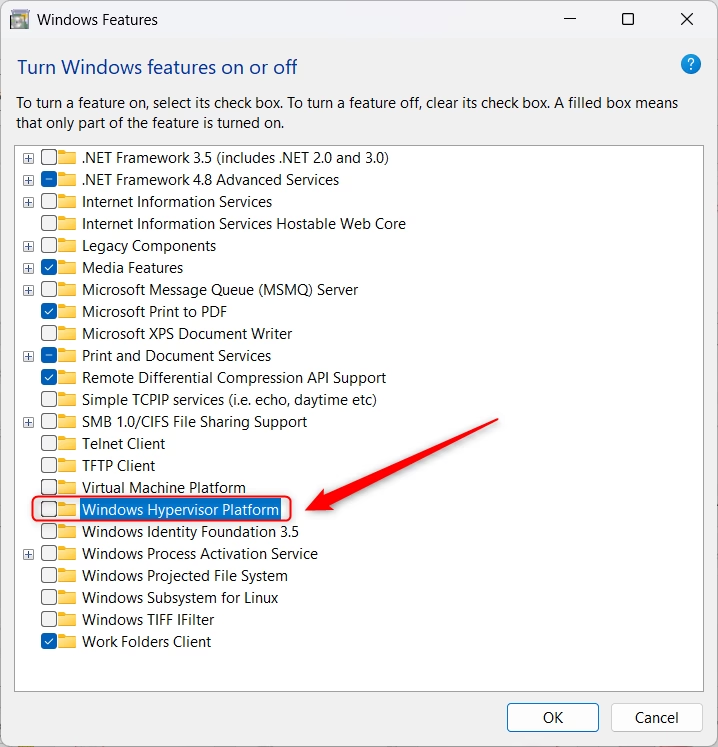
- Scroll down to Windows Hypervisor Platform. The list is long, so keep scrolling past the entries that start with H.
- Check the box next to Windows Hypervisor Platform. To turn it off later, clear the box instead.
- Click OK. Windows applies the change and shows a progress window.
- Click Restart now when prompted. The change does not take effect until you restart.
If the entry is missing, scroll further and look again. If it is still not there, check that Windows 11 is fully updated and that you are signed in with an administrator account. If the checkbox cannot be changed, a work or school policy may be managing the PC, so ask whoever runs it.
Turn On Windows Hypervisor Platform Using Command Prompt
If you prefer text commands, or you need to configure several machines, Command Prompt works well. You need administrator rights, because the command changes Windows components. These steps turn on Windows Hypervisor Platform from Command Prompt:
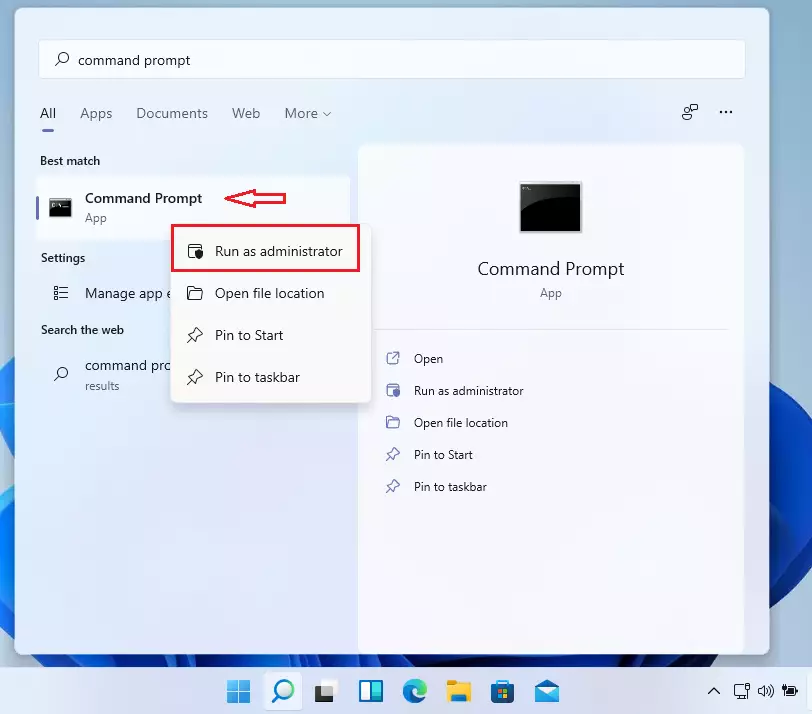
- Click Start and type Command Prompt. Right-click the result and choose Run as administrator.
- Click Yes if the User Account Control prompt appears. A Command Prompt window opens with “Administrator” in its title bar.
- Paste the command below and press Enter. Wait for it to finish. Windows reports that the operation completed successfully.
DISM /Online /Enable-Feature /FeatureName:"HypervisorPlatform"- Restart the PC. Windows may ask you to restart at the end of the command. Either way, the new state only applies after a reboot.
To turn the feature off, open an administrator Command Prompt the same way and run the disable syntax shown here:
DISM /Online /Disable-Feature /FeatureName:"HypervisorPlatform"Restart the PC again after the disable command so the change takes effect.
Turn On Windows Hypervisor Platform Using PowerShell
PowerShell is the better choice if you plan to script this or run it on several PCs. As with Command Prompt, it must be opened as an administrator. These steps turn on Windows Hypervisor Platform from PowerShell:
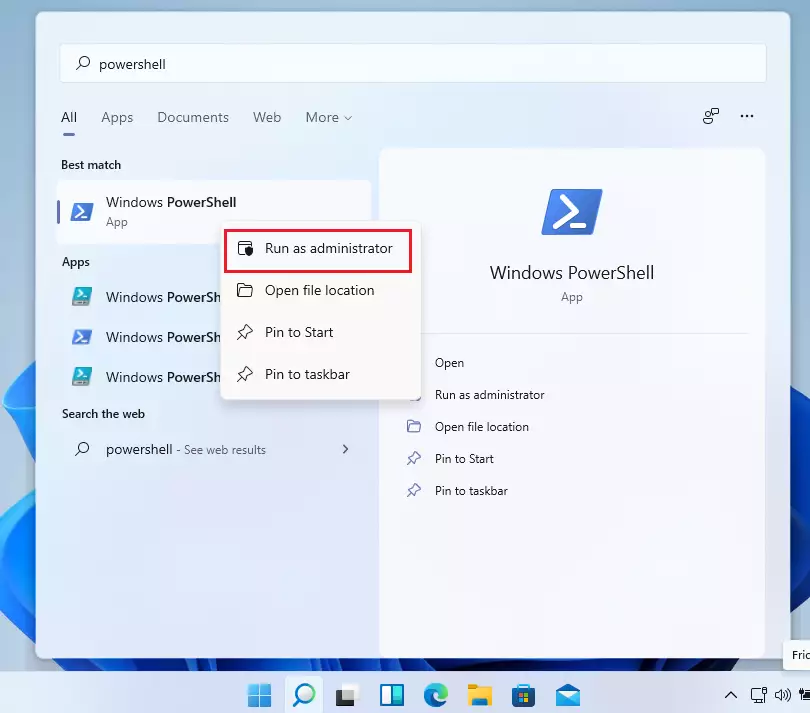
- Click Start and type PowerShell. Right-click the result and choose Run as administrator.
- Click Yes if the User Account Control prompt appears. An administrator PowerShell window opens.
- Paste the command below and press Enter. PowerShell may ask whether you want to restart now.
Enable-WindowsOptionalFeature -Online -FeatureName "HypervisorPlatform"- Restart the PC. If PowerShell offered a restart, type the answer it shows. Otherwise restart manually later, since the feature is not active until then.
To turn the feature off, use the matching disable command in an administrator PowerShell window:
Disable-WindowsOptionalFeature -Online -FeatureName "HypervisorPlatform"Restart the PC afterwards so the change takes effect.
How to Create Virtual Machines Using Hyper-V Manager
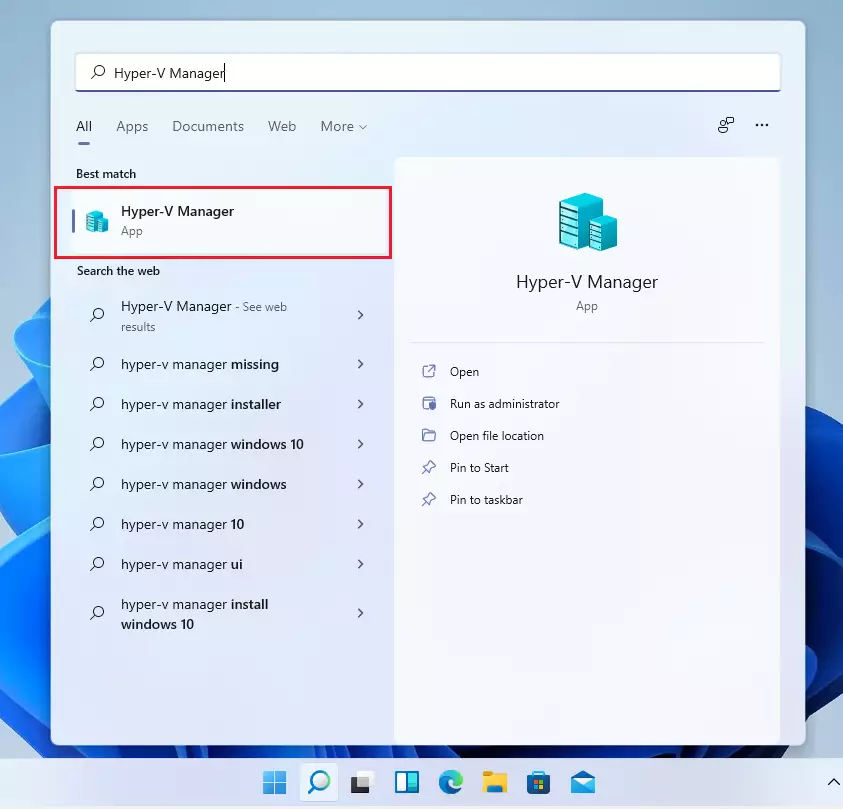
Hyper-V Manager is Microsoft's own tool for creating and managing virtual machines. It is separate from Windows Hypervisor Platform, so you may not need it. Third-party tools like VirtualBox have their own consoles. Hyper-V Manager is only available on Windows 11 Pro, Enterprise and Education, and only after you turn on the Hyper-V feature in Turn Windows features on or off. Windows 11 Home does not include it. If you do use it, these steps create a virtual machine:
- Click Start and search for Hyper-V Manager. If nothing appears, the Hyper-V feature is not turned on, or you are running Home.
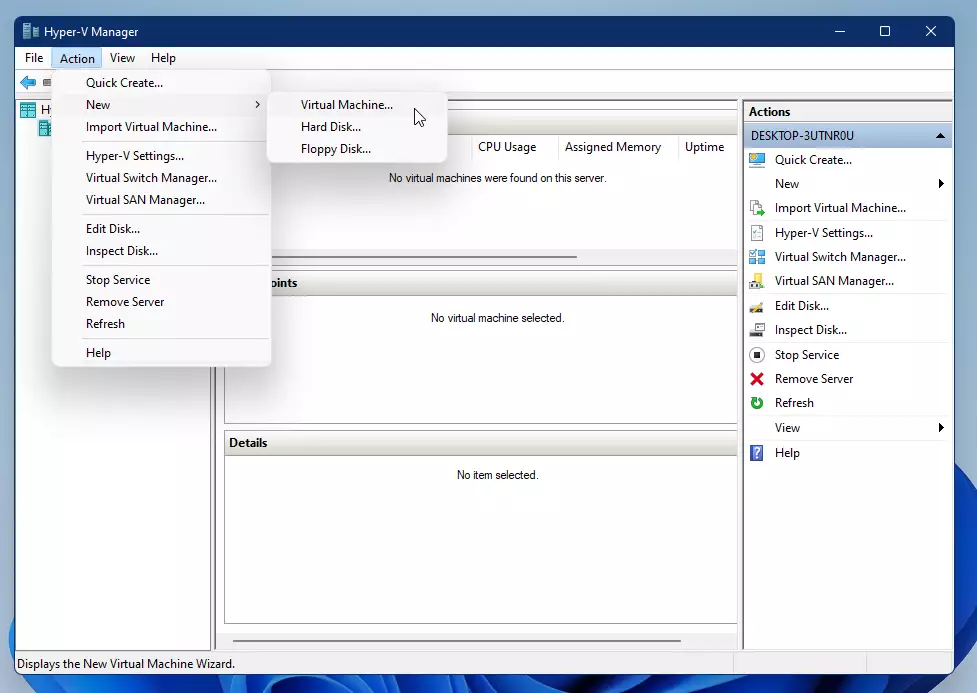
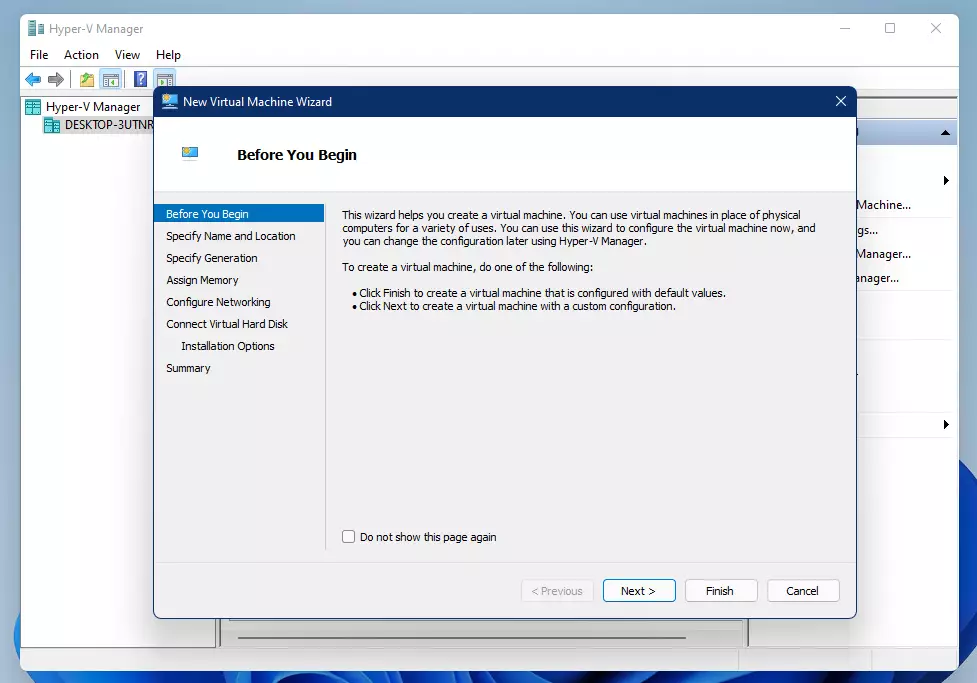
- Open Hyper-V Manager. In the menu, choose Action New Virtual Machine The New Virtual Machine Wizard opens.
- Follow the wizard to set up your virtual machine. You will choose a name, a generation, memory, networking, a virtual disk and an installation source such as an ISO file.
Once the platform is on, you can run other operating systems side by side with Windows 11. Each virtual machine is an isolated environment, so you can test software without risking your main installation. Linux distributions, for example, can run in a virtual machine on the same hardware, with no dedicated physical machine needed.
Summary
The Windows Hypervisor Platform forms the foundation for running virtual machines on Windows 11. Multiple configuration utilities, including the Settings app, Control Panel, Command Prompt, and PowerShell, handle platform adjustments.- Windows Hypervisor Platform helps you run virtual machines on Windows 11.
- You can turn it on or off through Settings, Control Panel, Command Prompt, or PowerShell.
- After enabling it, you can create and manage virtual machines using Hyper-V Manager.
- This is useful if you want to try out other operating systems or test software safely.
- For more tips on Windows 11, check out Geek Rewind.
Frequently asked questions
How to enable hypervisor in 🪟 Windows 11?
To enable the hypervisor in Windows 11, turn on Windows Hypervisor Platform. Search the Start menu for Windows Features, tick Windows Hypervisor Platform, and click OK. Restart when prompted. Virtualization must also be enabled in your PC's BIOS or UEFI, under a name like Intel VT-x or AMD-V.
How to enable Windows hypervisor platform?
Enable Windows Hypervisor Platform by opening Windows Features from the Start menu, ticking the Windows Hypervisor Platform box, and clicking OK. Windows installs the files and asks you to restart. The feature only works if virtualization is turned on in your BIOS or UEFI firmware.
How to turn on Windows hypervisor platform?
Open Start, type Windows Features, and select Turn Windows features on or off. Tick Windows Hypervisor Platform, click OK, and restart your PC when Windows asks. If the box is missing, your Windows build may not support it, or virtualization may be disabled in your firmware.
What Windows hypervisor platform is needed for?
Windows Hypervisor Platform lets third-party virtualization software run virtual machines on Windows. A virtual machine is an isolated environment that works like a separate computer. Tools such as VMware Workstation, VirtualBox and some Android emulators need this feature to start one. Turn it off if you don't use those tools.
What is Windows hypervisor platform?
Windows Hypervisor Platform is an optional Windows feature that gives other virtualization software access to the hypervisor Windows uses itself. A hypervisor is the layer that shares your CPU and memory between virtual machines. Turning the feature on lets tools like VirtualBox run alongside your regular apps.
How to turn on hypervisor?
To turn on the hypervisor, enable Windows Hypervisor Platform in Windows Features, then restart your PC. Hyper-V can also start the hypervisor, but it is a separate feature. Make sure virtualization is enabled in your BIOS or UEFI first, or the hypervisor will not run.
Still have a question?
Answered by AI from this guide. Good questions may be added to this page — please don't include personal details.
Did this guide fix your problem?

About the Author
Richard
Tech Writer, IT Professional
Richard is a writer at Geek Rewind who turns complex IT tasks into clear, step-by-step guides. He draws on years of hands-on experience in system administration and enterprise IT operations, focusing on Windows, Linux and WordPress: the problems people actually run into, and the fixes that work. His server and WordPress guides come from systems he runs himself. Richard builds and maintains the platform behind Geek Rewind, from its Ubuntu servers and Nginx configuration to its custom WordPress plugins. Many new tutorials start with readers' questions, and he's always glad to answer them in the comments.
No comments yet — be the first to share your thoughts!