How to Enable or Disable the “Clear TPM” Button in Windows 11 Security App

You can disable the “Clear TPM” button in Windows 11 by navigating to Computer Configuration Administrative Templates Windows Components Windows Security Device security in the Local Group Policy Editor and enabling the “Disable the Clear TPM button” setting. Alternatively, use the Registry Editor to create or modify the DisableClearTpmButton DWORD value.
What is TPM?
Trusted Platform Module (TPM) hardware is a dedicated security processor built into modern motherboards. It stores sensitive data, such as disk encryption keys and credentials, away from the main operating system. On some PCs the TPM is firmware-based rather than a separate chip, but Windows treats both the same way.
What Does the “Clear TPM” Button Do?
The "Clear TPM" button in Windows 11 resets your Trusted Platform Module (TPM) security chip. This restores the TPM to its original factory state, which can help resolve certain security issues. You will find the button in the Windows Security app, under Device security and then Security processor details.
Clearing the TPM deletes the keys it holds. Anything tied to those keys stops working until you set it up again. That is why you may want to control who can press the button.
Why Would You Turn Off the “Clear TPM” Button?
Shared PCs benefit from turning off this button. Hiding the option stops anyone else from accidentally wiping the security chip.
It also helps on work or family computers where BitLocker, Windows Hello PINs, or fingerprint sign-in are in use. One careless click could leave a user locked out of an encrypted drive. Hiding the button removes that risk.
How to Turn On or Off the “Clear TPM” Button Using Local Group Policy Editor
This method uses the Local Group Policy Editor. It is available in Windows 11 Pro, Enterprise, and Education. It is not included in Windows 11 Home. If you run Home, skip to the Registry Editor method below. You also need to be signed in with an administrator account.
- Press
Win + Rto open the Run box. - Type
gpedit.mscand press Enter. The Local Group Policy Editor opens. If you see a message that Windows cannot find the file, your edition does not include it, so use the Registry Editor method instead. - Follow this path in the left panel:
Computer Configuration > Administrative Templates > Windows Components > Windows Security > Device security - Click on
Device securityin the left panel. The policies for that folder now appear on the right. - Double-click
Disable the Clear TPM buttonon the right side. A settings window opens. - Choose one of these options:
- Not Configured or Disabled: The Clear TPM button will be available.
- Enabled: The Clear TPM button will be turned off (hidden).
- Click
OKto save. The window closes and the policy shows its new state in the list. - FLAG: Requires admin privileges — Restart your PC to apply the changes.
To undo the change, repeat the steps and set the policy back to Not Configured.
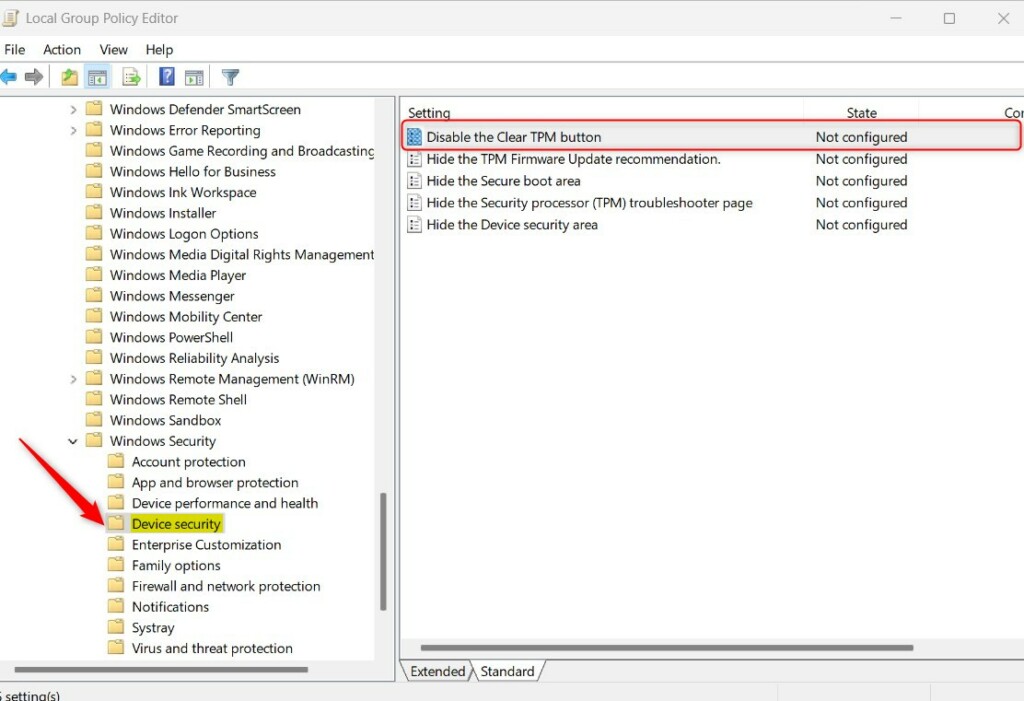
The Local Group Policy Editor lets you turn the Clear TPM button on or off in Windows 11. This tool controls how your PC's security chip settings are accessed, helping restrict who can clear the TPM.
Group Policy settings apply to every user on the PC, not just your account. Because of that, an administrator account is needed to change them. A standard user cannot switch the policy back.
How to Turn On or Off the "Clear TPM" Button Using Windows Registry Editor
Use Registry Editor if Group Policy Editor is unavailable on your edition of Windows. This is the usual route on Windows 11 Home. Sign in with an administrator account first.
Be careful here, because a wrong edit in the registry can cause problems. Consider exporting the key first (File Export) or creating a restore point, so you can go back if needed.
- Press
Win + Rto open the Run box. - Type
regeditand press Enter. Click Yes if User Account Control asks for permission. Registry Editor opens. - Navigate to this folder:
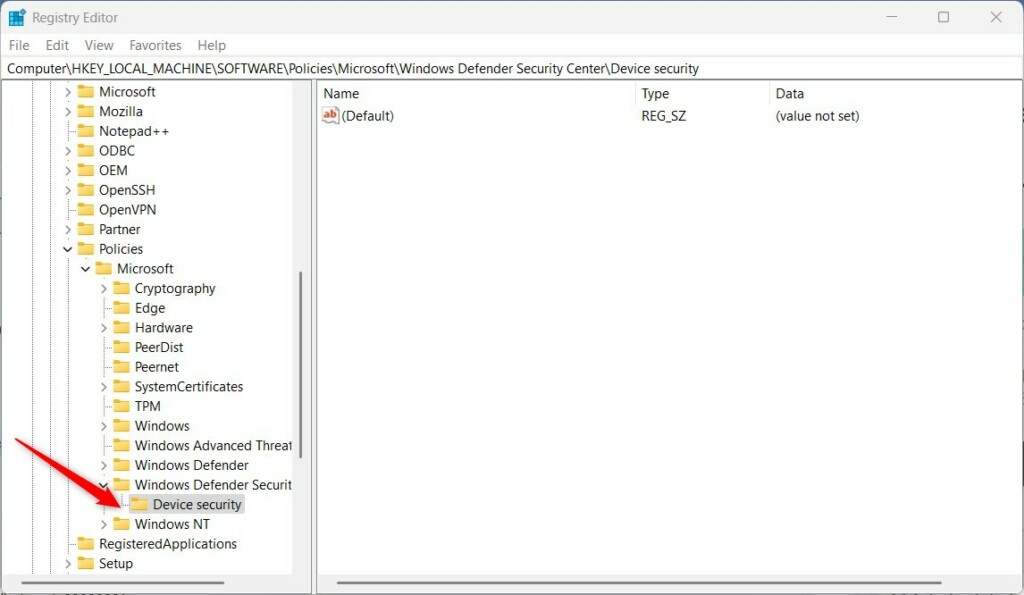
HKEY_LOCAL_MACHINE\SOFTWARE\Policies\Microsoft\Windows Defender Security Center\Device security - If the
Device securityfolder doesn't exist, you need to create it:- Right-click on
Windows Defender Security Centerin the left panel. - Select
New > Key. - Name it
Device security.
- Right-click on
- Right-click inside the
Device securityfolder in the right panel. - Select
New > DWORD (32-bit) Value. - Name the new value:
DisableClearTpmButton - Double-click
DisableClearTpmButtonto open it. The edit window appears. - Set the Base to
Decimal. - Set the Value data to:
1to turn off (disable) the Clear TPM button.0or delete the value to turn on (enable) the button.
- Click
OKand close Registry Editor. The new value now shows in the right panel with the data you entered. - FLAG: Requires admin privileges — Restart your PC to apply the changes.
After the restart, open the Windows Security app and go to Device security Security processor details Security processor troubleshooting If you turned the button off, the Clear TPM option should no longer be offered. If you turned it back on, it should appear again. To reverse either method, set the value back as described in the steps above.
Summary
Resetting the security chip through the Windows 11 Security app impacts existing PINs, fingerprint logins, and BitLocker drive encryption.
Device security features rely on this setting for proper operation. Enabling or disabling the button affects the TPM's functionality, including BitLocker encryption. Before anyone clears a TPM, make sure the BitLocker recovery key is saved somewhere other than the PC. Managing this configuration requires the Local Group Policy Editor or Registry Editor, both built-in Windows tools.
Rebooting your PC applies these modifications immediately. For more details, see the Clear TPM guide.
Have a question about this guide?
Answered by AI from this guide. Good questions may be added to this page — please don't include personal details.
Did this guide fix your problem?

About the Author
Richard
Tech Writer, IT Professional
Richard is a writer at Geek Rewind who turns complex IT tasks into clear, step-by-step guides. He draws on years of hands-on experience in system administration and enterprise IT operations, focusing on Windows, Linux and WordPress: the problems people actually run into, and the fixes that work. His server and WordPress guides come from systems he runs himself. Richard builds and maintains the platform behind Geek Rewind, from its Ubuntu servers and Nginx configuration to its custom WordPress plugins. Many new tutorials start with readers' questions, and he's always glad to answer them in the comments.
No comments yet — be the first to share your thoughts!