How to Turn On or off “Share Any Window” from the Taskbar in Windows 11

“Share Any Window” is a Windows 11 taskbar feature that lets you share a single app during a video call without showing your whole desktop. It is available in Windows 11 version 22H2 and later, depending on your build and update level. When it is on, hovering over an open app’s taskbar icon shows a share button for that window.
The setting controls whether that button appears when you use a meeting app such as Microsoft Teams or Zoom. Only the window you pick is shared, and everything else on your screen stays hidden. That keeps notifications, email and unrelated files away from your audience.
If you do not see the setting described below, your PC is probably on an older build or is missing recent updates. Check Settings Windows Update and install anything pending.
Open Settings , go to Personalization, then Taskbar, expand Taskbar behaviors, and toggle “Share any window from my taskbar” on or off. You can also select which apps can use this feature.
New in 🪟 Windows 11 Builds 26100.7309 and 26200.7309
Hovering over taskbar icons can also show a “Share with Copilot” button. It lets Copilot Vision, an AI tool that reads on-screen content, look at the app and offer suggestions. Copilot only sees what you choose to share with it. The same Share any window from my taskbar setting covers these taskbar share options, so turning it off removes the buttons.
How to Turn On or Off “Share Any Window” from the Taskbar
Option 1Using Windows Settings (Easy Way)
Settings is the easiest way to change this. It works on both Windows 11 Home and Pro, and you do not need administrator rights beyond a normal signed-in account.
- Press Win+I on your keyboard to open Settings .
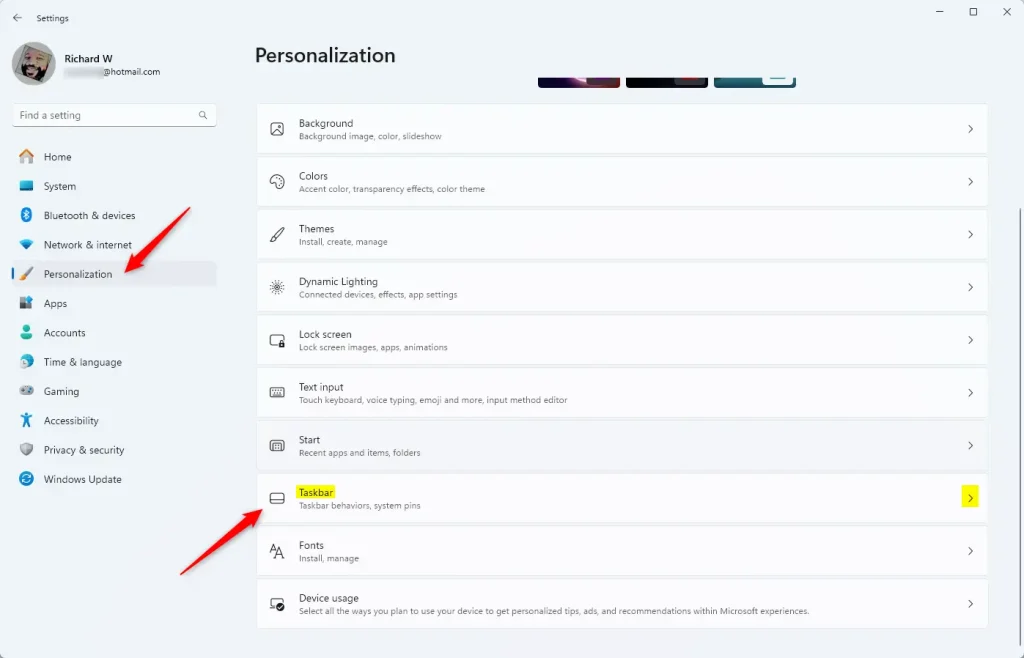
- Click Personalization in the left menu.
- Click Taskbar on the right side. The taskbar options appear.
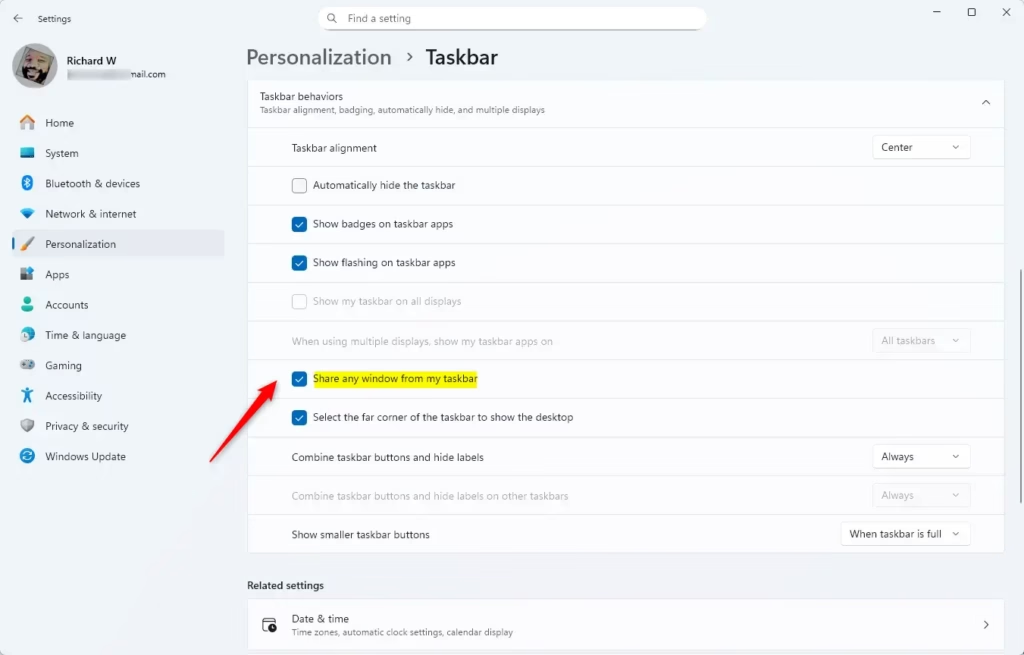
- Scroll down and click Taskbar behaviors to expand the list of options.
- Find Share any window from my taskbar. Check the box to turn it on, or uncheck it to turn it off.
- Open the dropdown under it to choose which apps can use the feature:
- All apps (default)
- Communication apps (like Teams)
- Chat agent apps
- None (turn off sharing)
- Close Settings when you are done.
The change applies immediately, so you do not need to restart. To check it, start a call or sharing session, then hover over an open app icon on the taskbar . The share button should appear or be absent, depending on what you chose.
If Share any window from my taskbar is missing, update Windows first. If it is greyed out, the setting may be managed by your organization or by another tool. To undo any change, go back to the same page and set the checkbox and dropdown the way they were. The defaults are checked, with All apps selected.
Option 2Using Registry Editor (Advanced Users)
Registry Editor is a database of low-level system settings. Use it when the Settings app is unavailable or when you need to apply the change in a repeatable way. Manual edits need exact entries, and a wrong one can cause problems. Back up the registry, or create a restore point, before applying anything below.
Pick the block that matches the behavior you want, apply it, and then check the taskbar. If the change does not show up right away, sign out and back in, or restart your PC. To undo it, apply the block for the previous behavior. All apps is the default.
To turn "Share any window" ON for All apps (default):
reg add "HKEY_CURRENT_USER\Software\Microsoft\Windows\CurrentVersion\Explorer\Advanced" /v TaskbarSn /t REG_DWORD /d 1 /fTo turn "Share any window" ON for Communication apps only:
reg add "HKEY_CURRENT_USER\Software\Microsoft\Windows\CurrentVersion\Explorer\Advanced" /v TaskbarSn /t REG_DWORD /d 2 /fTo turn "Share any window" ON for Chat agent apps only:
reg add "HKEY_CURRENT_USER\Software\Microsoft\Windows\CurrentVersion\Explorer\Advanced" /v TaskbarSn /t REG_DWORD /d 3 /fTo turn "Share any window" OFF:
reg add "HKEY_CURRENT_USER\Software\Microsoft\Windows\CurrentVersion\Explorer\Advanced" /v TaskbarSn /t REG_DWORD /d 0 /fWhy Use This Feature?
- Save time: Share windows without switching apps during meetings.
- Easy to use: Manage sharing right from the taskbar.
- Works with popular apps: Like Microsoft Teams and others.
- Customizable: Choose which apps can use this sharing feature.
- Smooth presentations: Share and stop sharing without disrupting your viewers.
These features save time in virtual meetings because you can share an open program straight from the taskbar. You do not have to hunt through app windows or switch screens while you are talking. Viewers see only the window you picked, not the rest of your desktop, so your presentation stays clean and private.
More Help
Want to learn more about taskbar features? Check out this official Microsoft page:
Example of Sharing a Window from Taskbar
Summary
The "Share Any Window" feature in Windows 11 makes screen sharing during meetings simpler by letting you share open apps directly from the taskbar. You can turn it on or off in Settings in a few clicks, or use the registry if Settings is not an option.
Have a question about this guide?
Answered by AI from this guide. Good questions may be added to this page — please don't include personal details.
Did this guide fix your problem?

About the Author
Richard
Tech Writer, IT Professional
Richard is a writer at Geek Rewind who turns complex IT tasks into clear, step-by-step guides. He draws on years of hands-on experience in system administration and enterprise IT operations, focusing on Windows, Linux and WordPress: the problems people actually run into, and the fixes that work. His server and WordPress guides come from systems he runs himself. Richard builds and maintains the platform behind Geek Rewind, from its Ubuntu servers and Nginx configuration to its custom WordPress plugins. Many new tutorials start with readers' questions, and he's always glad to answer them in the comments.
No comments yet — be the first to share your thoughts!