How to Enable Wireless Projection on Windows 11


How to Change Projection Settings
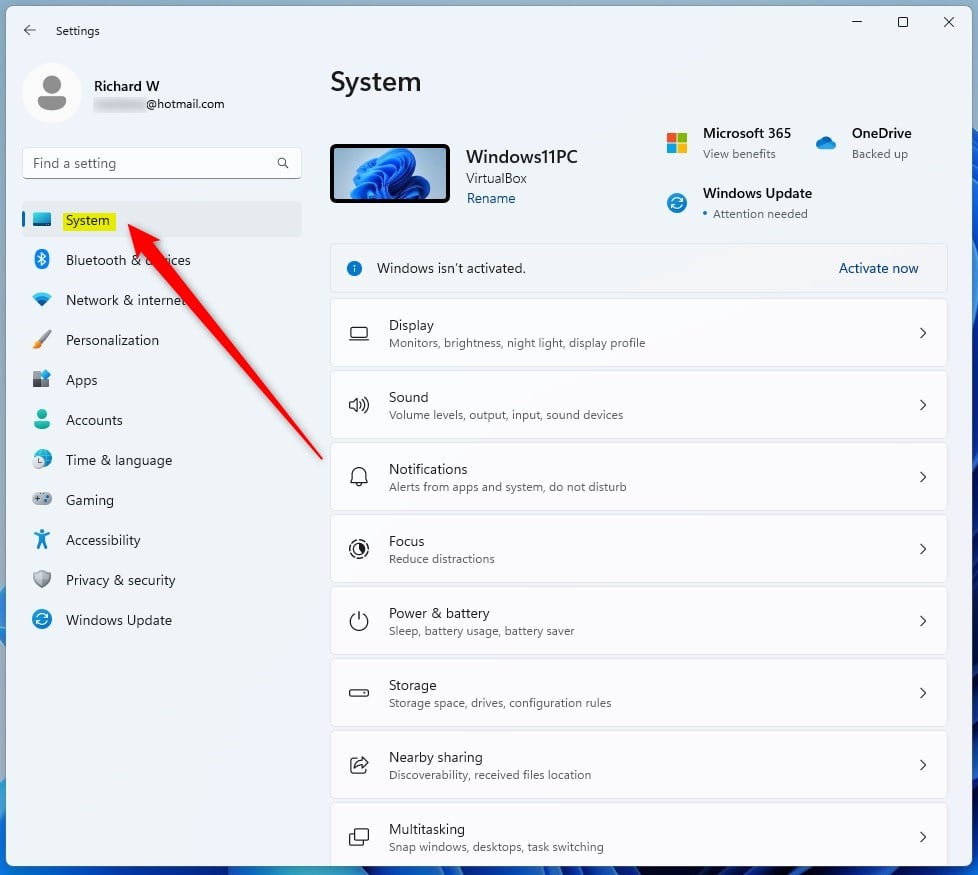
When setting up wireless projection Windows 11, you can change how your PC receives incoming connections from other devices. You can find these options under System, then ‘Projecting to this PC’ in your settings. This lets you decide which devices can connect to your computer and share their screens. Once installed, configuration determines how your PC handles incoming connections.-
- Open Settings and go to System.
-
- Click on Projecting to this PC.
-
- Select Optional features to manage the app if needed.
-
- Set your preferences for Ask to project to this PC. You can choose ‘Everywhere’, ‘Everywhere on secure networks’, or ‘Off’.
Using the Keyboard Shortcut
To start projecting from your sender device, press Win+K. This opens the Cast menu. Select your PC from the list to begin mirroring your screen immediately.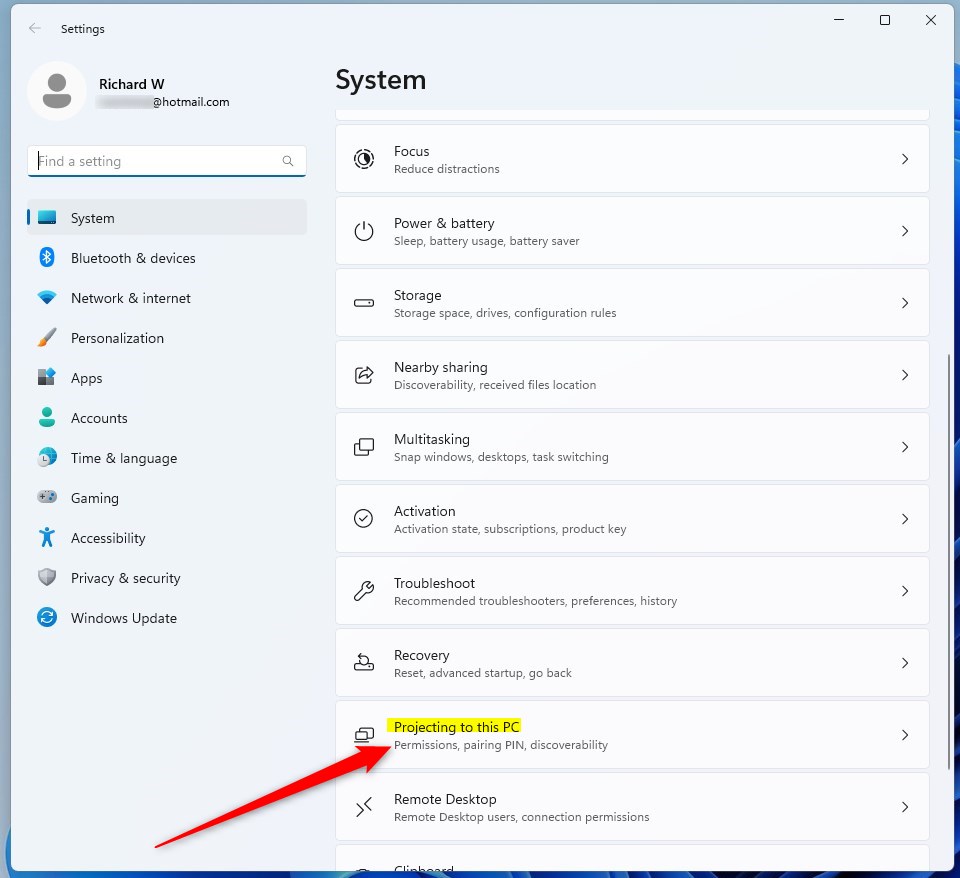
Troubleshooting Connectivity
If you cannot find your PC, ensure both devices are on the same Wi-Fi network. While Wi-Fi Direct does not always need a router, connecting both devices to the same Wi-Fi network typically makes them discoverable. Check your firewall settings if connections fail.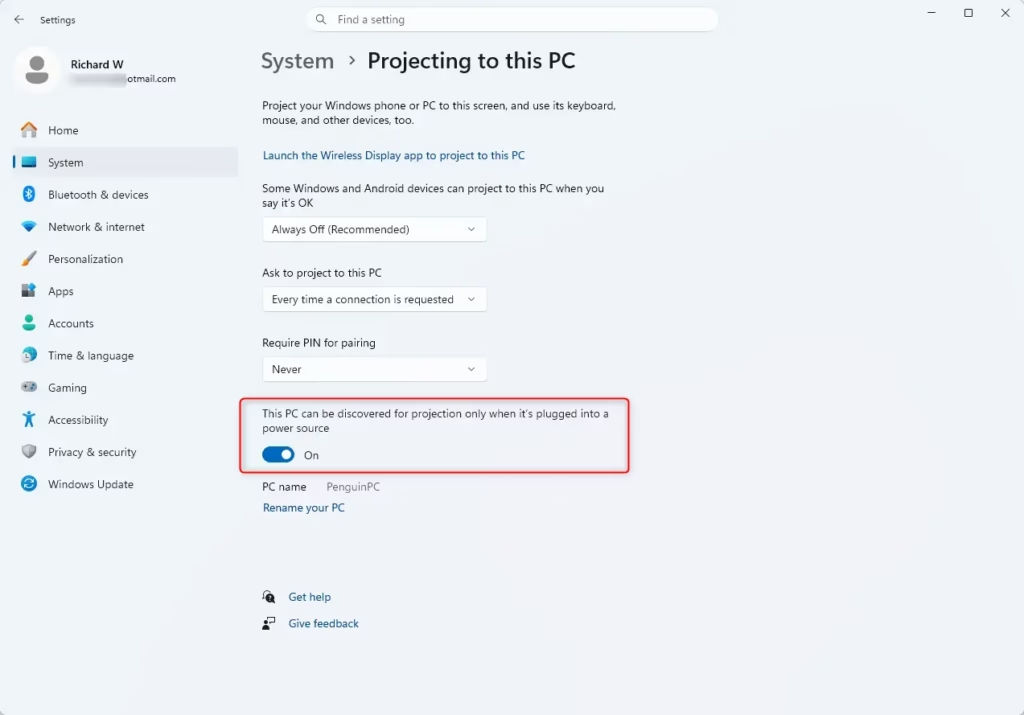
Summary
Wireless projection Windows 11 turns your computer into a versatile display receiver for casting screens without cables. Installing the Wireless Display feature, tweaking your connection preferences, and pressing Win+K gets everything up and running. Remember to check your power settings so your PC remains discoverable when you need it most. Wireless projection turns your PC into a versatile display receiver. Installing the Wireless Display feature, tweaking your connection preferences, and pressing Win+K gets everything up and running. Remember to check your power settings to ensure your PC remains discoverable when you need it most.Installing the Wireless Display Feature
To set up wireless projection Windows 11, you must first install the optional Wireless Display feature through your system settings. Windows 11 requires this specific add-on before your computer can act as a wireless receiver for other devices. Note that an administrator account is required to complete this installation. Before you can project, you must ensure the Wireless Display feature is installed. This is an optional feature in Windows 11. Note: This step requires admin privileges.-
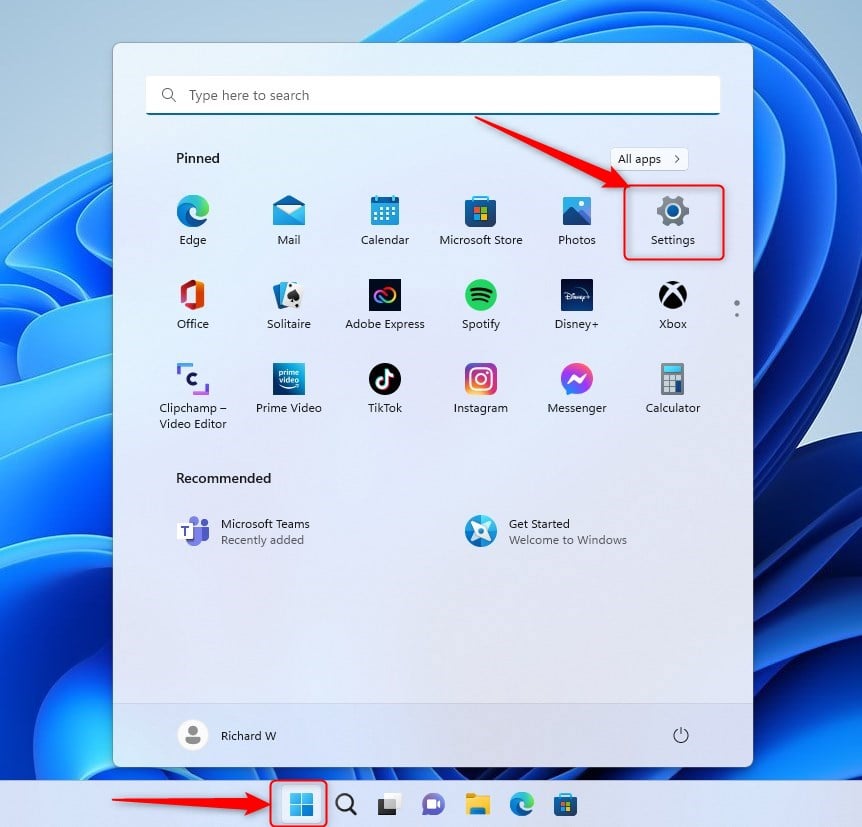
- Open Settings by pressing Win+I.
-
- Go to Apps Optional features.
-
- Click View features next to Add an optional feature.
-
- Search for Wireless Display.
-
- Check the box and click Next, then Install.
How to Change Projection Settings
When setting up wireless projection Windows 11, you can change how your PC receives incoming connections from other devices. You can find these options under System, then ‘Projecting to this PC’ in your settings. This lets you decide which devices can connect to your computer and share their screens. Once installed, configuration determines how your PC handles incoming connections.-
- Open Settings and go to System.
-
- Click on Projecting to this PC.
-
- Select Optional features to manage the app if needed.
-
- Set your preferences for Ask to project to this PC. You can choose ‘Everywhere’, ‘Everywhere on secure networks’, or ‘Off’.
Using the Keyboard Shortcut
To start projecting from your sender device, press Win+K. This opens the Cast menu. Select your PC from the list to begin mirroring your screen immediately.Troubleshooting Connectivity
If you cannot find your PC, ensure both devices are on the same Wi-Fi network. While Wi-Fi Direct does not always need a router, connecting both devices to the same Wi-Fi network typically makes them discoverable. Check your firewall settings if connections fail.Summary
Wireless projection Windows 11 turns your computer into a versatile display receiver for casting screens without cables. Installing the Wireless Display feature, tweaking your connection preferences, and pressing Win+K gets everything up and running. Remember to check your power settings so your PC remains discoverable when you need it most. Wireless projection turns your PC into a versatile display receiver. Installing the Wireless Display feature, tweaking your connection preferences, and pressing Win+K gets everything up and running. Remember to check your power settings to ensure your PC remains discoverable when you need it most.Wireless projection in Windows 11 lets you beam your phone or tablet screen directly to your PC over Wi-Fi without any cables. This built-in feature uses Miracast (a wireless display standard built into Windows) to send audio and video straight to your monitor.
You can use this setup to share work presentations, watch phone videos on a larger display, or control connected devices with your computer keyboard and mouse. Windows 11 also lets you turn on pin security so only approved devices can connect to your PC.
Install the Wireless Display optional feature via Settings Apps Optional features Then, configure your preferences in Settings System Projecting to this PC. Press Win+K on your sending device to connect.
Understanding Wireless Projection
Wireless projection Windows 11 lets you beam another device’s screen straight to your computer without any cables. It works much like casting to a smart TV by using a built-in technology called Miracast (a standard for sending video and audio wirelessly between devices). This feature turns your PC into a wireless receiver so you can share content easily. Wireless projection, also known as screen mirroring or casting to PC, lets you send your screen content wirelessly to another display. Windows 11 uses Miracast, which creates a direct connection between devices. Unlike a smart TV, which is a dedicated receiver, your PC can function as both a sender and a receiver.Installing the Wireless Display Feature
To set up wireless projection Windows 11, you must first install the optional Wireless Display feature through your system settings. Windows 11 requires this specific add-on before your computer can act as a wireless receiver for other devices. Note that an administrator account is required to complete this installation. Before you can project, you must ensure the Wireless Display feature is installed. This is an optional feature in Windows 11. Note: This step requires admin privileges.-
- Open Settings by pressing Win+I.
-
- Go to Apps Optional features.
-
- Click View features next to Add an optional feature.
-
- Search for Wireless Display.
-
- Check the box and click Next, then Install.
How to Change Projection Settings
When setting up wireless projection Windows 11, you can change how your PC receives incoming connections from other devices. You can find these options under System, then ‘Projecting to this PC’ in your settings. This lets you decide which devices can connect to your computer and share their screens. Once installed, configuration determines how your PC handles incoming connections.-
- Open Settings and go to System.
-
- Click on Projecting to this PC.
-
- Select Optional features to manage the app if needed.
-
- Set your preferences for Ask to project to this PC. You can choose ‘Everywhere’, ‘Everywhere on secure networks’, or ‘Off’.
Using the Keyboard Shortcut
To start projecting from your sender device, press Win+K. This opens the Cast menu. Select your PC from the list to begin mirroring your screen immediately.Troubleshooting Connectivity
If you cannot find your PC, ensure both devices are on the same Wi-Fi network. While Wi-Fi Direct does not always need a router, connecting both devices to the same Wi-Fi network typically makes them discoverable. Check your firewall settings if connections fail.Summary
Wireless projection Windows 11 turns your computer into a versatile display receiver for casting screens without cables. Installing the Wireless Display feature, tweaking your connection preferences, and pressing Win+K gets everything up and running. Remember to check your power settings so your PC remains discoverable when you need it most. Wireless projection turns your PC into a versatile display receiver. Installing the Wireless Display feature, tweaking your connection preferences, and pressing Win+K gets everything up and running. Remember to check your power settings to ensure your PC remains discoverable when you need it most.Was this guide helpful?

About the Author
Richard
Tech Writer, IT Professional
Richard is a writer at Geek Rewind who turns complex IT tasks into clear, step-by-step guides. He draws on years of hands-on experience in system administration and enterprise IT operations, focusing on Windows, Linux and WordPress: the problems people actually run into, and the fixes that work. His server and WordPress guides come from systems he runs himself. Richard builds and maintains the platform behind Geek Rewind, from its Ubuntu servers and Nginx configuration to its custom WordPress plugins. Many new tutorials start with readers' questions, and he's always glad to answer them in the comments.


No comments yet — be the first to share your thoughts!