How to Change Wireless Adapter Power Saving Mode in Windows 11
Changing your wireless adapter’s power saving mode in Windows 11 helps you balance Wi-Fi speed and battery usage.
This setting tells your computer how much to dim your Wi-Fi card to save battery power. Windows 11 usually sets this to ‘Power Saving Mode’ by default.
Sometimes, this default setting can make your Wi-Fi slower or delay your reconnection after waking your PC. You might get more stable internet and faster speeds by switching it to ‘Medium’ or ‘Maximum Performance’ instead.
Open Control Panel, navigate to Power Options, and adjust the Wireless Adapter Settings within your chosen power plan’s advanced settings. Alternatively, use the powercfg command in Windows Terminal with administrator privileges to set your desired mode.
What Is Wireless Adapter Power Saving Mode?
Wireless adapter power saving mode in Windows lets you choose how much energy your Wi-Fi connection uses, balancing battery life with internet speed.
Power Saving Options
| Mode | What It Does |
|---|---|
| Maximum Performance | Best Wi-Fi speed, uses more power. (Default when plugged in) |
| Low Power Saving | Good balance between speed and saving power |
| Medium Power Saving | More power saving but may reduce speed. (Default on battery) |
| Maximum Power Saving | Saves the most power but Wi-Fi may slow down |
How to Change Power Saving Mode via Control Panel
Change your wireless adapter power saving mode by adjusting your power plan in the Control Panel. This balances how fast your Wi-Fi works with how long your battery lasts. To do this, open the Control Panel, switch to small or large icons, and then click on Power Options to select your preferred plan.
- Open Control Panel : Press ⊞ Win+R on your keyboard. Type
controland press Enter. Switch the view to Small icons or Large icons. Click Power Options. - Choose your active power plan: Look for the plan you are using (like “Balanced”). Click Change plan settings next to it.
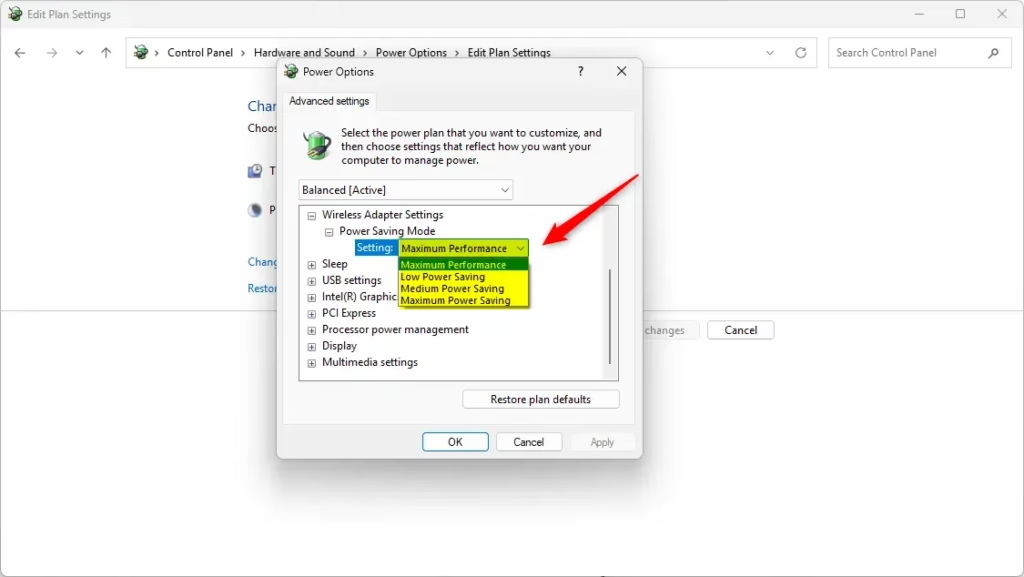
- Open advanced settings: Click Change advanced power settings.
Find Wireless Adapter Settings: Scroll down and expand Wireless Adapter Settings. Then expand Power Saving Mode.- Pick your preferred mode: Choose from the dropdown menus for On battery and Plugged in options. For example, select Maximum Performance for best Wi-Fi speed. Click OK to save your changes.
How to Change Power Saving Mode Using Commands
Changing your wireless adapter power saving mode using commands in Windows Terminal offers direct control over your Wi-Fi performance and battery usage. Opening Windows Terminal as an administrator is necessary to run these commands. This command-line method provides precise control over your wireless adapter's power settings.
Open Windows Terminal as administrator: ⚠️ Admin privileges required. Right-click the Start button and select Windows Terminal (Admin) or search for "Windows Terminal" and open it as administrator.
Copy and paste a command: Choose one of the commands below based on your preferred power saving mode. Paste it into the terminal and press Enter.
For Laptop on Battery:
When your laptop runs on battery, you can adjust the wireless adapter power saving mode to extend battery life or get the fastest Wi-Fi speed. To save more battery, use the command 'powercfg /SETDCVALUEINDEX SCHEME_CURRENT 19cbb8fa-5279-450e-9fac-8a3d5fedd0c1 12bbebe6-58d6-4636-95bb-3217ef867c1a 0'.
powercfg /SETDCVALUEINDEX SCHEME_CURRENT 19cbb8fa-5279-450e-9fac-8a3d5fedd0c1 12bbebe6-58d6-4636-95bb-3217ef867c1a 0Low Power Saving:
powercfg /SETDCVALUEINDEX SCHEME_CURRENT 19cbb8fa-5279-450e-9fac-8a3d5fedd0c1 12bbebe6-58d6-4636-95bb-3217ef867c1a 1Medium Power Saving:
powercfg /SETDCVALUEINDEX SCHEME_CURRENT 19cbb8fa-5279-450e-9fac-8a3d5fedd0c1 12bbebe6-58d6-4636-95bb-3217ef867c1a 2Maximum Power Saving:
powercfg /SETDCVALUEINDEX SCHEME_CURRENT 19cbb8fa-5279-450e-9fac-8a3d5fedd0c1 12bbebe6-58d6-4636-95bb-3217ef867c1a 3For Desktop or When Plugged In:
For desktop computers, or when your laptop is plugged in, you can change the wireless adapter power saving mode to prioritize Wi-Fi performance or energy saving. To select low power saving while plugged in, use the command 'powercfg /SETACVALUEINDEX SCHEME_CURRENT 19cbb8fa-5279-450e-9fac-8a3d5fedd0c1 12bbebe6-58d6-4636-95bb-3217ef867c1a 0'.
powercfg /SETACVALUEINDEX SCHEME_CURRENT 19cbb8fa-5279-450e-9fac-8a3d5fedd0c1 12bbebe6-58d6-4636-95bb-3217ef867c1a 0Low Power Saving:
powercfg /SETACVALUEINDEX SCHEME_CURRENT 19cbb8fa-5279-450e-9fac-8a3d5fedd0c1 12bbebe6-58d6-4636-95bb-3217ef867c1a 1Medium Power Saving:
powercfg /SETACVALUEINDEX SCHEME_CURRENT 19cbb8fa-5279-450e-9fac-8a3d5fedd0c1 12bbebe6-58d6-4636-95bb-3217ef867c1a 2Maximum Power Saving:
powercfg /SETACVALUEINDEX SCHEME_CURRENT 19cbb8fa-5279-450e-9fac-8a3d5fedd0c1 12bbebe6-58d6-4636-95bb-3217ef867c1a 3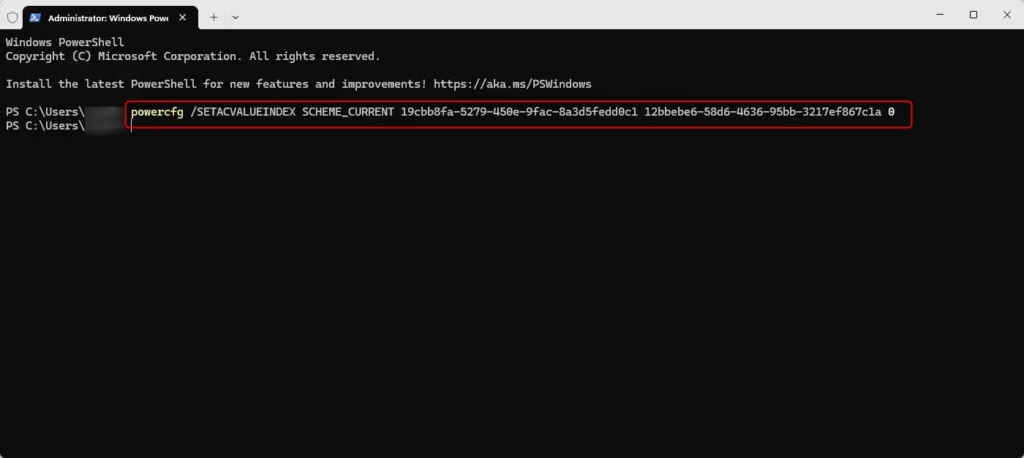
Summary
- Balance speed and battery life: Choose a power saving mode that fits what you need. Do you want faster Wi-Fi or longer battery life?
- Changing settings is easy: Use the Control Panel or Windows Terminal to make changes.
- Know what each mode means: More power saving means less Wi-Fi performance.
- For laptops: You can set different modes for when on battery or plugged in.
- Learn more: Check Intel’s official guide on wireless power management.
Wireless adapter power saving modes balance Wi-Fi speed and battery life. These modes can be changed using the Control Panel or Windows Terminal. Increased power saving may reduce Wi-Fi performance; laptop computers have different settings for battery and plugged-in use.
Was this guide helpful?

About the Author
Richard
Tech Writer, IT Professional
Richard, a writer for Geek Rewind, is a tech enthusiast who loves breaking down complex IT topics into simple, easy-to-understand ideas. With years of hands-on experience in system administration and enterprise IT operations, he’s developed a knack for offering practical tips and solutions. Richard aims to make technology more accessible and actionable. He's deeply committed to the Geek Rewind community, always ready to answer questions and engage in discussions.


No comments yet — be the first to share your thoughts!