How to Enable or Disable OneDrive Sync Notifications in Windows 11

OneDrive sync notifications in Windows 11 are pop-up alerts that tell you when your cloud files finish uploading, stop syncing, or run into problems. Microsoft builds this storage service directly into Windows 11 to keep your documents backed up across devices.
Stopping these alerts cuts down on screen interruptions so you can focus on your work. You can turn them on or off in the OneDrive settings menu with just a few clicks. If you manage many PCs, or you want a setting that survives a reinstall, Group Policy and the Registry Editor can do the same job. This guide covers all three, plus what to check when alerts do not appear.
Open the OneDrive app, click the gear icon for Help & Settings, select Settings, find the Notifications section, and toggle Notify me when syncing is paused On or Off. The change applies immediately without a restart.
Enable or Disable Notifications in OneDrive Settings
The simplest way to change OneDrive sync notifications is inside the OneDrive app itself. You open the app, click the gear icon labeled Help & Settings, choose Settings, go to the Notifications section, and change the switch for pause alerts to the state you want.
This method works on Windows 11 Home, Pro, Enterprise, and Education. It needs no administrator rights. It only changes the setting for your own account, and you can reverse it at any time by flipping the same switch back.

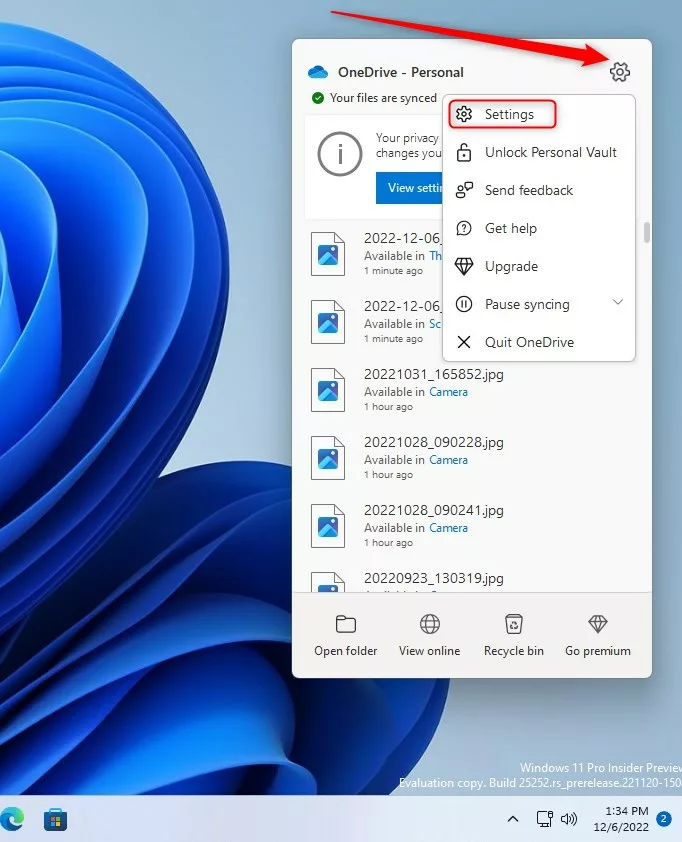
- Click the white or blue OneDrive cloud icon in the notification area at the right end of the taskbar . If you do not see it, click the small arrow to show hidden icons first.
- Wait for the OneDrive pop-up panel to open. It shows your recent files and sync status.
- Click the gear icon labeled Help & Settings, then choose Settings.
The OneDrive Settings window should now open. If the cloud icon is missing altogether, OneDrive is not running. Search for OneDrive in the Start menu and open it, and the icon will return.
- In the Settings window, find the Notifications section.
- Flip the switch for Notify me when syncing is paused to On or Off, depending on your preference.
- Close the window. The change applies right away, and you do not need to restart Windows.
With the switch Off, OneDrive stops showing the pop-up when sync pauses. Sync itself keeps working, and you can still check status by clicking the cloud icon. OneDrive updates its layout from time to time, so the section may sit under a different tab on your version. If you cannot find it, look through each tab of the Settings window.

Understanding Notification Types
| Notification Type | Description |
|---|---|
| File Activity | Alerts when others edit shared files. |
| On This Day | Memories from your photo collection. |
| System Alerts | Sync pauses or connection issues. |
Enterprise Management via Group Policy
IT administrators manage OneDrive alerts across company fleets using the Group Policy Editor (a built-in Windows tool for enforcing system-wide configurations on Pro and Enterprise editions). This action helps manage user experience by preventing unwanted pop-ups.
If you run Home, use the app settings above or the Registry method below instead. Settings pushed by policy can also override what a user picks in the OneDrive app, so a switch that is greyed out or keeps changing back often means a policy is controlling it. Policy changes may take a sync cycle, a sign-out, or a restart to apply.
Change Notifications via the Registry
This method requires administrator access and careful attention since editing the registry incorrectly can cause system problems.
Before you start, make a backup. In Registry Editor, choose File Export, pick a location, and save the file. If something goes wrong, double-click that file to restore the saved settings. This method works on every edition of Windows 11, including Home.
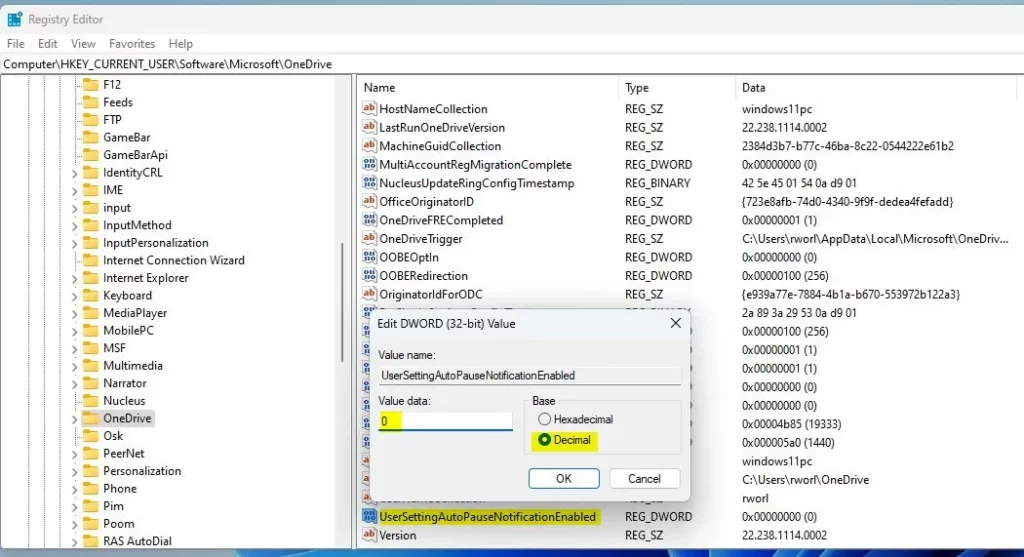
HKEY_CURRENT_USER\Software\Microsoft\OneDrive- Open the Registry Editor by searching for it in the Start menu and choosing to run it as administrator. Click Yes if User Account Control asks for permission.
- In the left pane, browse to the path given above.
- If you do not see the OneDrive folder, right-click the Microsoft folder, select New, and then create a Key named OneDrive.
The new OneDrive key should appear in the left pane under Microsoft. Select it so the right pane shows its contents.

- Right-click in the empty space on the right side of the OneDrive folder.
- Select New DWORD (32-bit) Value.
- Name the key
UserSettingAutoPauseNotificationEnabled. - Double-click the new entry.
- Set the Value data to
1to turn notifications on, or0to turn them off, then click OK.
The new value should now show in the right pane with the data you entered. Sign out and back in, or restart your PC, so OneDrive reads the new value. To undo the change, set the value back or right-click the entry and choose Delete.
Troubleshooting Common Issues
If your OneDrive sync notifications aren't showing up, check your Windows Notification Center settings to ensure OneDrive alerts are allowed.
- Open Settings System Notifications
- Make sure the main Notifications switch is On.
- Scroll to the list of apps and find Microsoft OneDrive. Turn its switch On.
Also check whether Do not disturb is turned on, since it hides all pop-ups until you turn it off. Then re-check the OneDrive app's own Notifications switch from the earlier section. Both the Windows setting and the OneDrive setting must allow alerts before you will see them.
Summary
Managing sync alerts happens through the app settings, Group Policy, or the Windows Registry. Adjusting these parameters keeps you informed about file status without unnecessary interruptions. Always verify battery and connection configurations so these notifications operate reliably.
For most people, the switch in the OneDrive app is all they need. Use Group Policy when you manage several PCs on Pro or Enterprise, and the Registry when you are on Home or need a scripted change. Whichever you pick, test it once by pausing sync and watching whether the alert appears or stays quiet.
Did this guide fix your problem?

About the Author
Richard
Tech Writer, IT Professional
Richard is a writer at Geek Rewind who turns complex IT tasks into clear, step-by-step guides. He draws on years of hands-on experience in system administration and enterprise IT operations, focusing on Windows, Linux and WordPress: the problems people actually run into, and the fixes that work. His server and WordPress guides come from systems he runs himself. Richard builds and maintains the platform behind Geek Rewind, from its Ubuntu servers and Nginx configuration to its custom WordPress plugins. Many new tutorials start with readers' questions, and he's always glad to answer them in the comments.
No comments yet — be the first to share your thoughts!