How to Enable Windows Updates in Windows 11 Soon as Possible

Windows Updates in Windows 11 ensures you get the latest features and security patches quickly.
Windows Update is the built-in system that automatically downloads and installs important security fixes and new features for your PC.
Keeping your Windows 11 PC updated helps it stay secure and gives you access to the newest features, like those in version 23H2.
While Windows 11 usually updates on its own, you can make sure you get new feature updates even faster. You can do this by checking two main settings: “Active Hours” and “Get me up to date.”
Turning on “Get me up to date” tells Microsoft to send you new feature releases as soon as they are ready.
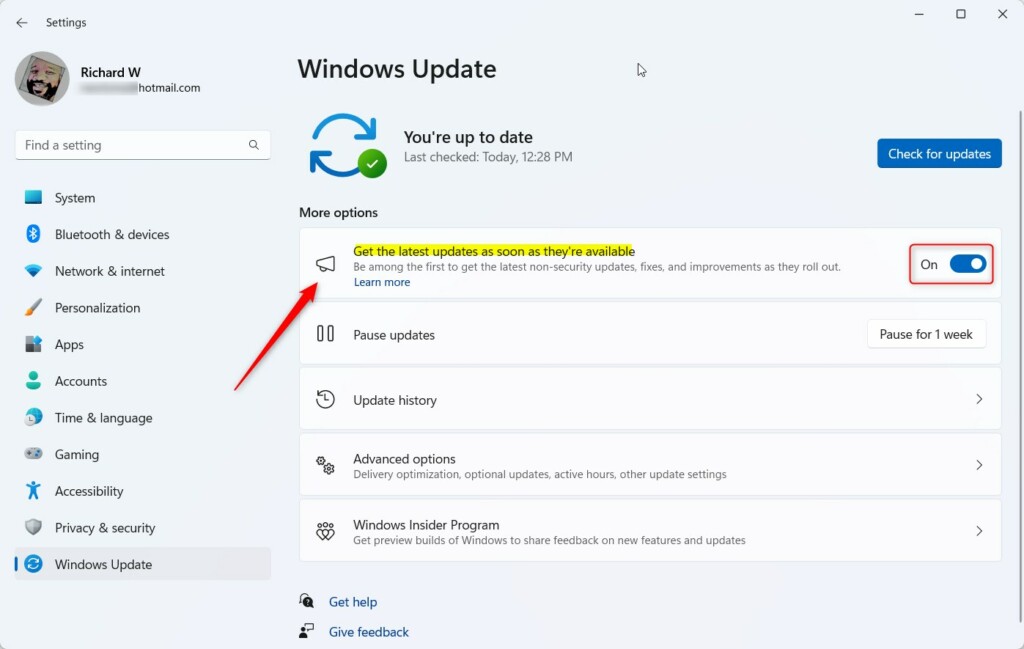
Enable Windows Updates by going to Settings > Windows Update and toggling “Get the latest updates as soon as they’re available” to On. This ensures your PC receives new features and security patches promptly.
Prerequisites
Method 1Using the Settings App
Get the latest features and security fixes for Windows updates as soon as they’re ready, directly from the Settings app. Open Settings, go to Windows Update, and make sure the option to get updates as soon as they’re available is turned on.
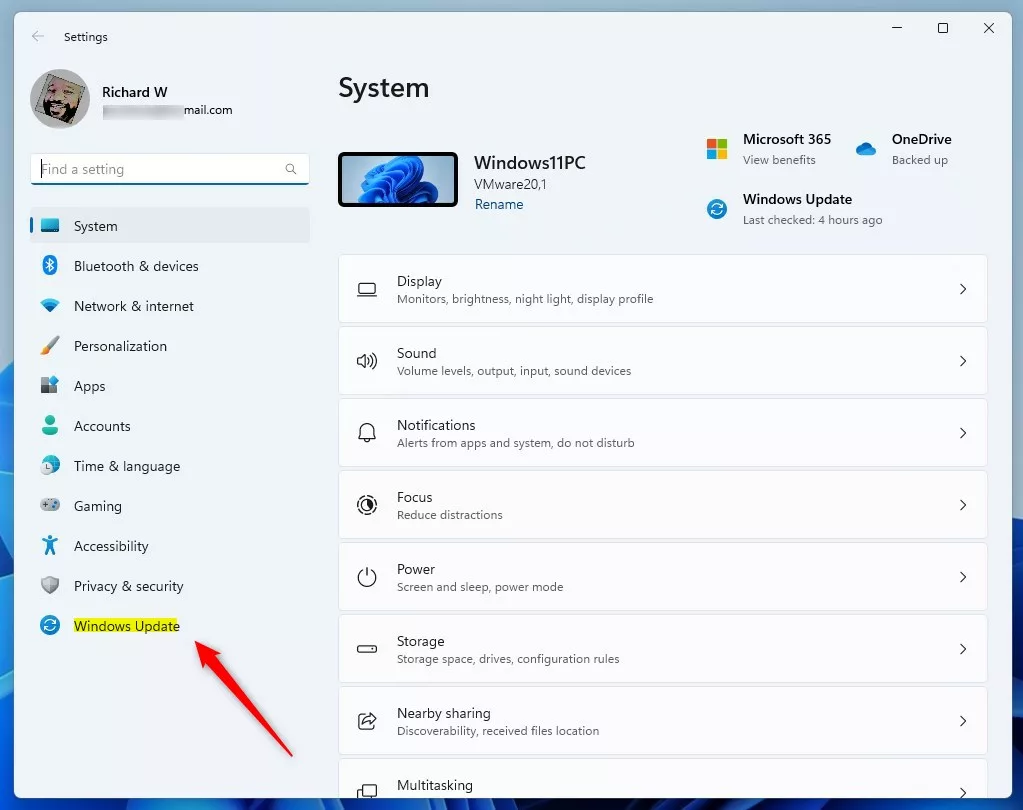
- Open the Windows Settings app by pressing the Windows key + I.
- Click on the Windows Update button located on the left side of the menu.
- On the right side, find the tile labeled “Get the latest updates as soon as they’re available.”
- Toggle the switch to On to enable it .
Method 2Using the Windows Registry (Admin Required)
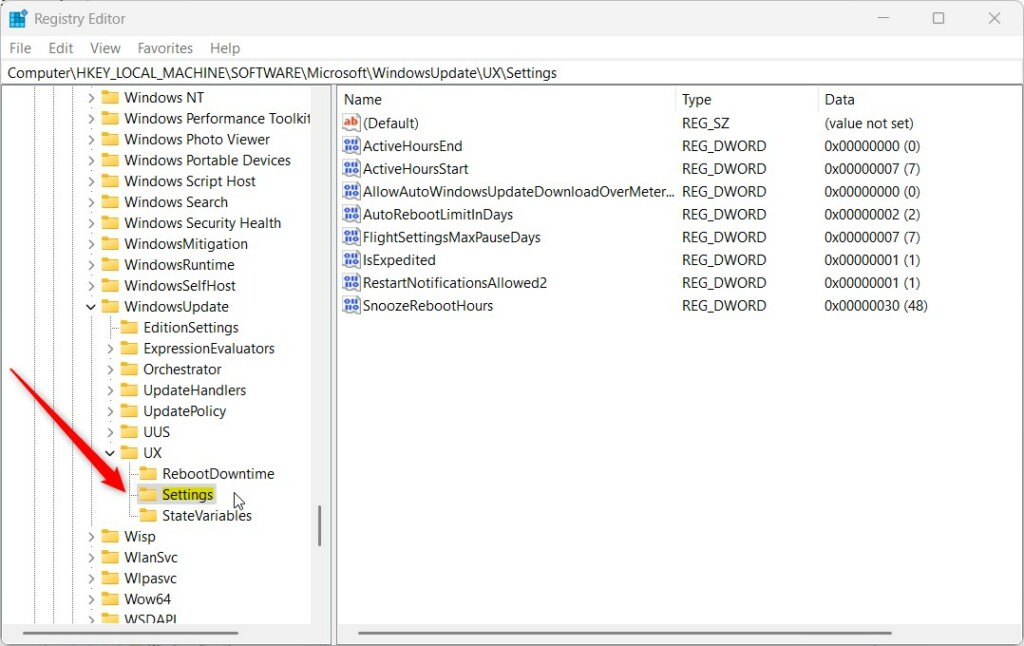
Windows updates can arrive faster by making a small change in the Windows Registry. This requires administrator access, so proceed with caution. This method involves opening the Registry Editor and adding a specific value to a particular location to signal your preference for quicker updates.
- Open the Windows Registry by typing regedit in the Start menu.
- Navigate to:
HKEY_LOCAL_MACHINE\SOFTWARE\Microsoft\WindowsUpdate\UX\Settings - Right-click in the empty space and select New -> DWORD (32-bit) Value.
- Name it
IsContinuousInnovationOptedInand set the value to1.
Advanced Troubleshooting
If your updates are failing, try the official Windows Update Troubleshooter. You can also clear the update cache by deleting files in 📁C:\Windows\SoftwareDistribution\Download. Administrator privileges are needed to modify this folder.
Force Updates via PowerShell
To force a Windows 11 update, open PowerShell as an administrator and run the command `Install-Module PSWindowsUpdate -Force`. This command downloads and installs the necessary update module, allowing you to manually check for and install updates immediately, bypassing the standard update schedule.
Install-Module PSWindowsUpdate
Get-WindowsUpdate -Install -AcceptAll
Summary
Control how your computer receives updates in Windows 11. Turning on the “Get the latest updates” feature ensures your device gets new enhancements immediately. If you encounter errors, use the Troubleshooter or PowerShell to force the process. Always keep your system updated to maintain security.
Related Topics
Why are my Windows updates stuck at 0%?
Updates often get stuck due to a corrupted cache or a hung background service. Try restarting the Windows Update service (wuauserv) in the Services app or run the Windows Update Troubleshooter to reset the connection to Microsoft servers and clear pending download errors.
Can I disable automatic updates permanently?
While you can pause updates for up to five weeks in Settings, Microsoft does not recommend disabling them permanently. Security updates are vital for protecting your PC from vulnerabilities. Using Group Policy (gpedit.msc) to disable them is only recommended for enterprise environments.
Was this guide helpful?

About the Author
Richard
Tech Writer, IT Professional
Richard, a writer for Geek Rewind, is a tech enthusiast who loves breaking down complex IT topics into simple, easy-to-understand ideas. With years of hands-on experience in system administration and enterprise IT operations, he’s developed a knack for offering practical tips and solutions. Richard aims to make technology more accessible and actionable. He's deeply committed to the Geek Rewind community, always ready to answer questions and engage in discussions.


No comments yet — be the first to share your thoughts!