How to Ease Cursor Movement Between Displays in Windows 11

The “Ease cursor movement between displays” setting stops your mouse pointer from catching on the edges of mismatched screens. It helps most when one monitor sits higher than another, or when the two are different sizes or resolutions.
The setting is in the Display page of the Settings app , not in the Accessibility menu. Once it is on, dragging windows and moving the pointer between displays is much smoother.
Open Settings System Display Multiple displays and check the Ease cursor movement between displays box. The pointer now moves smoothly between monitors instead of catching on misaligned edges, and changes take effect immediately without restart.
Making Your Cursor Move Better Between Screens
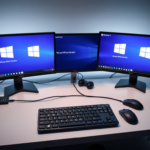
With this feature on, your pointer moves between monitors even when their physical arrangement doesn’t match. Without it, the pointer can stick at an edge where the screens don’t line up. This is most noticeable when the displays are at different heights or have different resolutions.
You can change the setting in two ways. The first is the Settings app, which is the easier route. The second is the Windows Registry, which is a database that stores system settings. Use the registry only if the setting is missing in Settings or doesn’t behave as expected. This guide covers both.
Option 1Using Windows Settings
The Ease Cursor Movement setting controls how your pointer travels from one screen to the next. You don’t need any special commands to turn it on or off. A checkbox in Settings does the job.
This option only exists on recent builds of Windows 11. If you can’t find it later in these steps, run Windows Update and check again.
Open Windows Settings
- Press Windows + I on your keyboard.
- Wait for the Settings window to open. You should see a left sidebar with categories such as System, Bluetooth & devices and Personalization.
Go to Display Settings
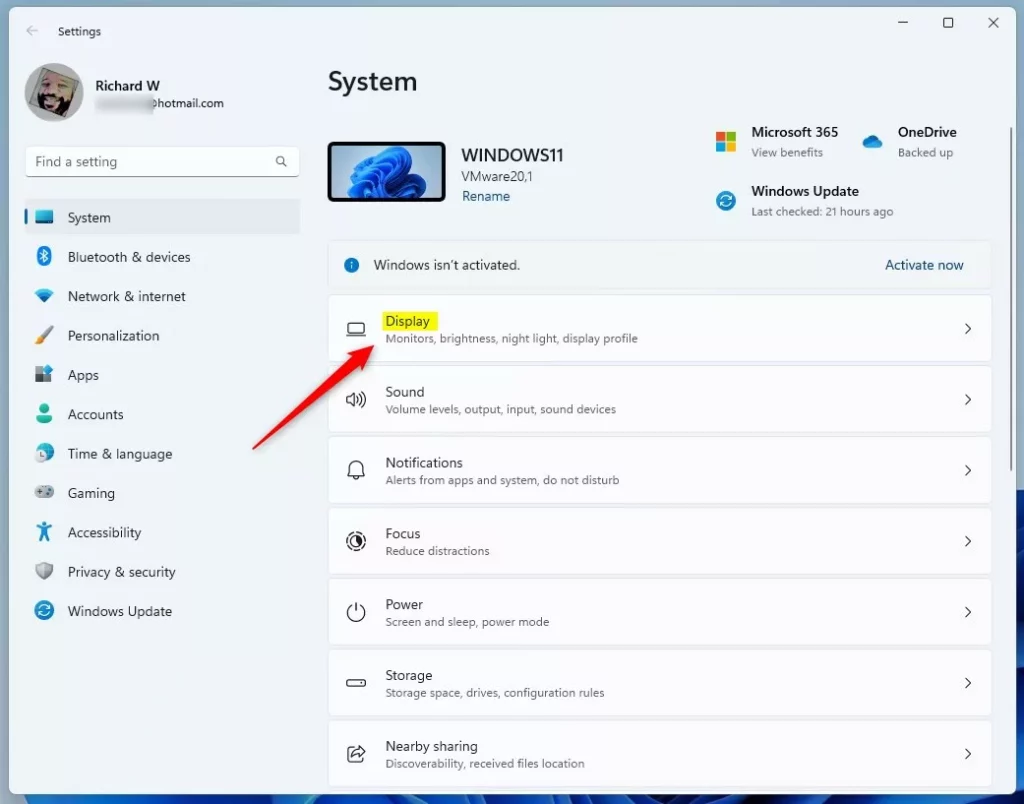
- Click System in the left sidebar.
- On the right side, click Display.
- You should now see the Display page. It shows a preview of your monitors at the top, with numbered boxes for each screen.
Find Multiple Displays
- Scroll down the Display page until you see Multiple displays.
- Click Multiple displays to expand it. Extra options appear under it, including the cursor setting.
This feature is for setups with two or more monitors. If a second monitor is plugged in but doesn't show, click Detect or check the cable and input source.
Change "Ease cursor movement between displays"
You can turn this feature on or off directly in the Settings app. The path is Settings System Display Multiple displays There you select or clear the checkbox for the option, depending on whether you want smooth transitions.
- Under Multiple displays, find Ease cursor movement between displays.
- Select the checkbox to turn it on, or clear it to turn it off.
- Check the box. A tick means the feature is on.
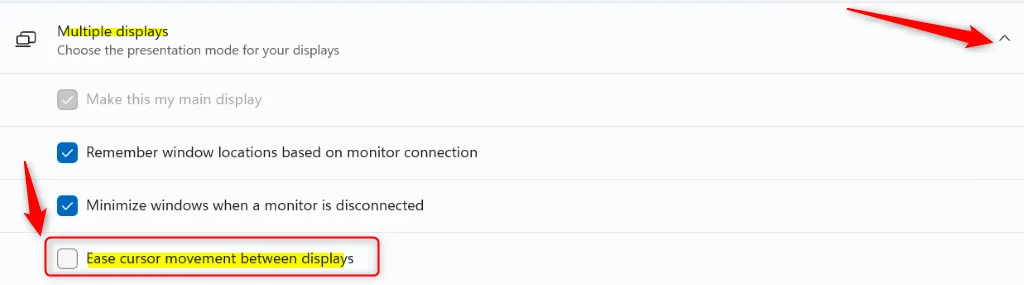
The "Ease cursor movement between displays" setting is typically on by default to help people with multiple screens. If your cursor gets stuck, check that the box is ticked. If you prefer the previous behavior, or the setting causes problems, clear the box here.
To undo any change, come back to the same checkbox and set it the way it was.
It is most useful if you move your monitors around or use screens of different sizes.
Close Settings
Close the Settings window. The change takes effect immediately, and you don't need to restart.
To test it, move your cursor slowly across the gap between your screens, especially at a spot where one screen ends and the other doesn't. The pointer should now carry across instead of sticking. Then drag a window from one display to the other to confirm.
Option 2Changing the Registry Manually
You can also set this through the Windows Registry. It lets you force the setting on or off when the Settings app option is missing or doesn't work. You open Registry Editor and change one system value. Back up the registry first, because mistakes can cause system instability.
Caution: The Windows Registry is a critical part of Windows. Changing the wrong settings can cause serious problems. To make a backup, open Registry Editor, go to File Export, and save a copy somewhere safe. To undo your changes later, you can double-click that saved file and confirm the merge.
Registry Editor changes need an administrator account. On a work or school PC, an administrator may have locked this down.
How to Open the Registry Editor
- Press the Windows key and the R key together. The Run box opens.
- Type
regeditand press Enter, or click OK. - If a User Account Control (UAC) message asks for permission to make changes, click Yes.
- Registry Editor should now open, with a folder tree in the left pane.
To Turn On "Ease Cursor Movement Between Displays"
You can turn on ease cursor movement by editing the registry when the setting isn't available in the Settings app. The short version is this. Open Registry Editor and go to HKEY_CURRENT_USER\Control Panel\Desktop. Find the MouseMonitorTransitionSetting value, and change its data to 1 to enable smooth screen transitions. The steps below walk through each part.
Go to the Right Registry Location
Use the left-hand pane to navigate to the path below. You can also copy and paste it into the address bar at the top of Registry Editor and press Enter:
HKEY_CURRENT_USER\Control Panel\Cursors
When it works, the Desktop key is selected and its values are listed in the right-hand pane.
Find or Create the Value
- In the right-hand pane, look for a value named
CursorDeadzoneJumpingSetting. - If you see it, double-click it to edit it.
- If you don't see it, right-click an empty space in the right-hand pane.
- Select New, then choose DWORD (32-bit) Value. A new entry appears with its name ready to edit.
- Name the new value exactly
CursorDeadzoneJumpingSetting, then press Enter. The name must match exactly. - Double-click the new value to open it.
Set the Value
The "Edit DWORD (32-bit) Value" window opens. This happens when you double-click an existing value, or after you create and double-click a new one. Here you set the Value data.
- In the Value data field, type
1. This enables "Ease cursor movement between displays." - Make sure Base is set to Hexadecimal.
- Click OK to save the change. The value should now show your new data in the right-hand pane.
The change doesn't apply until you sign out or restart. See the last registry step below.
To Turn Off "Ease Cursor Movement Between Displays"
To go back to the older, rigid cursor behavior, turn the setting off in the registry. Open Registry Editor and go to HKEY_CURRENT_USER\Control Panel\Desktop. Find the MouseMonitorTransitionSetting value, and change its data to 0 to disable smooth transitions.
Go to the Right Registry Location
- Open Registry Editor the same way as before (
regedit). - Go to this path:
HKEY_CURRENT_USER\Control Panel\Cursors
Find or Create the Value
In the right-hand pane, find the CursorDeadzoneJumpingSetting value. If it isn't there, create it the same way you did when enabling the setting: right-click an empty space, choose New, then DWORD (32-bit) Value, and name it exactly as shown.
Set the Value
- Double-click
CursorDeadzoneJumpingSetting. The "Edit DWORD (32-bit) Value" window opens. - In the Value data field, type
0. This disables "Ease cursor movement between displays." - Make sure Base is set to Hexadecimal.
- Click OK to save the change.
Close Registry Editor and Restart
You must restart your computer, or sign out and back in, after editing the registry. Until you do, Windows keeps using the old cursor settings. Close Registry Editor completely once your values are set. Then restart or sign out so the new transition behavior applies across all connected displays.
After you sign back in, open Settings System Display Multiple displays to see whether the checkbox matches what you set. Then test the pointer between screens.
Warning: If you're uncertain about any step when editing the registry, use the Settings app method instead. Mistakes in the registry can lead to system instability.
Summary
The "Ease cursor movement between displays" setting makes your mouse pointer move smoothly between monitors, even if their edges don't line up perfectly. You can turn it on or off with the checkbox in Settings System Display Multiple displays If that option isn't available, you can change a registry value instead and then restart or sign out.
Was this guide helpful?

About the Author
Richard
Tech Writer, IT Professional
Richard is a writer at Geek Rewind who turns complex IT tasks into clear, step-by-step guides. He draws on years of hands-on experience in system administration and enterprise IT operations, focusing on Windows, Linux and WordPress: the problems people actually run into, and the fixes that work. His server and WordPress guides come from systems he runs himself. Richard builds and maintains the platform behind Geek Rewind, from its Ubuntu servers and Nginx configuration to its custom WordPress plugins. Many new tutorials start with readers' questions, and he's always glad to answer them in the comments.


No comments yet — be the first to share your thoughts!