How to Turn On or off “Compatible Apps Always Control Lighting” in Windows 11

“Compatible apps in the foreground always control lighting” is a setting in Windows 11’s Dynamic Lighting feature. It decides whether background software or only the app in your active window controls your RGB accessories, such as keyboards, mice and case lights.
You can let background apps change your lighting, or let only the program you are using take charge. Dynamic Lighting works on Windows 11 version 22H2 and newer. On some builds you may need the latest cumulative update before the Dynamic Lighting page appears in Settings.
Open Settings , go to Personalization Dynamic Lighting, then toggle the switch labeled Compatible apps in the foreground always control lighting on or off. The change applies immediately without restarting Windows 11.
What Does “Compatible Apps in the Foreground Always Control Lighting” Mean?
Here is what each position of the switch does:
- On: The app you are currently using controls the lighting. Background apps cannot change it while you work in another window.
- Off: Other apps running in the background can also control the lighting, even if you’re using a different app. If two lighting apps compete, you may see the effects flicker or switch back and forth.
How to Turn This Setting On or Off Using Windows Settings
The easiest way to change this is the Settings app . You open Personalization, go to the Dynamic Lighting page, and flip the switch. This works the same on Windows 11 Home and Pro, and you do not need to restart. Press the Win plus I to open Settings quickly.
- Open the Settings app:
- Click the Start menu button and select Settings, or
- Press
Windows key + Ion your keyboard to open Settings quickly.
- Go to Personalization:
In the left menu, click Personalization. The personalization options, such as Background, Colors and Themes, appear on the right.
- Select Dynamic Lighting:
Find and click the Dynamic Lighting tile on the right side. You may need to scroll down to see it. If the tile is missing, run Windows Update and install any pending updates, then check again. Your Windows 11 build may be too old to include the feature.
- Toggle the setting:
Find the switch labeled Compatible apps in the foreground always control lighting. It sits under the main Dynamic Lighting controls.
Click the switch to turn it On or Off as you want. The change applies right away. If the option is missing or greyed out, make sure Dynamic Lighting itself is turned on and that a compatible lighting device is connected.
- Close Settings:
When done, just close the Settings window. To undo the change, come back to this page and flip the switch the other way.
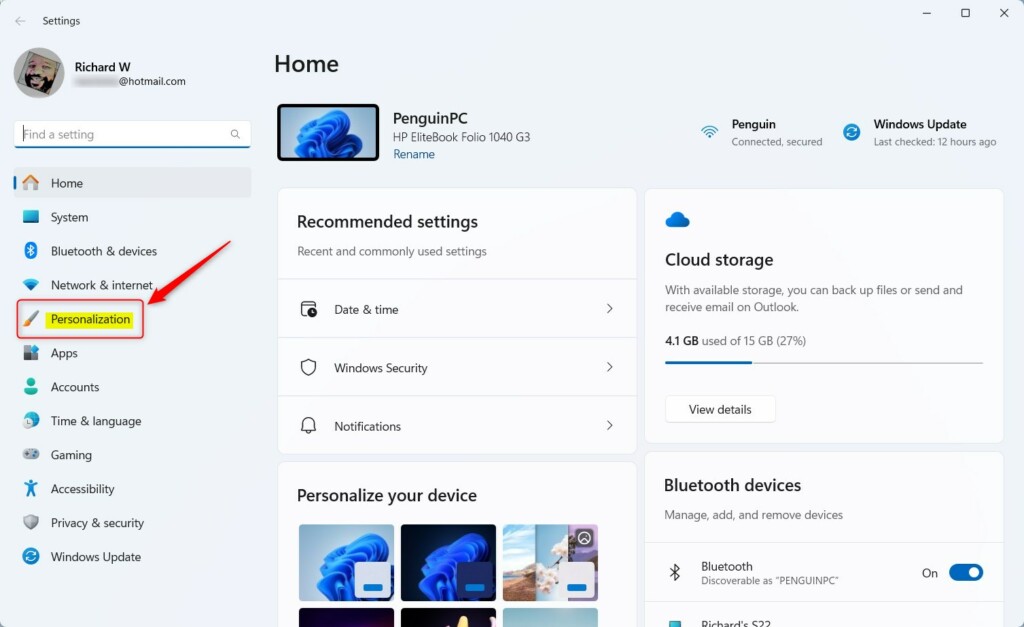
Click Personalization in Windows Settings
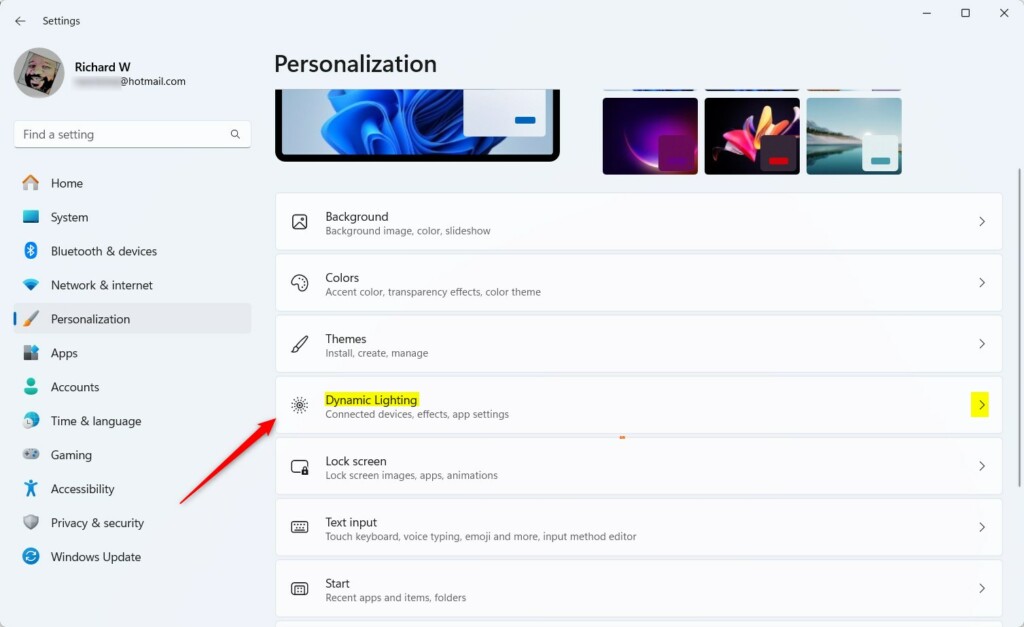
Select the Dynamic Lighting tile
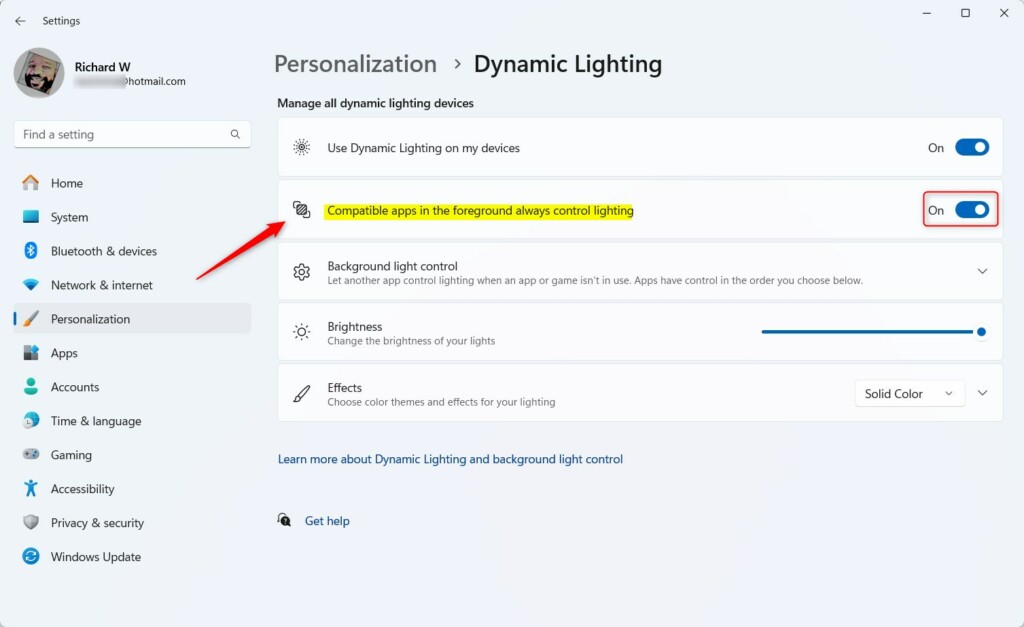
Toggle the setting On or Off
How to Change This Setting Using the Windows Registry (Advanced)
This method is for advanced users. A wrong edit in the registry can cause system problems, so take a backup first. In Registry Editor, click File, then Export, and save a copy of the registry. You can import it later if something goes wrong. This works on both Home and Pro editions.
- Open the Registry Editor:⚠️ Admin privileges required
- Press
Windows key + R, typeregedit, and press Enter.
- Press
- Go to this folder (key):
HKEY_CURRENT_USER\Software\Microsoft\LightingIf you don't see the Lighting folder, you can create it. Right-click Microsoft, choose New Key, and name it Lighting. Select the new Lighting key when you are done.
- Create a new value:
Right-click an empty area on the right side of the Lighting folder and select New DWORD (32-bit) Value. A new entry appears in the list with its name highlighted for editing.
- Name the new value:
Type this name exactly, then press Enter:
ControlledByForegroundApp - Set the value:
Double-click this new value and set the Base to Decimal.
Set the Value data to:
1to turn On (foreground apps control lighting)0to turn Off (background apps can control lighting)
- Apply the changes:
Click OK, close Registry Editor, and restart your PC to apply the changes. To undo the change later, reopen this value and enter the other number, or delete the value you created, then restart again.
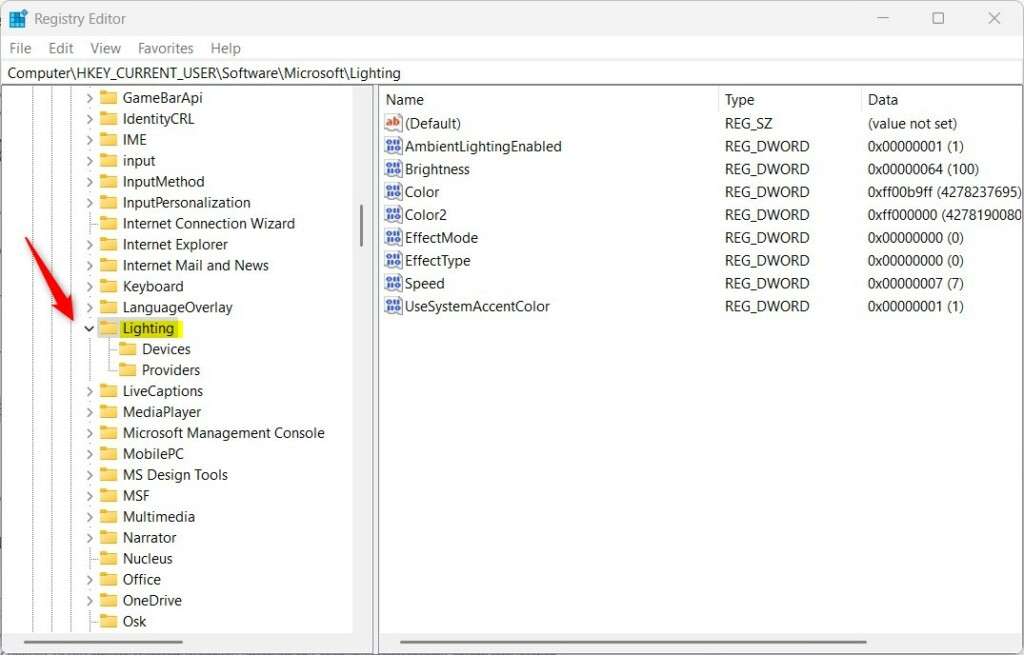
Windows Registry Editor showing Lighting key
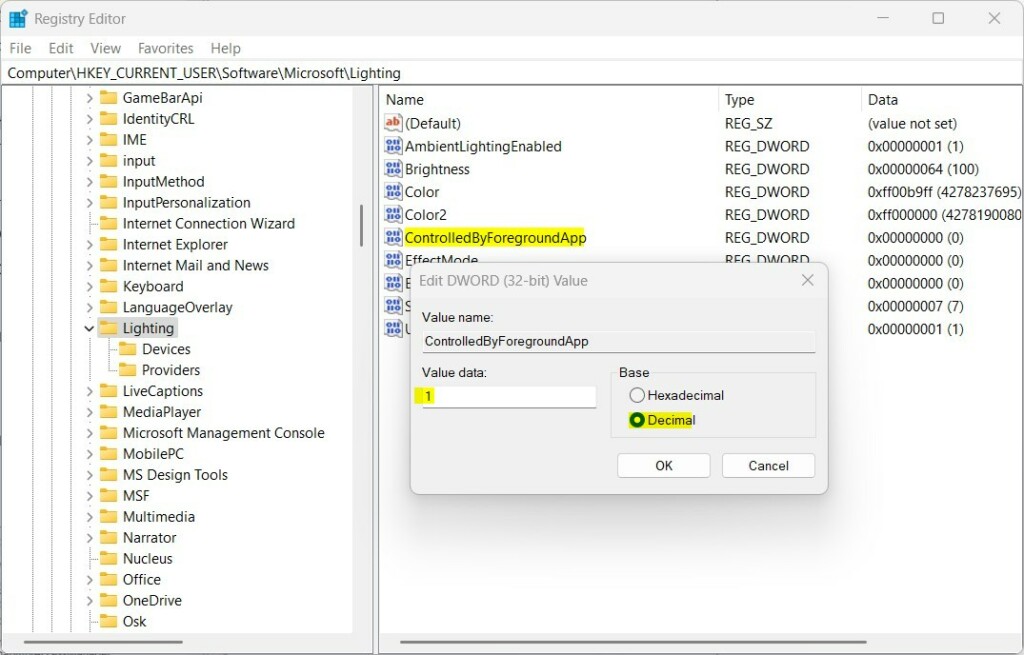
Set the value to 1 or 0
Need More Help?
For more info, you can check the official Microsoft support page about Dynamic Lighting.
If you run into problems or have questions, feel free to ask in the comments or search for help online. When you do, mention your Windows 11 version and which lighting apps you have installed.
Summary
You can turn the compatible apps setting on or off in Windows 11 Dynamic Lighting through either the Settings app or the Registry Editor. Both methods decide which software manages your RGB devices. Use Settings unless it is unavailable to you. It is quicker, needs no restart, and carries no risk to the registry.
You can reach the setting through Settings Personalization Dynamic Lighting, or through the Registry Editor if you are an advanced user. The setting controls which applications can change the lighting on your connected RGB devices.
Why this matters: This setting helps you manage which apps can alter your lighting effects. If two lighting apps fight over your devices, turning it on stops background apps from interfering.
What happens: When you enable this setting, only the app you're actively using will control your lighting. When you disable it, background apps can also change your lighting even while you're using something else.
Was this guide helpful?
100% of readers found this helpful (1 votes)

About the Author
Richard
Tech Writer, IT Professional
Richard is a writer at Geek Rewind who turns complex IT tasks into clear, step-by-step guides. He draws on years of hands-on experience in system administration and enterprise IT operations, focusing on Windows, Linux and WordPress: the problems people actually run into, and the fixes that work. His server and WordPress guides come from systems he runs himself. Richard builds and maintains the platform behind Geek Rewind, from its Ubuntu servers and Nginx configuration to its custom WordPress plugins. Many new tutorials start with readers' questions, and he's always glad to answer them in the comments.



No comments yet — be the first to share your thoughts!