How to Turn On or off AutoEndTasks in Windows 11

AutoEndTasks is a Windows 11 setting that closes stuck apps for you when you shut down, restart, or sign out. Without it, Windows can hang on the “This app is preventing shutdown” screen while it waits for a program to exit. With it on, Windows forces those programs to close right away.
Turning AutoEndTasks on speeds up shutdown, but you can lose unsaved work if an app is still open. Leaving it off keeps the safety warning in place, so you always get the chance to save your files first. If you often shut down with documents open, think twice before turning it on.
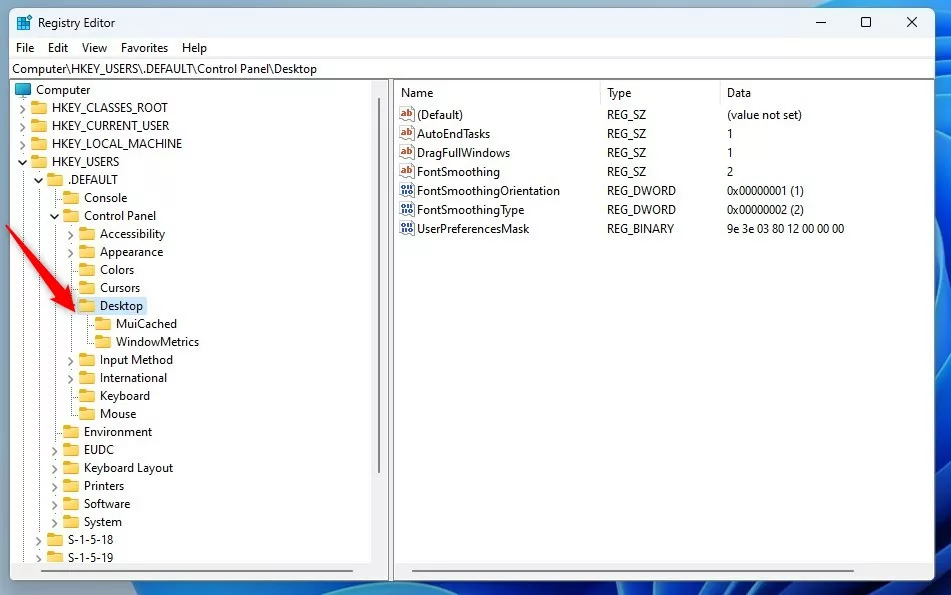
AutoEndTasks in Windows 11 automatically closes applications during shutdown or restart. You can enable or disable this by editing the Windows Registry. Navigate to 🗝️HKEY_USERS.DEFAULTControl PanelDesktop, create or modify the AutoEndTasks string value, setting it to 1 to enable or 0 to disable.
What Happens When AutoEndTasks Is On or Off?
- AutoEndTasks ON (set to 1): Windows closes open apps automatically when you shut down or restart, without asking. Unsaved changes in those apps are lost.
- AutoEndTasks OFF (set to 0): Windows waits for you to close apps or choose to force close them before it shuts down.
How to Turn AutoEndTasks On or Off (Step-by-Step)
There is no switch for this in the Settings app, so you change it in the Windows Registry. The steps are the same on Windows 11 Home and Pro, because Registry Editor is included in both. You need an administrator account, and you will probably see a User Account Control prompt when Registry Editor opens.
Before you start, back up the registry. In Registry Editor, click File Export, choose a location, give the file a name, and click Save. If anything goes wrong, you can double-click that file to restore it.
- Press Windows key + R to open the Run box. Type
regeditand press Enter. Click Yes if User Account Control asks for permission. Registry Editor opens. - In the left pane, go to this path: 🗝️HKEY_USERS\.DEFAULT\Control Panel \Desktop. Expand each folder by clicking the arrow next to it. You can also paste the path into the address bar at the top of the window and press Enter.
- If you do not see the folder named Desktop under Control Panel, you need to create it:
- Right-click Control Panel and select New Key A new folder appears with its name highlighted. Type Desktop and press Enter.
- Select the Desktop folder. In the right pane, right-click an empty space and select New String Value A new entry appears with its name highlighted for editing.
- Type the name AutoEndTasks and press Enter. Spell it exactly as shown, or Windows will ignore the value.
- Double-click AutoEndTasks. The Edit String window opens. Set the Value data box:
- Type
1to turn ON AutoEndTasks (Windows will close apps automatically). - Type
0to turn OFF AutoEndTasks (Windows will ask before closing apps). - Or delete this string value to go back to the default Windows behavior. To do that, right-click it, select Delete, and confirm with Yes.
- Type
- Click OK to save. The value now shows your number in the Data column.
- Close Registry Editor and restart your computer to apply the change.
To undo the change later, return to the same place and set the value to 0 or delete it. Restart again afterward. If the setting does not seem to take effect on your own account, use the per-user method below.
Apply AutoEndTasks Setting for Only Your User Account
If you want to change AutoEndTasks only for your own user account and not for the whole system, follow the same steps, but go to this folder path instead:
HKEY_CURRENT_USER\Control Panel\Desktop
Then create or edit the AutoEndTasks string value the same way. Set it to 1 or 0 as described above, or delete it to return to the default. Sign out and back in, or restart, so the change applies.
What the AutoEndTasks Prompt Looks Like
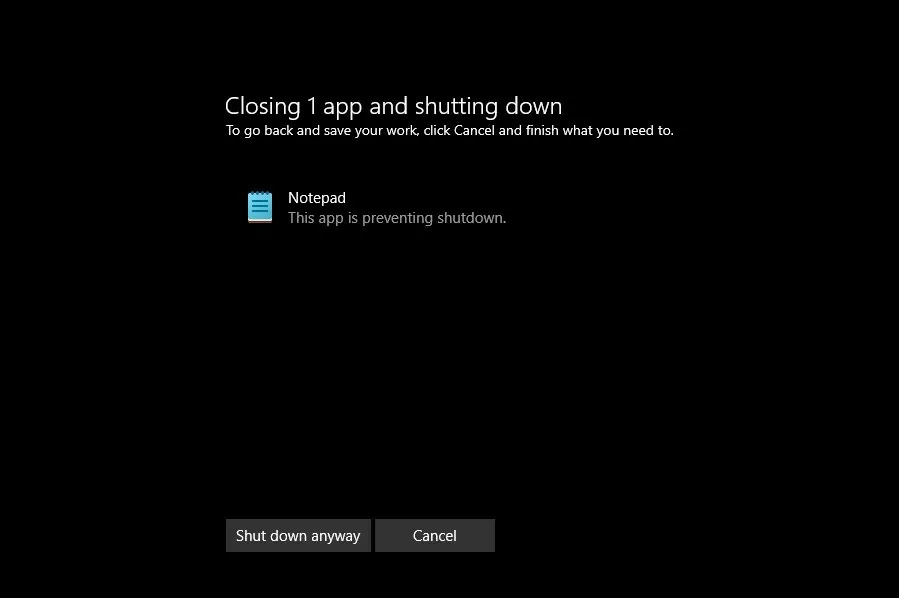
If AutoEndTasks is off and you try to shut down with apps still open, Windows shows the "This app is preventing shutdown" screen. It lists the apps that are still running and gives you two choices: cancel the shutdown and go save your work, or shut down anyway. It looks like this:
Summary
- AutoEndTasks controls whether Windows closes apps automatically during shutdown or restart.
- You can change this setting by editing the Windows Registry.
- Turning it on makes your computer shut down faster but may close apps without saving.
- Turning it off means Windows will ask you before closing apps, helping you avoid losing data.
- Make sure to back up your registry before making changes.
AutoEndTasks decides whether Windows 11 forces stubborn apps to close during shutdown or restart. Turning it on speeds up shutdowns. Turning it off keeps your data safer by prompting you to save work in open apps before the system turns off.
Was this guide helpful?

About the Author
Richard
Tech Writer, IT Professional
Richard is a writer at Geek Rewind who turns complex IT tasks into clear, step-by-step guides. He draws on years of hands-on experience in system administration and enterprise IT operations, focusing on Windows, Linux and WordPress: the problems people actually run into, and the fixes that work. His server and WordPress guides come from systems he runs himself. Richard builds and maintains the platform behind Geek Rewind, from its Ubuntu servers and Nginx configuration to its custom WordPress plugins. Many new tutorials start with readers' questions, and he's always glad to answer them in the comments.


No comments yet — be the first to share your thoughts!