How to Turn On or off Archive Apps in Windows 11

Archive apps in Windows 11 saves storage space by shrinking programs you rarely use. The feature is available in Windows 11 Home, Pro, and Enterprise, and it helps most on PCs with small drives that fill up quickly.
When the feature is on, Windows keeps the app icon on your desktop or Start menu . Click the icon and Windows downloads and restores the program, which usually takes only seconds on a decent connection. This tutorial shows four ways to turn it on or off.
Open Settings, click Apps, then Advanced app settings, and toggle Archive apps On or Off. The change takes effect immediately without restarting your PC.
What are Archive Apps?
Archive apps automatically shrinks programs you rarely use. It frees disk space without deleting your personal data or settings. When you click an archived app, Windows downloads the missing files from the cloud so the program opens normally again. Because of this, an archived app needs an internet connection the first time you open it afterwards.
Turning the feature off keeps every program fully installed and ready to launch, with no download step. That is the better choice if you often work offline or on a slow connection. If your drive is nearly full, leave it on. Pick whichever suits how you work.
Reference:
Option One
Turn Archive Apps On or Off for Your Account in Settings
- Open Settings by pressing the Win+I keys. The Settings window opens.
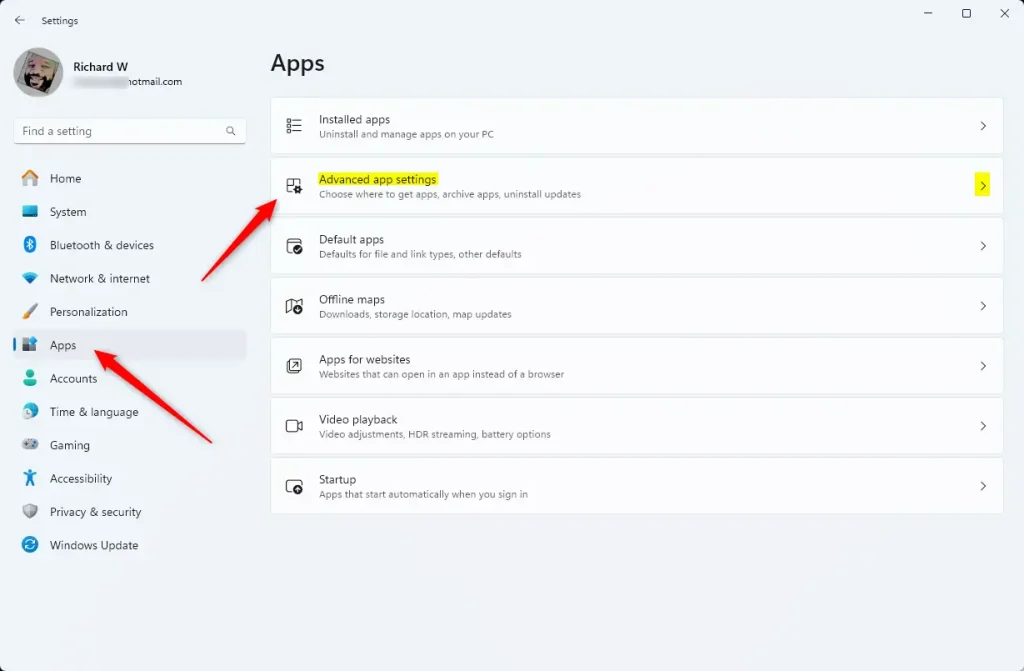
- Click Apps on the left side. Then click Advanced app settings on the right side.
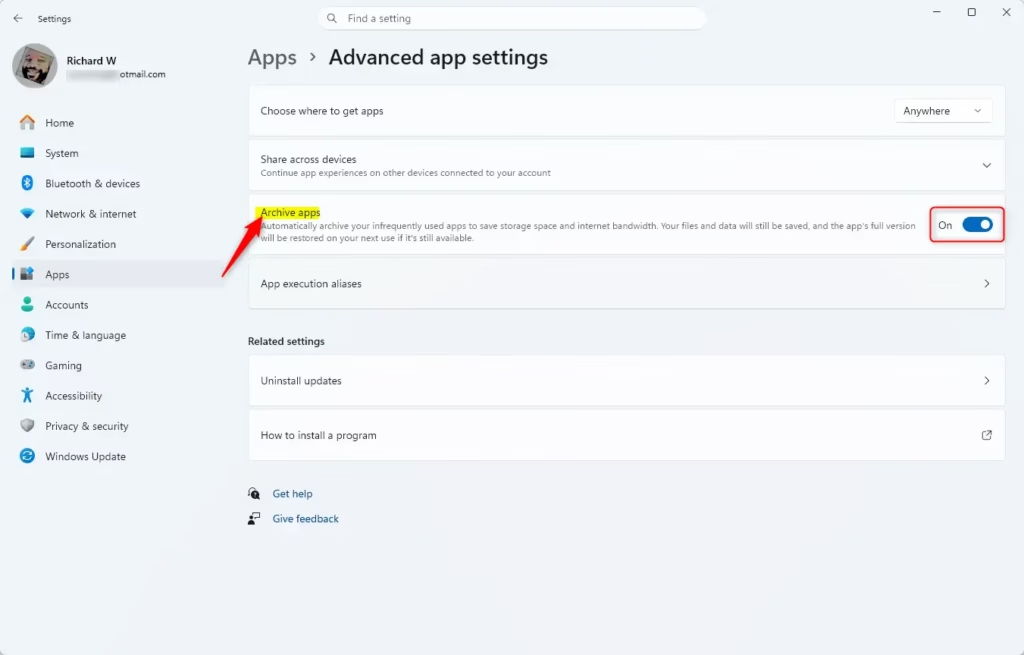
- Open Advanced app settings Find the archive apps setting on the Advanced app settings page. If you don't see it, your Windows 11 build may be too old, so run Windows Update and check again. If the setting is greyed out or says some settings are managed by your organization, a policy is controlling it. In that case use Option Three or Option Four instead.
- Turn archive apps On (this is the default) or Off, whichever you want. The switch changes right away and you don't need to click a Save button.
- Close Settings. You don't need to restart. To undo the change, come back and flip the switch the other way.
Option Two
Turn Archive Apps On or Off for a Specific Person in Registry Editor
Registry Editor is an advanced tool for changing system settings. This option uses it to turn archive apps on or off for one specific user account, rather than changing the rule for everyone. To pick the right account, you need that user's unique security number, called a Security Identifier (SID). You must be signed in as an administrator for this option.
A wrong change in the registry can cause problems that are hard to trace.
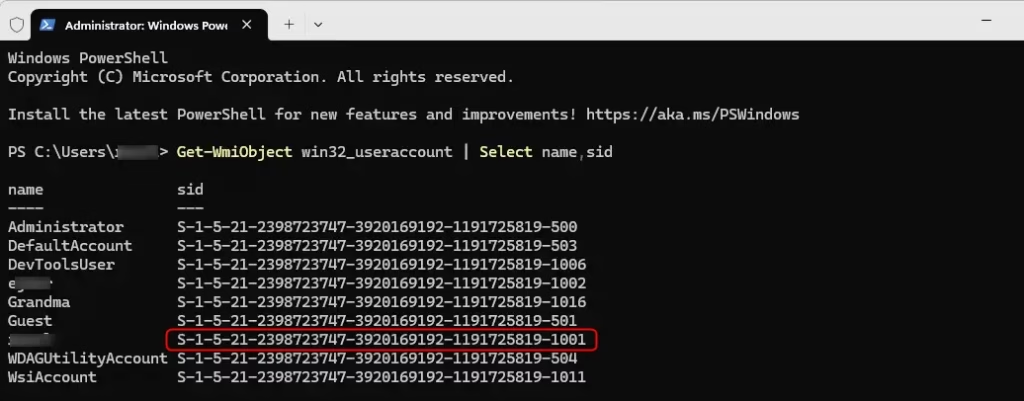
- Open Windows Terminal as administrator. Right-click the Start button and choose Terminal (Admin), then confirm the User Account Control prompt. Select Windows PowerShell if it isn't the tab that opened.
- Copy and paste the command below into PowerShell. Press Enter. The output should show the SID information for the account you need, so keep the window open or write it down.
Gather the Security Identifier (SID, a unique string of numbers and letters that identifies a user account) before making any changes.
- Open Registry Editor (regedit.exe). Click Yes if User Account Control asks for permission.
- Navigate to this location in the left pane of Registry Editor. Where the path calls for the user's SID, use the one from the previous steps. A user's SID key normally shows up under HKEY_USERS only while that account is signed in, so have that user sign in first if you can't find it.
Local Group Policy Editor controls system-wide archiving rules across Pro, Enterprise, and Education installations. Administrators govern multi-user environments efficiently through centralized policy parameters.
On Home edition, use Option Four instead.
- Open Local Group Policy Editor by pressing Win+R, typing gpedit.msc, and pressing Enter. If Windows says it can't find gpedit.msc, you are on Home edition.
- Navigate to this location in the left pane. Expand each folder in turn until you reach the last one:
Computer Configuration > Administrative Templates > Windows Components > App Package Deployment
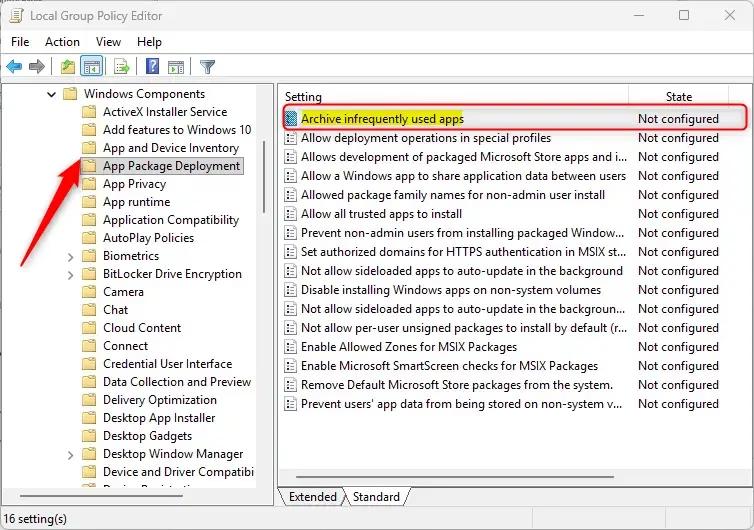
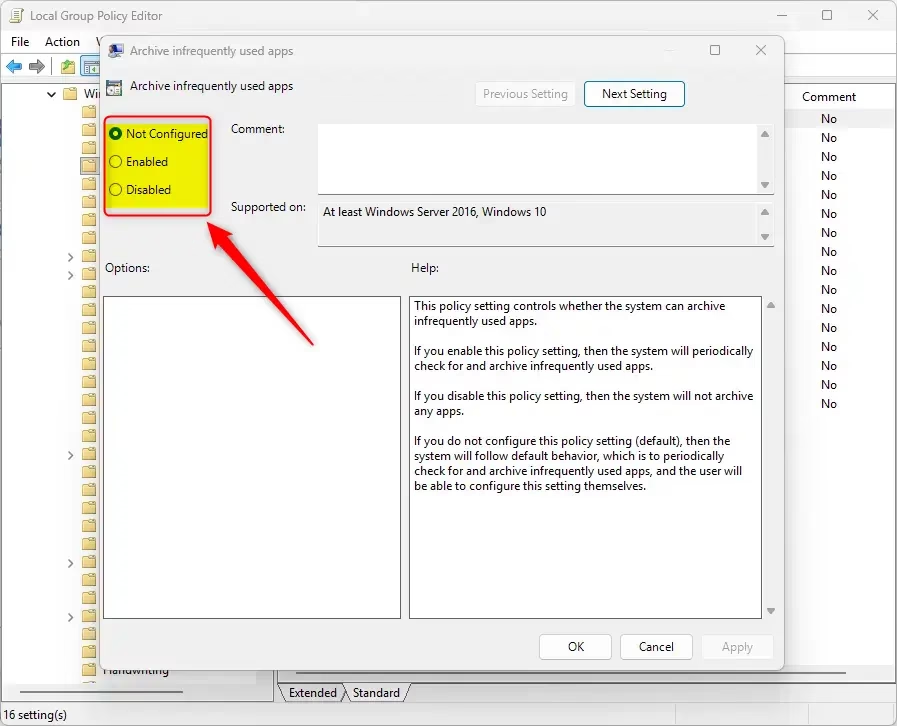
- In the right pane, double-click Archive infrequently used apps to open its settings. A policy window opens with three choices.
To Turn Archive Apps On for Everyone:
To turn archive apps on for everyone:
- Click the dot next to Enabled.
- Click OK. Go to step 8 below.
To Turn Archive Apps Off for Everyone:
To turn archive apps off for everyone:
- Click the dot next to Disabled. (see screenshot below)
- Click OK. Go to step 8 below.
To Use Default Settings (Let People Choose):
To undo a policy and let each user decide in Settings again:
- Click the dot next to Not Configured.
- Click OK. Go to step 8 below.
- Close Local Group Policy Editor. If the change doesn't seem to apply, restart the PC or sign out and back in.
Option Four
Turn Archive Apps On or Off for Everyone Using a REG File
⚠️ Admin Required: You must be signed in with an administrator account to use this option. If you are not, Windows will ask for administrator credentials or block the change.
To Turn Archive Apps On for Everyone:
reg add "HKEY_LOCAL_MACHINE\SOFTWARE\Policies\Microsoft\Windows\Appx" /v AllowAutomaticAppArchiving /t REG_DWORD /d 1 /f
To Turn Archive Apps Off for Everyone:
reg add "HKEY_LOCAL_MACHINE\SOFTWARE\Policies\Microsoft\Windows\Appx" /v AllowAutomaticAppArchiving /t REG_DWORD /d 0 /f
To Use Default Settings (Let People Choose):
reg delete "HKEY_LOCAL_MACHINE\SOFTWARE\Policies\Microsoft\Windows\Appx" /v AllowAutomaticAppArchiving /f
Summary
Managing archive apps helps you save disk space on your Windows 11 computer by shrinking programs you don't use often. Use the Settings app to change the feature for your own account. To change it for other people who share the PC, use Registry Editor or Local Group Policy Editor. Here is a quick summary of the four options:
- Option One: Use Settings for just your account. This is the easiest way.
- Option Two: Use Registry Editor to change settings for one specific person on the computer. Requires admin access.
- Option Three: Use Local Group Policy Editor to change settings for everyone. Only works on Pro, Enterprise, and Education versions. Requires admin access.
- Option Four: Use a REG file to change settings for everyone. Works on all versions. Requires admin access.
Was this guide helpful?

About the Author
Richard
Tech Writer, IT Professional
Richard is a writer at Geek Rewind who turns complex IT tasks into clear, step-by-step guides. He draws on years of hands-on experience in system administration and enterprise IT operations, focusing on Windows, Linux and WordPress: the problems people actually run into, and the fixes that work. His server and WordPress guides come from systems he runs himself. Richard builds and maintains the platform behind Geek Rewind, from its Ubuntu servers and Nginx configuration to its custom WordPress plugins. Many new tutorials start with readers' questions, and he's always glad to answer them in the comments.




No comments yet — be the first to share your thoughts!