How to Turn “Expand to Open Folder” on or off in File Explorer’s Navigation Pane in Windows 11

Expand to open folder in Windows 11 makes File Explorer highlight and expand your current folder path in the left sidebar as you browse. The sidebar is called the Navigation pane. With the option on, it always shows exactly where you are in the drive structure. If you open many directories, though, the pane can grow long and cluttered.
You can turn the setting on or off in under a minute. Use the right-click menu , File Explorer Options, the Registry Editor (a tool for changing advanced Windows settings ) or PowerShell. The setting works the same on Windows 11 Home and Pro. You can switch it back at any time by repeating the same steps.
Open File Explorer , right-click any empty space in the left sidebar, and click Expand to current folder to toggle the feature on or off. You can also open the three-dot menu, select Options, go to the View tab, and check or uncheck the expand setting to update your view.
Step 1Use the Quick File Explorer Menu
The quickest way is the right-click menu in the Navigation pane. It needs no extra windows and no administrator rights, and the change applies straight away.
- Press Win+E to open File Explorer .
- Look at the Navigation pane on the left. Right-click an empty spot in it, such as the blank area below the last item. If the pane is full, collapse a few folders or drag the pane’s edge wider to find some blank space. A small context menu appears.
- Click Expand to current folder. The menu closes, and the pane updates to match the setting you chose.
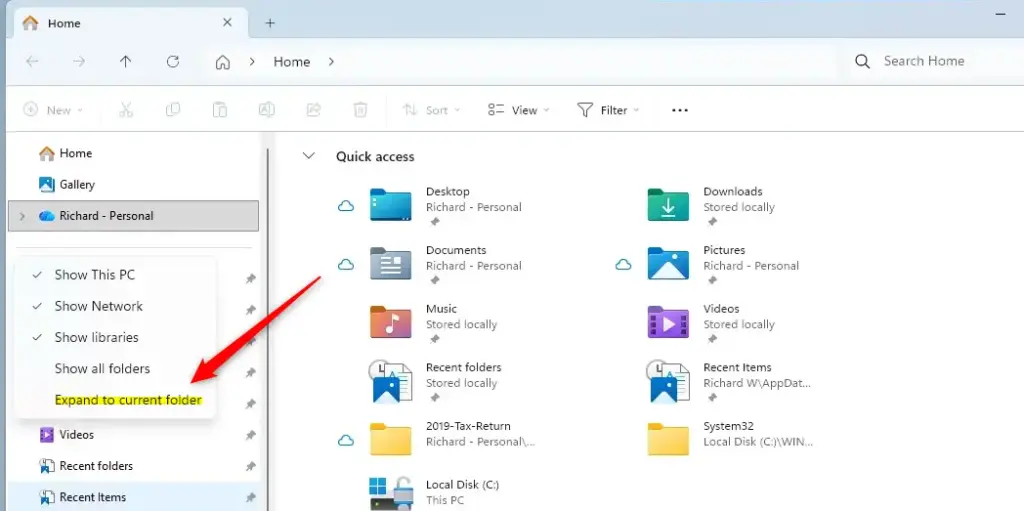
To check the current state, right-click the empty space again. A checkmark next to the option means the feature is on, so the pane expands to your current folder as you browse. No checkmark means it is off, and the pane stays as it is while you move between folders.
If other people share your computer, their File Explorer settings stay as they left them.
Step 2Adjust Settings in Folder Options
The Folder Options window is the traditional place for this setting. It is useful if you want to see it next to the other File Explorer preferences. The window is called Folder Options, and the menu item that opens it is named Options.
- Press Windows Key + E to open File Explorer.
- Click the three horizontal dots (See more) in the top toolbar. A menu opens.
- Select Options. The Folder Options window opens.
- Click the View tab at the top of the window.
- Scroll down the Advanced settings list until you find Expand to open folder. It sits in the Navigation pane group of settings.
- Select the checkbox to turn the feature on, or clear it to turn it off.
- Click Apply, then click OK. The window closes and the new setting takes effect. If an open File Explorer window does not change right away, close it and open a new one.
If the option is greyed out or missing, check that you are on the View tab and not General. Also check that you opened Options from File Explorer itself. A work or school PC may have this setting locked by policy, and in that case you need to ask your administrator.
Step 3Hide the Sidebar Completely for Maximum Focus
If the real problem is that the sidebar takes up too much room, you can hide the Navigation pane completely. This does not change the Expand to open folder setting. It only removes the pane from view. It needs no administrator rights.
- Press Windows Key + E to open File Explorer.
- Click View in the top toolbar. A menu opens.
- Hover your mouse over Show. A submenu opens.
- Click Navigation pane to remove the checkmark.
The sidebar disappears at once, and the file list gets a wider window. To bring the sidebar back, repeat the steps and click Navigation pane again so the checkmark returns. Your Expand to open folder setting is kept while the pane is hidden.
Step 4Edit the Windows Registry for Advanced Control
The Windows Registry (the central database for system settings) lets you change this setting at a lower level. It is also the method to use if you want to prepare the same value for several computers. It works on both Home and Pro editions.
Back up the registry before you change anything. In Registry Editor, click File Export to save a copy. Also make sure you have administrator rights.
- Press Windows Key + R to open the Run box.
- Type
regeditand press Enter to open the Registry Editor. Click Yes if a prompt asks for permission. - Click the address bar at the top of the Registry Editor window, paste this address, then press Enter:
HKEY_CURRENT_USER\Software\Microsoft\Windows\CurrentVersion\Explorer\Advanced. The right pane now shows the values stored in that key. - Look through the list on the right for a value named
NavPaneExpandToCurrentFolder. - If you do not see it, right-click an empty space in the right pane, select New, then click DWORD (32-bit) Value. Name the new value
NavPaneExpandToCurrentFolder. - Double-click the value. In the Value data box, type
1to turn the auto-expand feature on, or type0to turn it off. - Click OK and close the Registry Editor.
- Restart File Explorer or your computer to apply the change. Signing out and back in also works.
To undo the change, set the value back to its earlier number, or import the backup you exported before you started.
Step 5Automate the Setting Using PowerShell
PowerShell (a command-line shell for system administration) lets you apply the setting with commands instead of menus. This is handy for scripts or for setting up several computers the same way.
- Right-click the Start button and select Terminal (Admin) or PowerShell (Admin). This requires administrator privileges. Click Yes if a prompt asks for permission.
- To turn the expand folder feature on, paste these commands and press Enter after each one:
Set-ItemProperty -Path "HKCU:\Software\Microsoft\Windows\CurrentVersion\Explorer\Advanced" -Name "NavPaneExpandToCurrentFolder" -Value 1Stop-Process -Name explorer -Force - To turn the expand folder feature off, paste these commands instead and press Enter after each one:
Set-ItemProperty -Path "HKCU:\Software\Microsoft\Windows\CurrentVersion\Explorer\Advanced" -Name "NavPaneExpandToCurrentFolder" -Value 0Stop-Process -Name explorer -Force
The second command in each pair restarts File Explorer automatically, so the new sidebar setting takes effect right away. Your File Explorer windows will close and reopen briefly when this happens. Save any file operations in progress before you run it.
Summary
Controlling expand to open folder helps you keep the File Explorer sidebar tidy. You can toggle it from the right-click menu, the Folder Options window, the Windows Registry or PowerShell. The right-click menu and Folder Options are the easiest, and the Registry and PowerShell suit scripted changes.
Have a question about this guide?
Answered by AI from this guide. Good questions may be added to this page — please don't include personal details.
Did this guide fix your problem?

About the Author
Richard
Tech Writer, IT Professional
Richard is a writer at Geek Rewind who turns complex IT tasks into clear, step-by-step guides. He draws on years of hands-on experience in system administration and enterprise IT operations, focusing on Windows, Linux and WordPress: the problems people actually run into, and the fixes that work. His server and WordPress guides come from systems he runs himself. Richard builds and maintains the platform behind Geek Rewind, from its Ubuntu servers and Nginx configuration to its custom WordPress plugins. Many new tutorials start with readers' questions, and he's always glad to answer them in the comments.
No comments yet — be the first to share your thoughts!