How to Stop Users from Changing Desktop Themes in Windows 11

Windows 11 lets you change how your desktop looks using themes. A theme changes your background picture, colors, sounds and even your mouse cursor. There are many to choose from, including ones for different seasons and styles.
If you want to make sure people using your computer can’t change the desktop theme, this guide shows two ways to do it. One uses the Local Group Policy Editor and the other uses the Registry Editor. Which one you need depends on your Windows edition.
Open Local Group Policy Editor by typing Edit group policy in the Start search, then navigate to User Configuration Administrative Templates Control Panel Personalization, find Prevent changing theme, double-click it, select Enabled, and click OK. Restart your computer. Users can no longer change themes.
What Are Desktop Themes?
A Windows 11 desktop theme bundles several visual settings into one package. Knowing what a theme controls helps explain why you might want to lock it down on a shared computer, such as a family PC, a lab machine or a kiosk. Changing the theme changes all of these at once:
- Background wallpaper
- Window colors
- Sounds
- Mouse pointer style
On a shared computer, you may not want others switching the look around. Both methods below block that. They don’t change the theme that is currently applied. So set up the desktop the way you want it first, then apply the restriction.
How to Stop Users from Changing Themes Using Local Group Policy Editor
Local Group Policy Editor is the quickest way to do this on Windows 11 Pro, Enterprise and Education. It applies a system-wide restriction that blocks users from changing the theme. If you run Windows 11 Home, the editor isn’t installed and the search in step 2 will find nothing. Skip to the Registry Editor method below.
- Click the Start button (the Windows icon on the taskbar ).
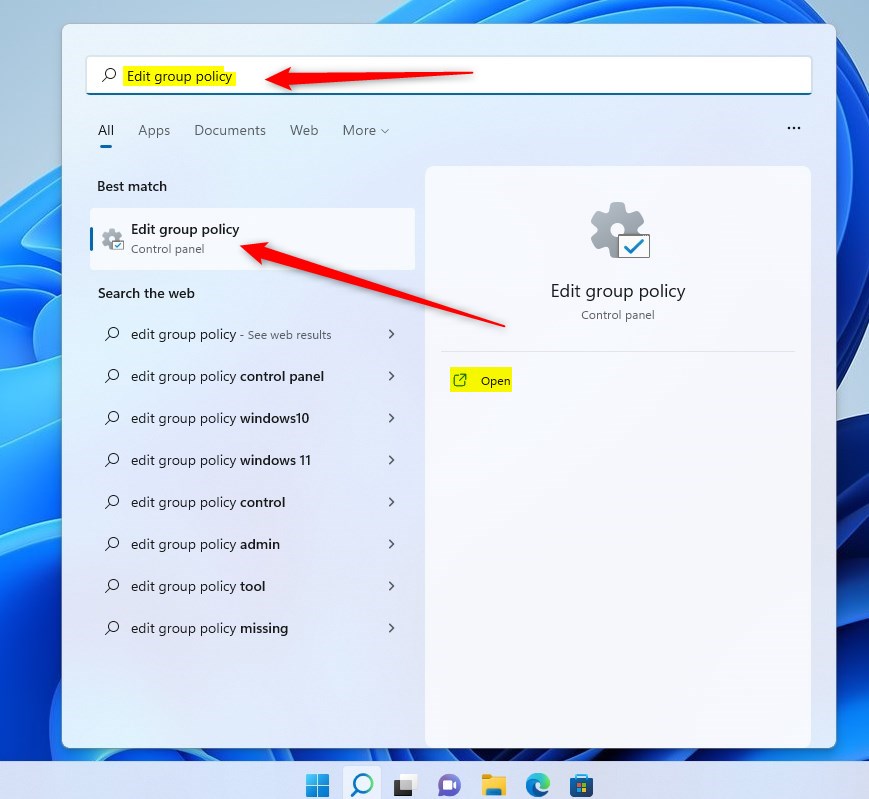
- Type
Edit group policyin the search box and press Enter. You should see the Local Group Policy Editor window open. - Look at the folder tree on the left side of the window.
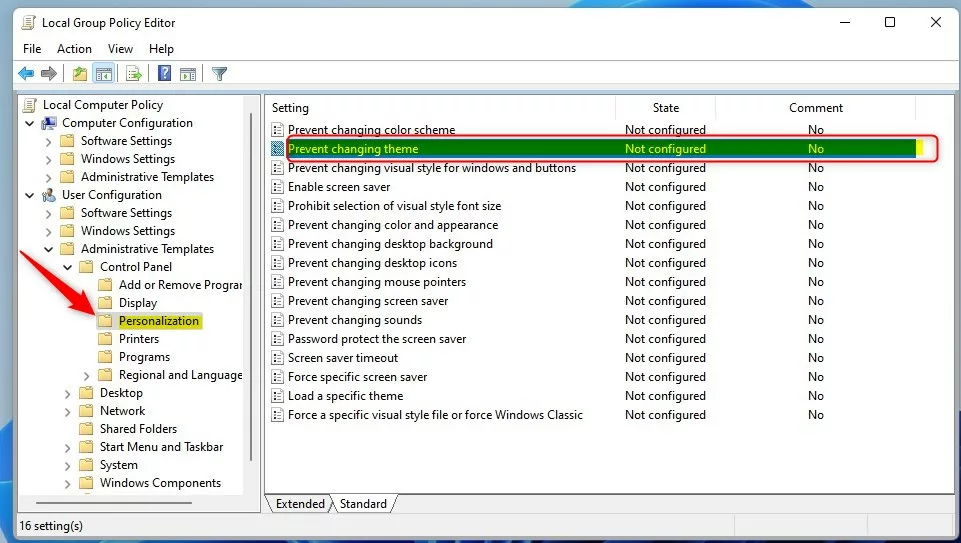
- Click the arrows to open the folders in this order:
User Configuration > Administrative Templates > Control Panel > Personalization
- On the right side, find the setting called Prevent changing theme and double-click it. A settings window opens.
- Select Enabled to stop users from changing themes.
- Click OK to save.
- Close the editor and restart your computer for the change to take effect.
After the restart, try opening the personalization settings and changing the theme. The change should be blocked. To undo it, go back to the same setting, select Not Configured, click OK and restart again.
What do the options mean?
- Not Configured: Users can change themes (default setting).
- Enabled: Users cannot change or save themes.
- Disabled: Users can change themes (same as Not Configured).
How to Stop Users from Changing Themes Using Windows Registry (If Group Policy Editor isn’t available)
You create one registry value by hand, and it enforces the same restriction for standard users. It also works on Pro and other editions if you prefer it. Be careful in the registry, because a wrong edit can cause problems. Before you start, you can back up the registry from the Registry Editor menu bar with File Export
Step 1: Open the Registry Editor.
- Press Windows key + R on your keyboard to open the Run box.
- Type
regeditand press Enter. - If User Account Control asks for permission, click Yes. The Registry Editor window should now open.
Step 2: Go to this key in the left pane:
HKEY_CURRENT_USER\Software\Microsoft\Windows\CurrentVersion\Policies\Explorer
If the Explorer key doesn't exist yet, create it. This is normal and doesn't mean anything is wrong:
- Right-click the
Policieskey. - Choose New Key
- Name the new key
Explorer. It should now appear in the left pane under its parent.
Step 3: Create the new value.
- Click the
Explorerkey in the left pane so it is selected. - Right-click an empty space in the right pane and choose New DWORD (32-bit) Value.
- Name the new value
NoThemesTab. - Double-click
NoThemesTaband set Value data to 1. - Click OK.
Step 4: Close the Registry Editor and restart your PC. The restriction takes effect after the restart.
To undo it, return to the same value and set it to the "allow" number shown below, or delete the value, then restart.

What does the value mean?
1= Prevent users from changing desktop themes.0= Allow users to change desktop themes.
Summary
- You can stop users from changing desktop themes in Windows 11.
- Use the Local Group Policy Editor if your Windows edition supports it.
- If not, use the Registry Editor method carefully.
- Always restart your computer after making these changes.
Locking down the screen appearance stops other users from altering wallpapers, colors and sounds on a shared PC. Depending on your Windows edition, you can do this in either the Local Group Policy Editor or the Registry Editor. Both changes are easy to reverse if your needs change.
Need more help? Check out this article on resetting Group Policy settings: Reset Group Policy Settings in Windows 11
Was this guide helpful?

About the Author
Richard
Tech Writer, IT Professional
Richard is a writer at Geek Rewind who turns complex IT tasks into clear, step-by-step guides. He draws on years of hands-on experience in system administration and enterprise IT operations, focusing on Windows, Linux and WordPress: the problems people actually run into, and the fixes that work. His server and WordPress guides come from systems he runs himself. Richard builds and maintains the platform behind Geek Rewind, from its Ubuntu servers and Nginx configuration to its custom WordPress plugins. Many new tutorials start with readers' questions, and he's always glad to answer them in the comments.


No comments yet — be the first to share your thoughts!