How to Add or Remove Scrollbar in Windows Terminal
Controlling the scrollbar’s appearance in Windows Terminal is possible. This guide details how to make those changes on Windows 11.
Open Windows Terminal, click the down arrow, select Settings, then navigate to Defaults Appearance Under the Window section, choose your desired scrollbar visibility from the dropdown menu and click Save.
What is Windows Terminal?
Windows Terminal is a handy app that consolidates your command-line tools, such as Command Prompt and PowerShell, into a single window. Adjusting its appearance, including the scrollbar, can make managing tasks more comfortable.
Windows Terminal offers extensive customization for its appearance and behavior. Settings include language, window size, the default profile, and startup options. A particularly handy tweak involves the scrollbar – the bar on the side of the window that aids navigation through lengthy command outputs.
Why Change the Scrollbar?
Adjusting the Windows Terminal scrollbar can significantly improve reading through long command lists. You can choose to always show, always hide, or only display the scrollbar when you move your mouse near the edge. This decision affects how much text is visible at any given moment.
How to Change the Scrollbar Visibility in Windows Terminal
Open Windows Terminal: Click the Start menu , type Terminal, and click Windows Terminal from the results.

Open Windows Terminal. Click the Start menu, type Terminal, and select Windows Terminal. Next, click the small down arrow (˅) near the top and choose Settings, or press Ctrl + Comma to open the settings menu.
Open Settings : Once Terminal is open, click the small down arrow (˅) near the top, then select Settings. Or pressCtrl + ,on your keyboard.

Open Windows Terminal. Click the Start menu, type Terminal, and select Windows Terminal. Next, click the small down arrow (˅) near the top and choose Settings, or press Ctrl + Comma to open the settings menu.
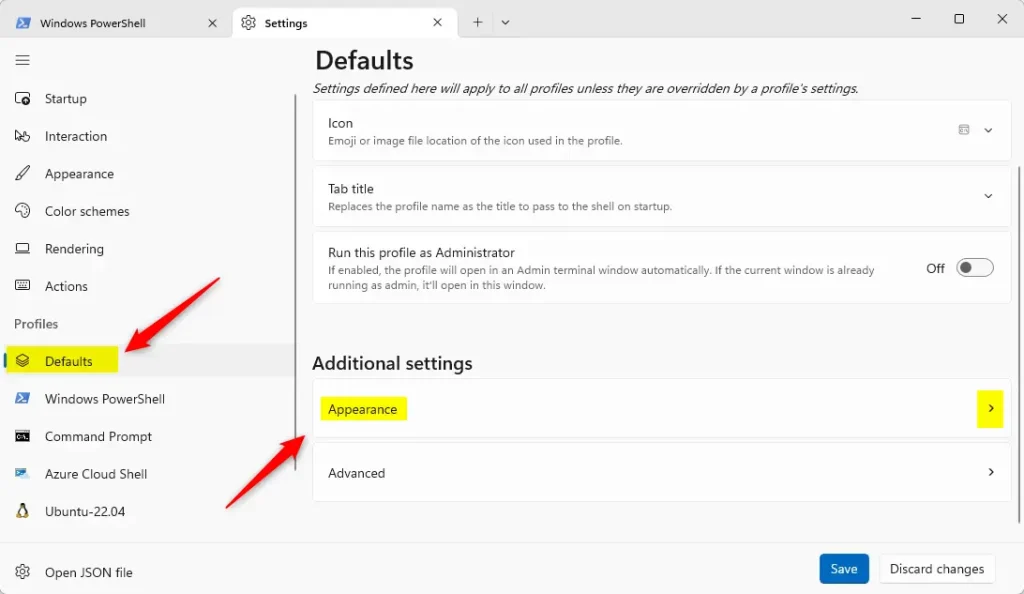
Go to Defaults & Appearance: In the Settings window, find and click on Defaults under the Profiles section on the left side. Then click on the Appearance section on the right to open it.
Open Windows Terminal. Click the Start menu, type Terminal, and select Windows Terminal. Next, click the small down arrow (˅) near the top and choose Settings, or press Ctrl + Comma to open the settings menu.
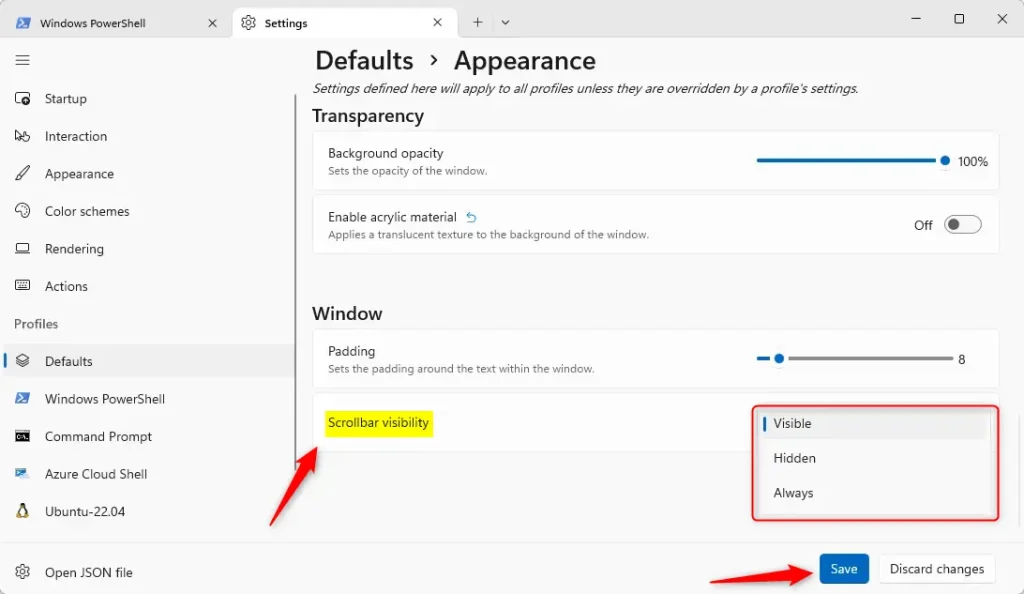
Change Scrollbar Visibility: Scroll down until you see Scrollbar visibility under the Window section. Click the dropdown menu and choose one of these options:
- Visible (default): Scrollbar appears only when you move your mouse near the edge.
- Hidden: Scrollbar is always hidden.
- Always: Scrollbar is always visible.
Open Windows Terminal. Click the Start menu, type Terminal, and select Windows Terminal. Next, click the small down arrow (˅) near the top and choose Settings, or press Ctrl + Comma to open the settings menu.
Save your changes: Click the Save button at the bottom right to apply your new scrollbar setting.
That's it! Your scrollbar will now behave the way you want.
Summary
Windows Terminal's settings menu allows users to control when scrollbars appear. This adjustment impacts how users navigate long outputs, offering a visual guide to viewing more content.
If you have questions or want to share your tips, leave a comment below!
Was this guide helpful?

About the Author
Richard
Tech Writer, IT Professional
Richard, a writer for Geek Rewind, is a tech enthusiast who loves breaking down complex IT topics into simple, easy-to-understand ideas. With years of hands-on experience in system administration and enterprise IT operations, he’s developed a knack for offering practical tips and solutions. Richard aims to make technology more accessible and actionable. He's deeply committed to the Geek Rewind community, always ready to answer questions and engage in discussions.


No comments yet — be the first to share your thoughts!