How to Schedule Automatic Shutdown on Windows 11

Automatic shutdown on Windows 11 lets your PC turn itself off at a set time. It saves power and stops the computer from running all night. You can set it up with two built-in tools: the Run dialog for a one-off timer, and Task Scheduler for a repeating schedule. Neither needs extra software.
Save your files before the timer runs out. Open apps close without warning when the countdown ends, and any unsaved work is lost.
Press Win+R, type shutdown -s -t 3600 and press Enter to schedule a one-time shutdown in one hour. For a daily automatic shutdown, open Task Scheduler, create a new task with the shutdown command, and set it to run at your chosen time on the Triggers tab.
Method 1Using the Run Dialog (Quick Shutdown Timer)
Use the Run dialog when you want a quick, one-time shutdown timer. It works on both Home and Pro and does not need an administrator account. It runs once. When the PC shuts down, the timer is gone, so use Task Scheduler (below) if you want a daily routine.
- Press Win+R on your keyboard. The Run dialog opens in the bottom-left corner of the screen.
- Type
shutdown -s -t 3600in the Open box and press Enter. The number 3600 is in seconds, so this shuts the PC down in one hour. To pick another delay, change the number: 1800 is 30 minutes, 7200 is two hours. - Look for the notification that appears in the corner of the screen. It tells you when the PC will turn off. If you don’t see it, the timer is still running. Notifications can be hidden by Focus assist or Do not disturb.
How to cancel a scheduled shutdown
If you change your mind, you can stop the timer at any point before it reaches zero.
- Press Win+R to open the Run dialog again.
- Type
shutdown /aand press Enter. - Watch for a notification saying the scheduled shutdown was cancelled. The timer is aborted immediately and the PC stays on. If nothing seems to happen, there may have been no active timer to cancel, or the countdown had already finished.
Method 2Using Task Scheduler for Daily Automation
Task Scheduler is a built-in Windows tool for running automated tasks. You can use it to shut your PC down every day at the same time without third-party software. It is included in Windows 11 Home and Pro. This method gives you full control over your daily routine, so the machine never stays on overnight by accident.
The task you build is made of three parts: a name and security settings (General), a time (Triggers) and the shutdown command itself (Actions). A fourth tab, Conditions, controls power behavior. The steps below go through each one in order.
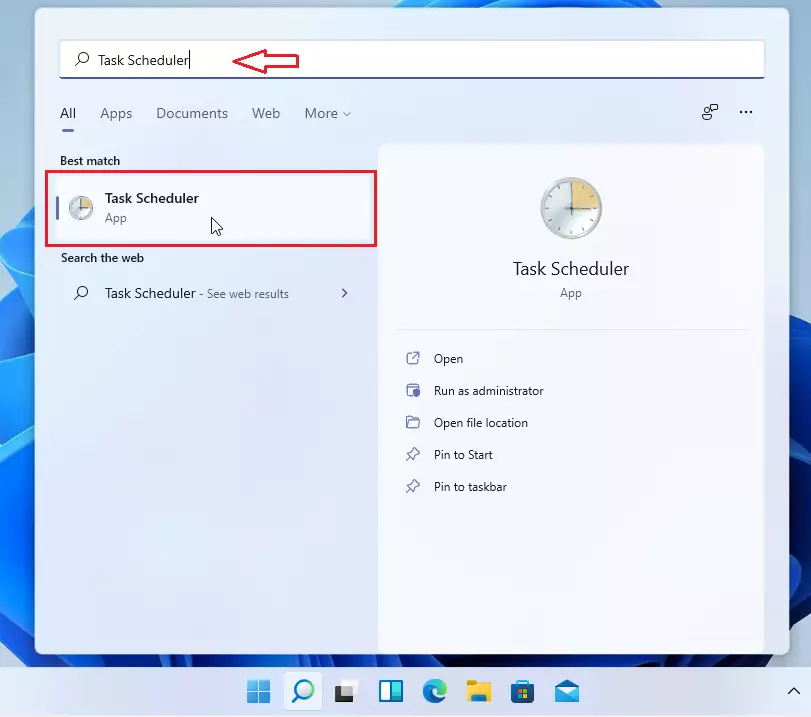
- Click the Start button.
- Type Task Scheduler in the search box.
- Click Task Scheduler in the results. The Task Scheduler window opens.
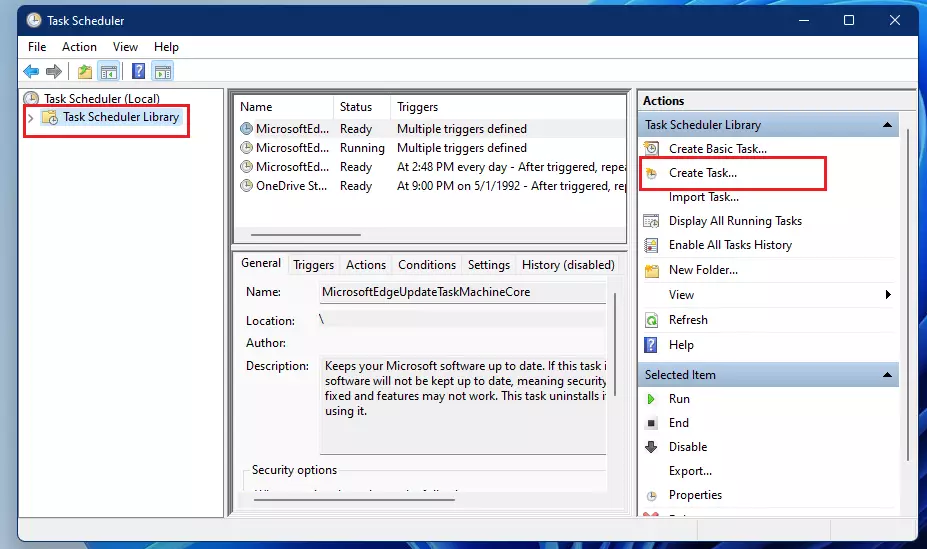
- In the left pane, select Task Scheduler Library.
- In the Actions pane on the right side of the window, click Create Task. Pick Create Task, not Create Basic Task, because you need the extra settings on its tabs.
A new window named Create Task opens, with the tabs General, Triggers, Actions, Conditions, Settings and History.
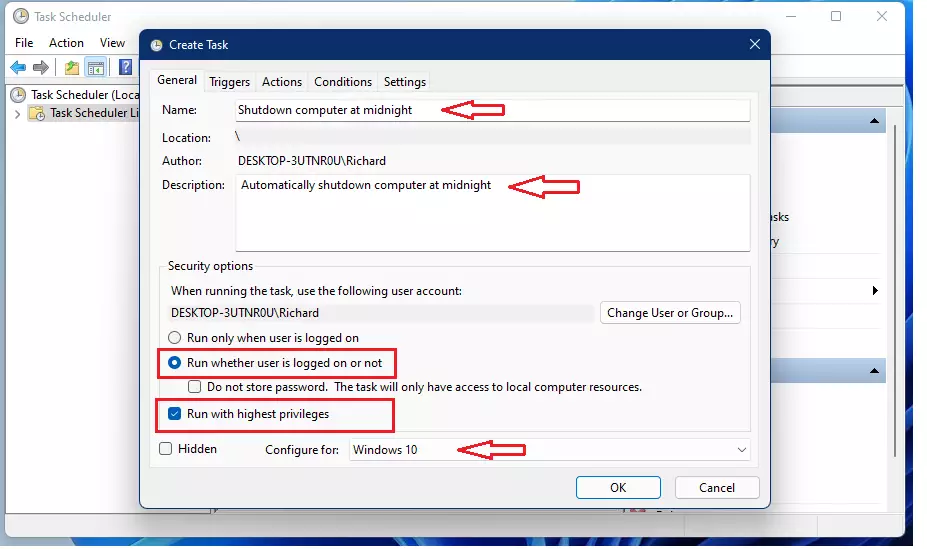
In the Create Task window, start on the General tab and set the following:
- On the General tab, type a name for your task in the Name box, for example "Nightly Shutdown". Pick something you will recognize later.
- Select Run whether user is logged on or not. This lets the shutdown happen even if you are signed out. Windows will ask for your account password when you save the task. A account with no password usually cannot use this option.
- Check the box for Run with highest privileges. This step requires admin privileges, so you need to be signed in with an administrator account.
- Set Configure for to Windows 10 or Windows 11. On some Windows 11 builds the list shows only "Windows 10". Choose that. It works on Windows 11 too.
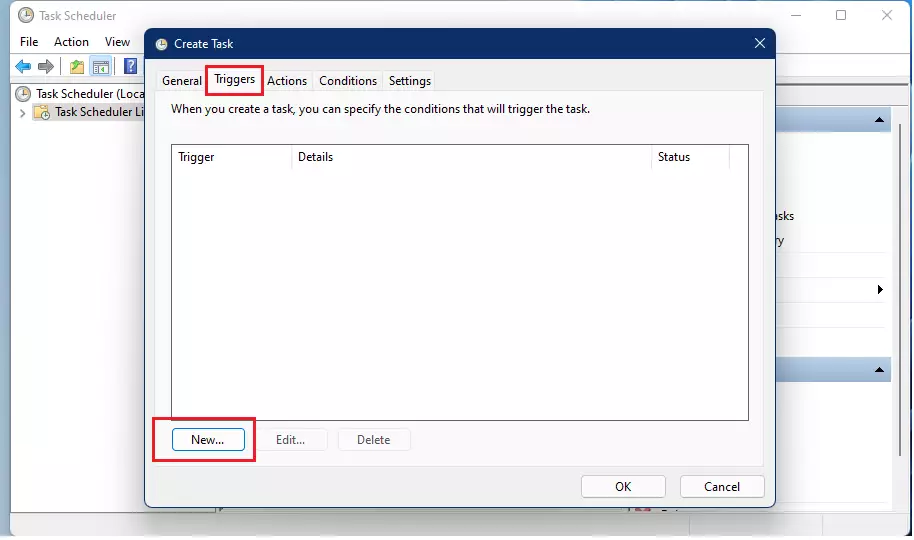
- Click the Triggers tab.
- Click the New button at the bottom. The New Trigger window opens.
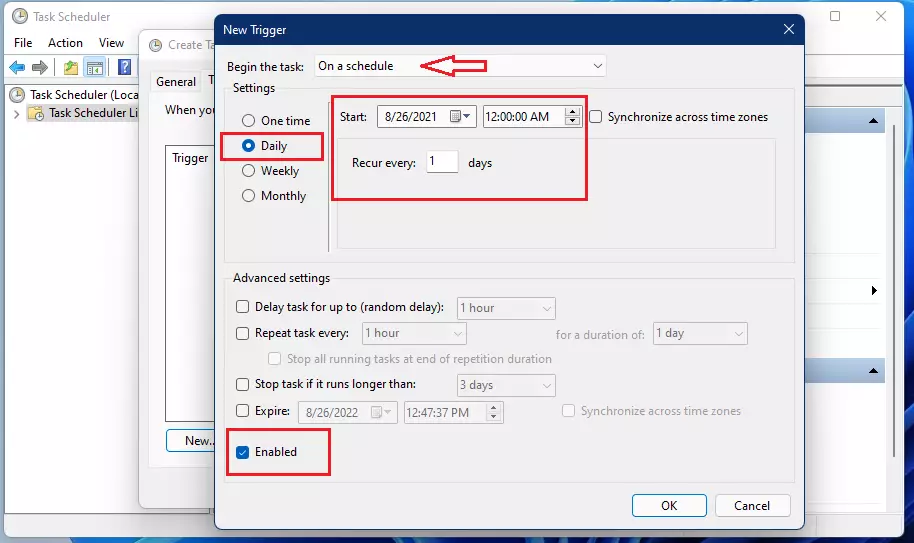
In the New Trigger window, set the following:
- Set Begin the task to On a schedule.
- Under Settings, select Daily. Leave Recur every at 1 days for a nightly shutdown.
- Pick your preferred time in the Start field. Time is in 12-hour format by default, so check AM and PM. Leave enough time to finish your work and save your files.
- Make sure the Enabled box at the bottom is checked. If it is cleared, the trigger exists but never fires.
- Click OK. The trigger now appears in the list on the Triggers tab.
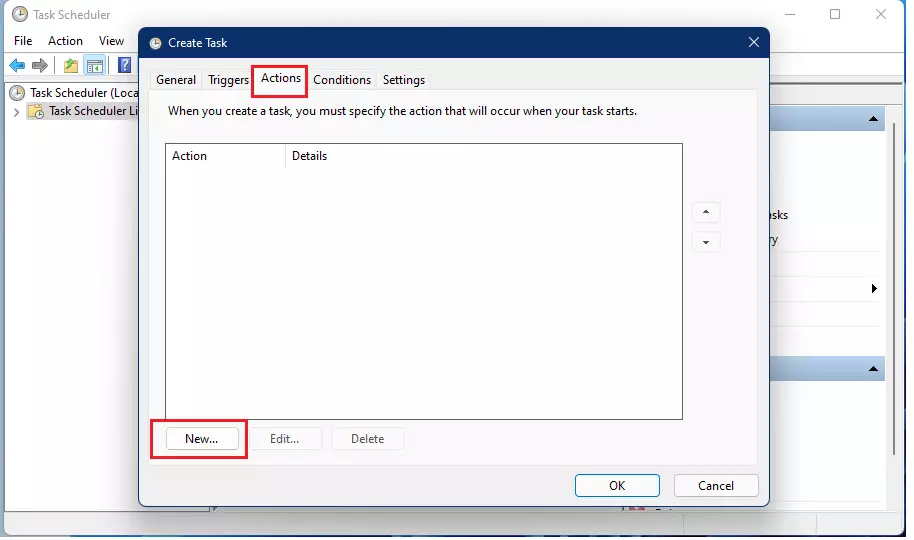
- Click the Actions tab.
- Click the New button. The New Action window opens.
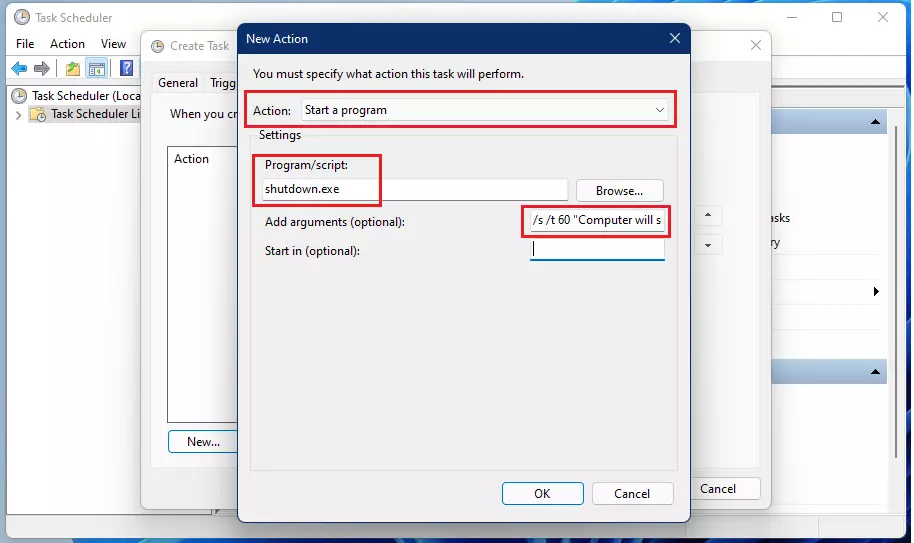
In the New Action window, set the following:
- Keep Action set to Start a program. This is the default.
- In the Program/script box, type:
shutdown.exe - In the Add arguments (optional) box, type:
/s /t 60 /c "Computer will shutdown in 60 seconds" - Click OK. The action now appears in the list on the Actions tab. If a typo slips into the program or arguments, the task will run but nothing will shut down, so check both boxes before you continue.
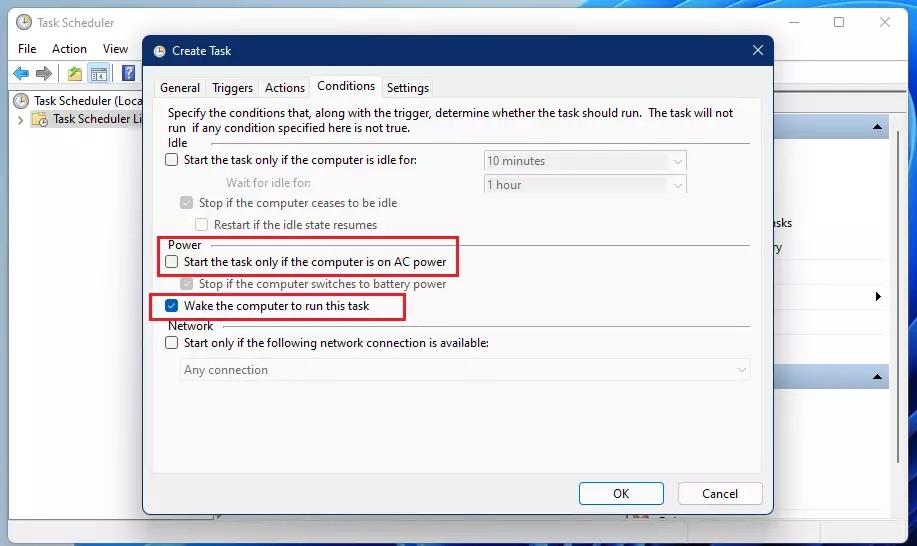
The Conditions tab has the power settings that matter for a shutdown task. Make these changes:
- Click the Conditions tab.
- Uncheck Start the task only if the computer is on AC power. This option is checked by default on laptops. Leaving it on means the shutdown is skipped when the laptop runs on battery.
- Check Wake the computer to run this task. This lets the PC wake from sleep to run the shutdown. It depends on your power settings allowing wake timers, so it may not work on every machine.
- Click OK to save the task.
These changes make sure the scheduled shutdown happens even if the computer is unplugged.
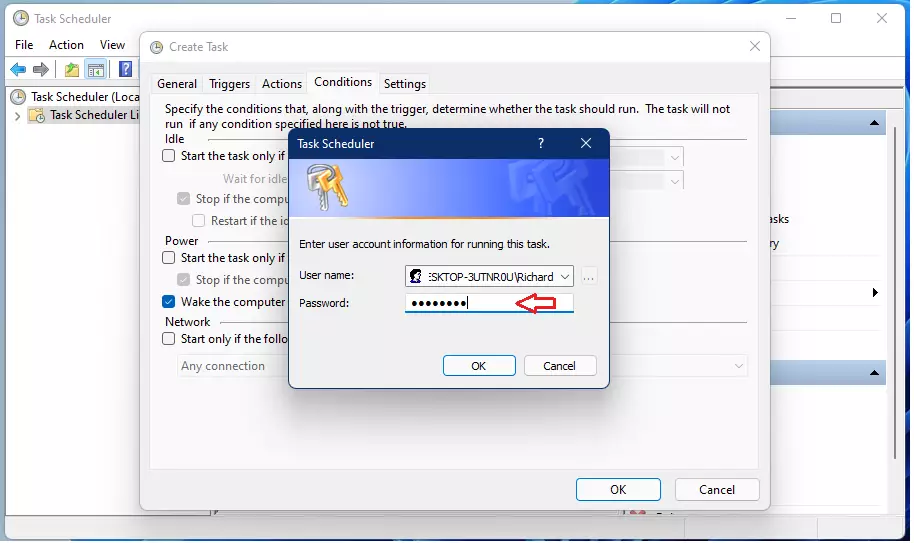
Type it and confirm. You need administrator permissions for this. If the password is rejected, check that you are using the right account and that it has a password set.
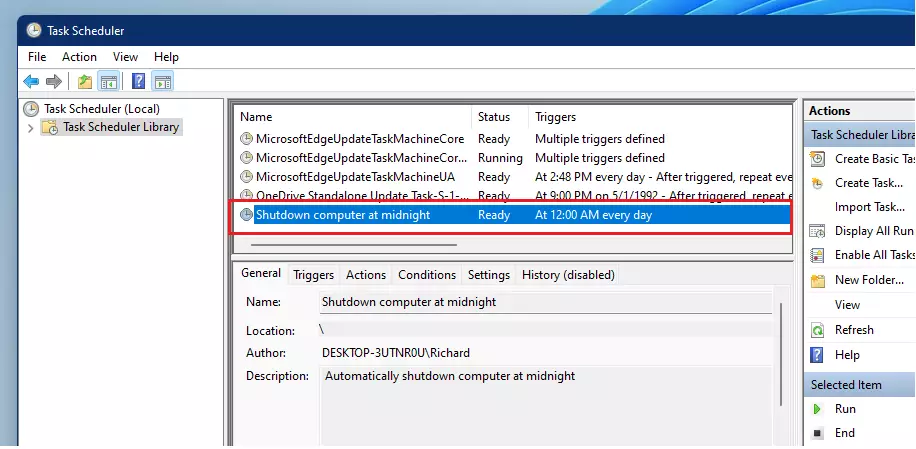
Once saved, the shutdown task appears in the Task Scheduler Library list. From there you can view and manage the scheduled automatic shutdown for your Windows 11 computer.
To remove it completely, right-click the task and choose Delete. No restart is needed for either change. The first time, you can check that it works by setting the trigger a few minutes ahead and saving your work before the time arrives.
Summary
Summary: setting up an automatic shutdown saves power and turns off your computer on schedule. Use the Run dialog for a one-off timer and cancel it any time before it ends. Use Task Scheduler when you want the same shutdown every day.
Was this guide helpful?

About the Author
Richard
Tech Writer, IT Professional
Richard is a writer at Geek Rewind who turns complex IT tasks into clear, step-by-step guides. He draws on years of hands-on experience in system administration and enterprise IT operations, focusing on Windows, Linux and WordPress: the problems people actually run into, and the fixes that work. His server and WordPress guides come from systems he runs himself. Richard builds and maintains the platform behind Geek Rewind, from its Ubuntu servers and Nginx configuration to its custom WordPress plugins. Many new tutorials start with readers' questions, and he's always glad to answer them in the comments.



[…] Windows, which uses an app called Task Scheduler, Ubuntu Linux uses a job scheduler called […]
[…] on your hard drive before turning off the computer. On most PCs, one can resume using the power button. Sometimes, pressing any key on the keyboard or opening a lid on the laptop may wake the PC […]
[…] from where you left off without losing your work or sessions. On most PCs, one can resume using the power button. Pressing any key on the keyboard or opening a lid on the laptop may wake the PC from […]
[…] open the Task Scheduler in Windows. In Windows 11, go to the Start Menu, then search for and open the Task Scheduler […]
[…] most PCs, one can resume using the power button. However, in many cases, pressing any key on the keyboard or opening a lid on the […]