How to Change When Your Windows 11 Computer Goes to Sleep
You can change your Windows 11 computer’s sleep timer. This prevents it from shutting down too soon or staying on longer than you’d prefer.
The sleep setting decides how long your PC waits before it automatically enters a low-power state to save energy.
You can adjust this to keep your system active during important tasks, boosting productivity, or conserve power when you step away.
In Windows 11, you’ll usually find this setting within the Power & Battery options, often under Screen and sleep.
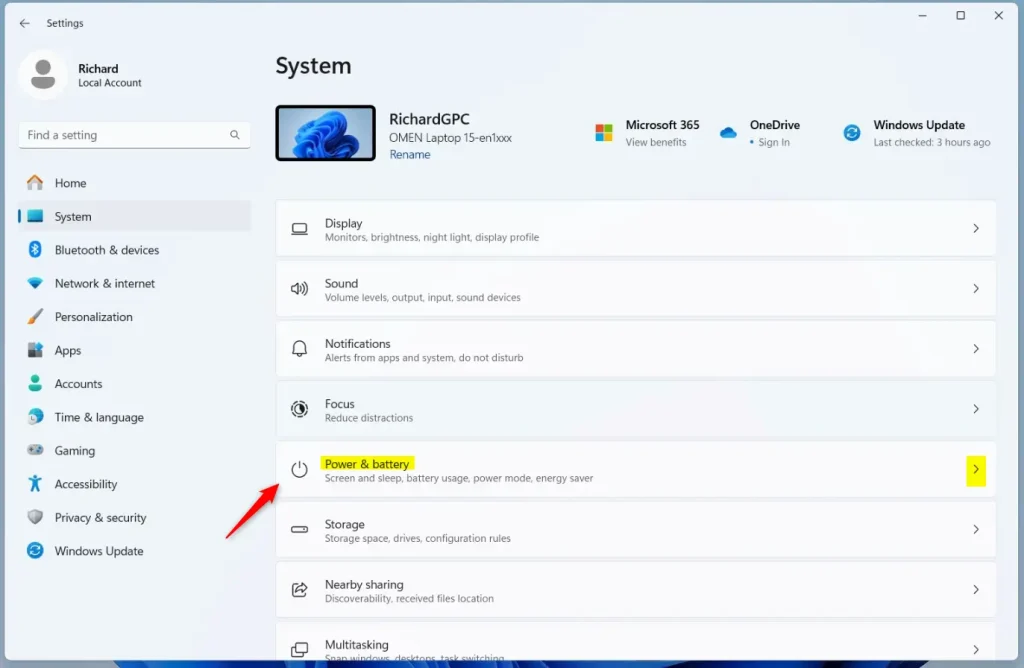
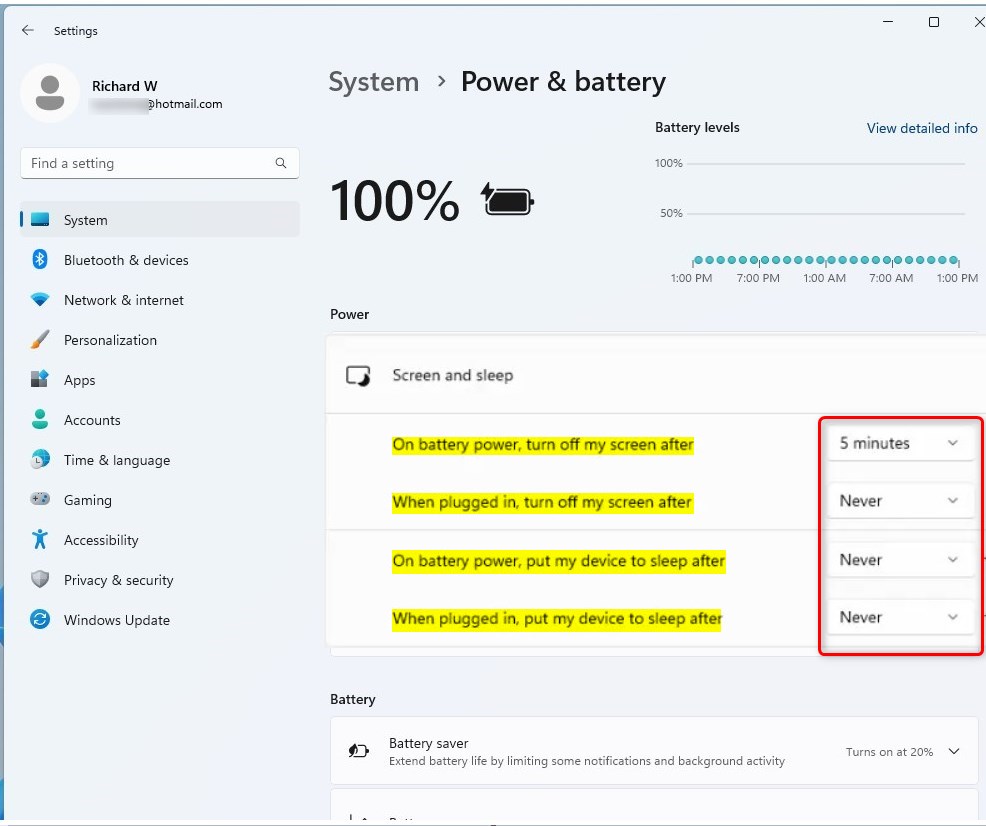
Open Settings, go to System, then Power & battery, and click Screen and sleep. Adjust the dropdown menus for “On battery power” and “When plugged in” to set your desired sleep timeout, or select “Never” to disable automatic sleep.
What is Sleep Mode?
Windows sleep mode is a power-saving feature that lets your computer rest while keeping it ready to wake up instantly, just like pausing a video.
Use Sleep mode when you’ll be away from your computer for a short while.
How to Change Sleep Timeout – The Easy Way
- Open Settings: Press Windows key + I on your keyboard.
- Click System on the left menu, then select Power & battery (or just Power if you don’t see battery options).
- Click Screen and sleep to expand the options.
- Here you can set how long your PC waits before it goes to sleep:
- On battery power, put my device to sleep after: Choose how many minutes or hours your laptop waits when not plugged in.
- When plugged in, put my device to sleep after: Choose how long your PC waits before sleeping when it’s plugged into power.
Changing when your Windows 11 computer goes to sleep is simple using the Settings app, allowing you to adjust the Windows 11 sleep timeout for battery or plugged-in power.
- Close Settings when you’re done.
Alternative: Change Sleep Settings Using Control Panel
- Open the Control Panel by searching for it in the Start menu.
- Set the view to Small icons or Large icons if it’s not already, then click Power Options.
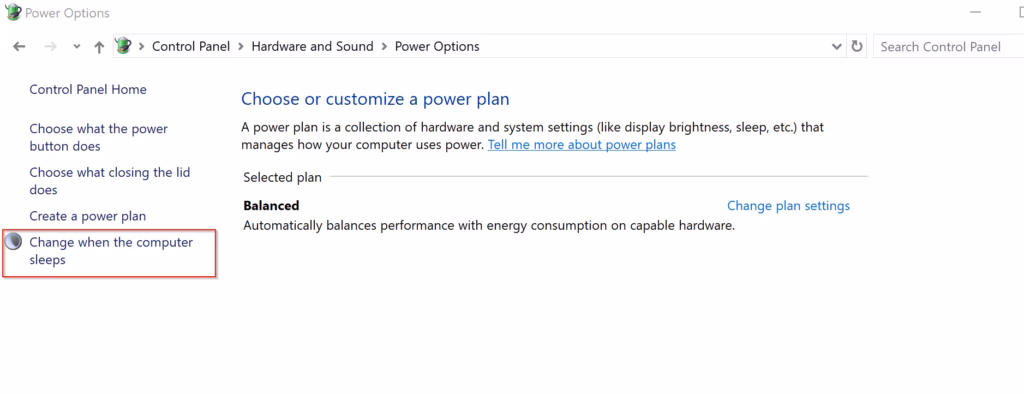
- Click Choose when the computer sleeps on the left side.
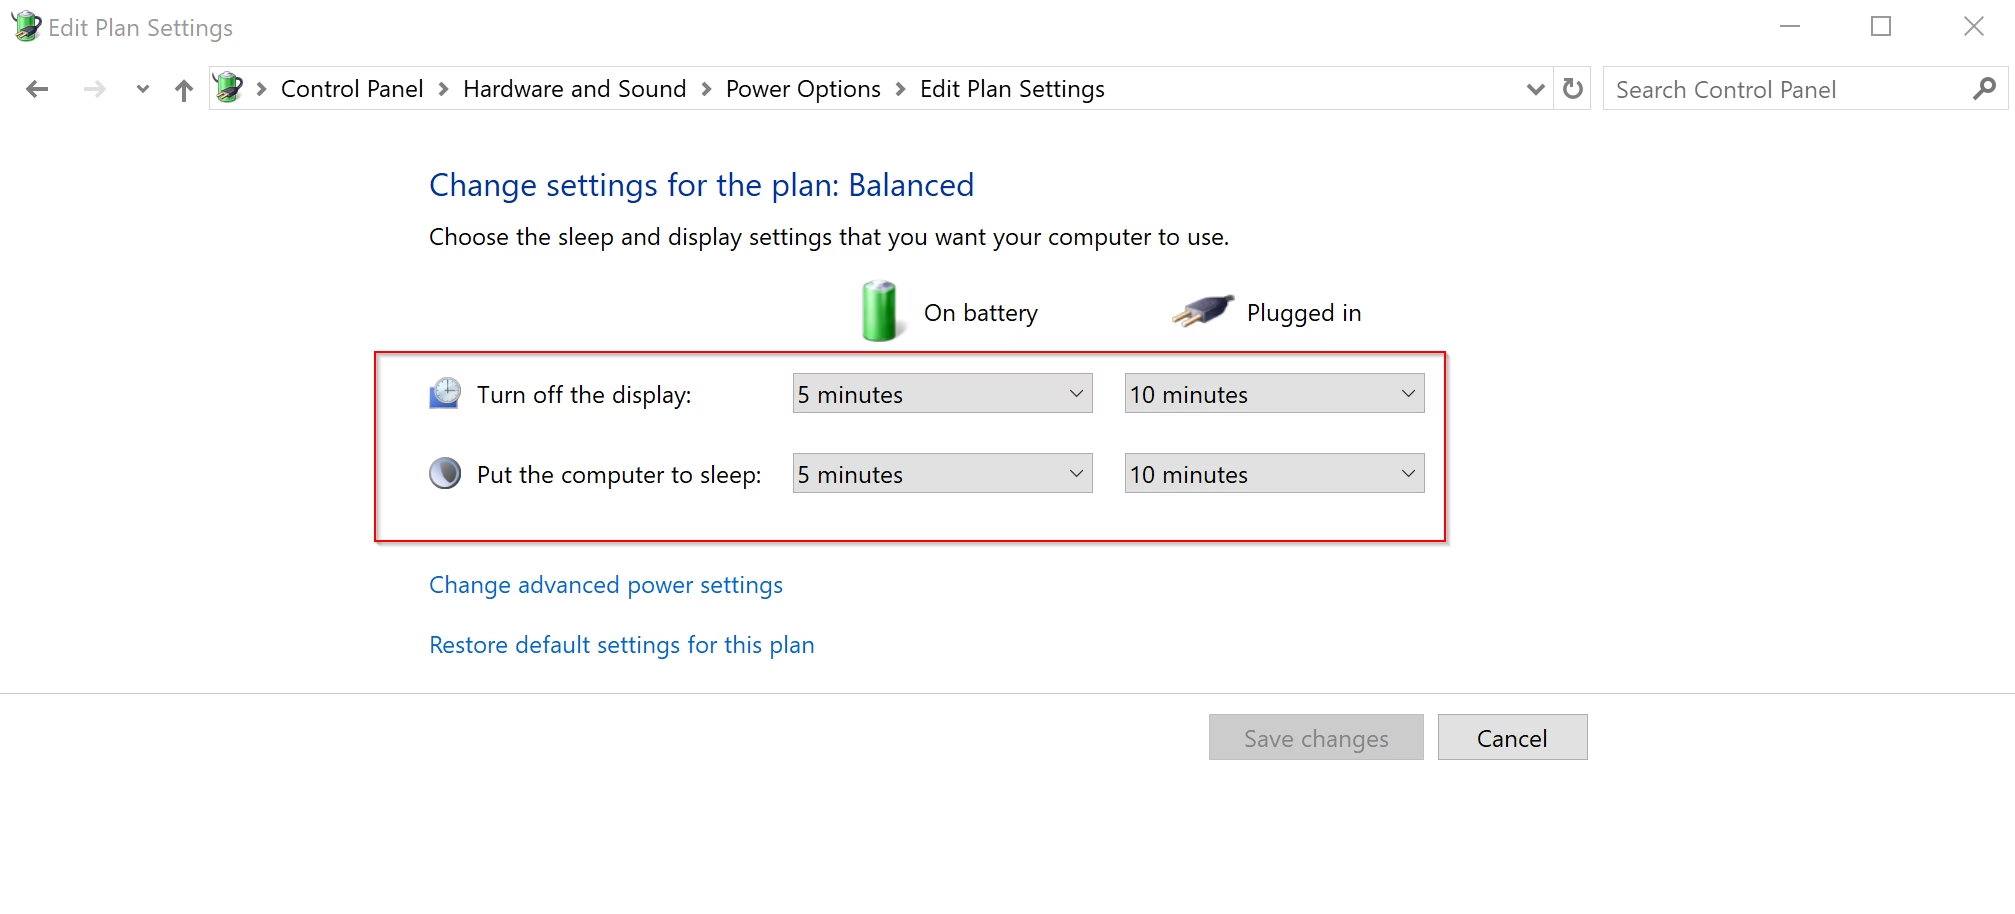
- Use the drop-down menus to pick how many minutes or hours before sleep for both On battery and Plugged in (if available). Select Never if you don’t want automatic sleep.
- Click Save changes.
- Close Control Panel when finished.
If you prefer the classic interface, you can adjust your Windows 11 sleep timeout settings using the Control Panel, offering a familiar way to manage power options.
Advanced Option: Use Power Plan Settings
- Open Control Panel and go to Power Options.
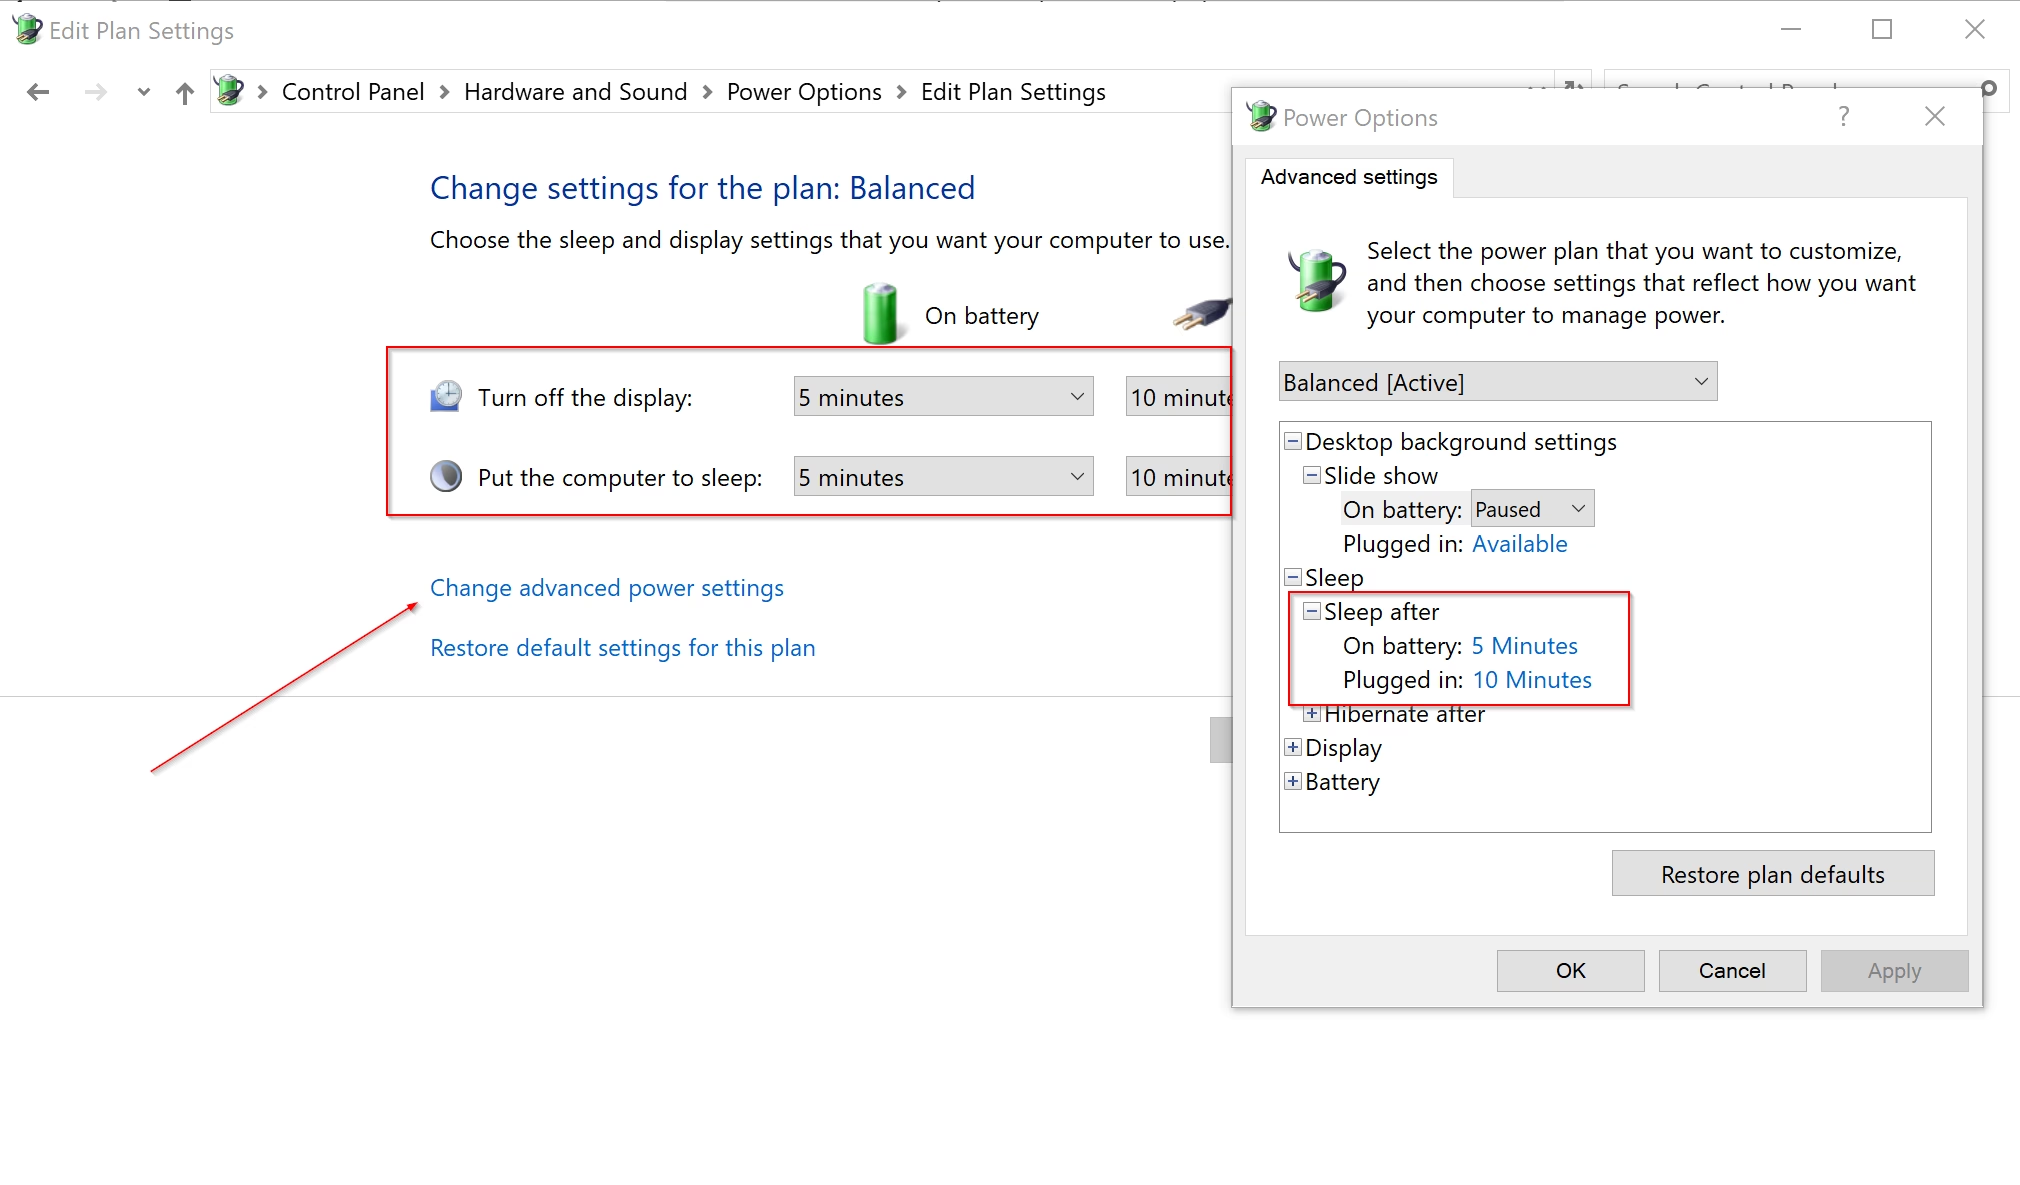
- Click Change plan settings next to your current power plan.
- Select Change advanced power settings.
- Scroll down and click the plus (+) next to Sleep, then expand Sleep after.
- Set how many minutes or hours before sleep for On battery and Plugged in. Choose Never by entering 0.
- Click OK to save.
- Close Control Panel if you want.
For more detailed control over your Windows 11 sleep timeout, you can access advanced power plan settings through the Control Panel to fine-tune sleep durations for different power states.
For more detailed control over your Windows 11 sleep timeout, you can access advanced power plan settings through the Control Panel to fine-tune sleep durations for different power states.
Use Command Prompt to Change Sleep Timeout (For Advanced Users)
Advanced users can quickly adjust the Windows 11 sleep timeout using Command Prompt or PowerShell with simple commands, offering a fast way to manage power settings without the graphical interface.
powercfg -change -standby-timeout-dc <minutes>
This command sets the sleep time when your device is running on battery power (this applies to laptops).
powercfg -change -standby-timeout-ac <minutes>
This command sets the sleep time when your device is plugged in.
Replace <minutes> with the number of minutes you want your PC to wait before going to sleep. Use 0 if you want it to never sleep.
For example, to set the sleep timeout to 30 minutes when plugged in, type:
powercfg -change -standby-timeout-ac 30
Note: Desktop PCs typically don’t have separate settings for battery and plugged-in power.
Summary
- Save Energy: Sleep mode helps your PC save power and protect your battery.
- Customize: You can pick how long your computer waits before sleeping.
- Easy to Change: Change sleep settings in Settings, Control Panel, or even with commands.
- Protect Your Work: Windows saves your work automatically in sleep mode.
- More Help: Check Microsoft’s official guide if you want to learn more.
Understanding how to change your Windows 11 sleep timeout helps you balance energy saving with convenience, ensuring your computer sleeps when you want it to and protects your work.
Was this guide helpful?

About the Author
Richard
Tech Writer, IT Professional
Richard, a writer for Geek Rewind, is a tech enthusiast who loves breaking down complex IT topics into simple, easy-to-understand ideas. With years of hands-on experience in system administration and enterprise IT operations, he’s developed a knack for offering practical tips and solutions. Richard aims to make technology more accessible and actionable. He's deeply committed to the Geek Rewind community, always ready to answer questions and engage in discussions.


No comments yet — be the first to share your thoughts!