Optimize RAM Usage in Microsoft Edge with Resource Controls

- 11 steps
- Needs administrator rights
Resource Controls in Microsoft Edge limit how much computer memory the browser can use at once, so it is less likely to slow down your PC. Edge runs on the Chromium engine, the open-source core behind several major web browsers. Chromium-based browsers can use a lot of RAM when you open many tabs, because each tab and extension often runs in its own process.
Turning on these limits keeps more RAM free for your games and other desktop programs, so the system stays fast and responsive. This tutorial covers the settings inside Edge first, then a registry method for administrators.
To control RAM usage in Microsoft Edge, open Settings, click System and performance, then turn on Resource controls. Use the slider to set the maximum percentage of available system RAM Edge can use, and choose whether the limit applies only during PC gaming or always.
Turn On or Off Resource Controls for Microsoft Edge
You can manage how much memory Edge uses directly in the browser settings. The path is the main menu, then Settings, then the System and performance page. You don’t need administrator rights for this method, and the changes apply only to your own Edge profile.
If a setting described below is missing, update Edge first and check again. Edge normally updates itself, but it only installs the update after a restart of the browser.
- Open the Microsoft Edge browser.
- Click the three dots in the top right corner (or press Alt+F) and select Settings. The Edge Settings page opens in a new tab.

- On the left menu, click System and performance. If you don’t see the left menu, the window may be too narrow. Widen it, or click the menu icon at the top left of the Settings page.
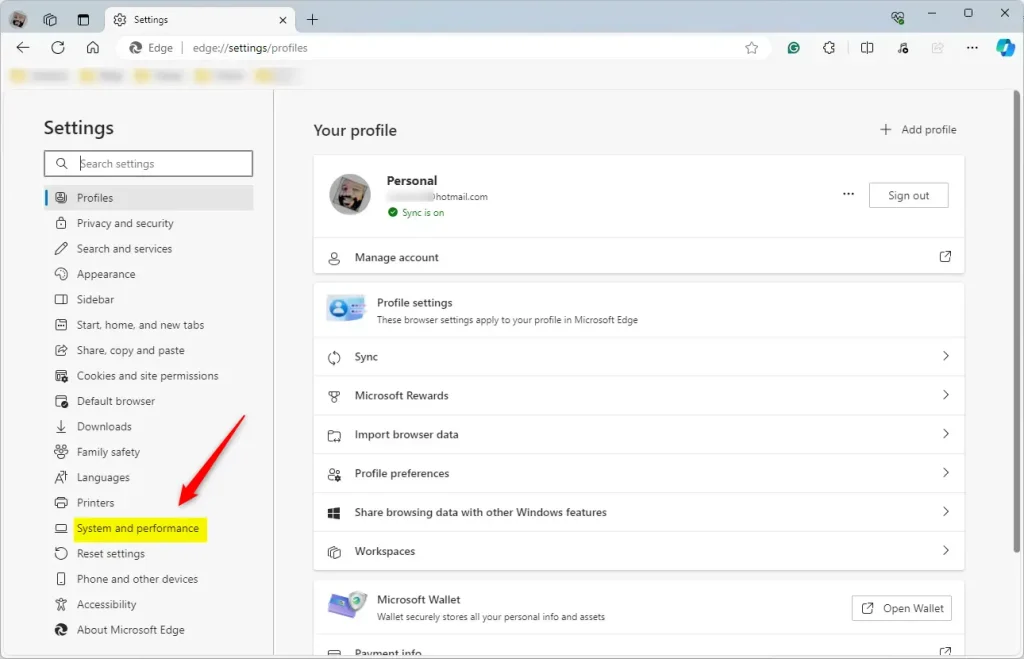
Under the “Manage your performance” section, you should now see the controls for Memory Saver and Resource controls. If Resource controls is missing, your Edge version probably doesn’t include it yet. Update Edge and restart it, then look again.
Understanding Memory Saver vs. Efficiency Mode
Memory Saver and Efficiency Mode are the two main Edge controls for saving system resources. Memory Saver frees up memory from inactive background tabs. Efficiency Mode reduces overall browser activity to save power and keep your system responsive during heavy use. They do different jobs, and you can use them together.
- Memory SaverThis mode frees up memory from inactive tabs. You can choose Balanced, which saves memory while keeping your current tabs responsive, or Efficiency, which is more aggressive and prioritizes saving resources above all else. When you go back to a tab that was put to sleep, it may reload, so unsaved form data on that page can be lost. Pick Balanced if that bothers you.
- Efficiency ModeThis is a broader setting that helps optimize your PC’s power usage and battery life while Edge is running. It works in tandem with Memory Saver to ensure the browser does not hog resources while you are multitasking. On a desktop PC you may notice little difference. On a laptop running on battery, it matters more.
Setting Your RAM Limits
Setting a specific RAM limit stops Edge from taking over your system memory when you run heavy apps or games. You turn on Resource controls, choose when the limit applies, and use the slider to set the maximum amount of RAM Edge may use.
- Under “Manage your performance”, turn the Resource controls switch to On. The related options appear below it.
- Choose when the limit applies: Only during PC gaming or Always. Pick Always if other heavy programs, not just games, compete with Edge for memory.
- Move the slider to pick the maximum amount of available system RAM (memory) Edge can use. Don’t set it too low. A very small cap makes Edge discard tabs constantly, and pages will keep reloading.
To undo this, turn the Resource controls switch back to Off. No restart is needed.
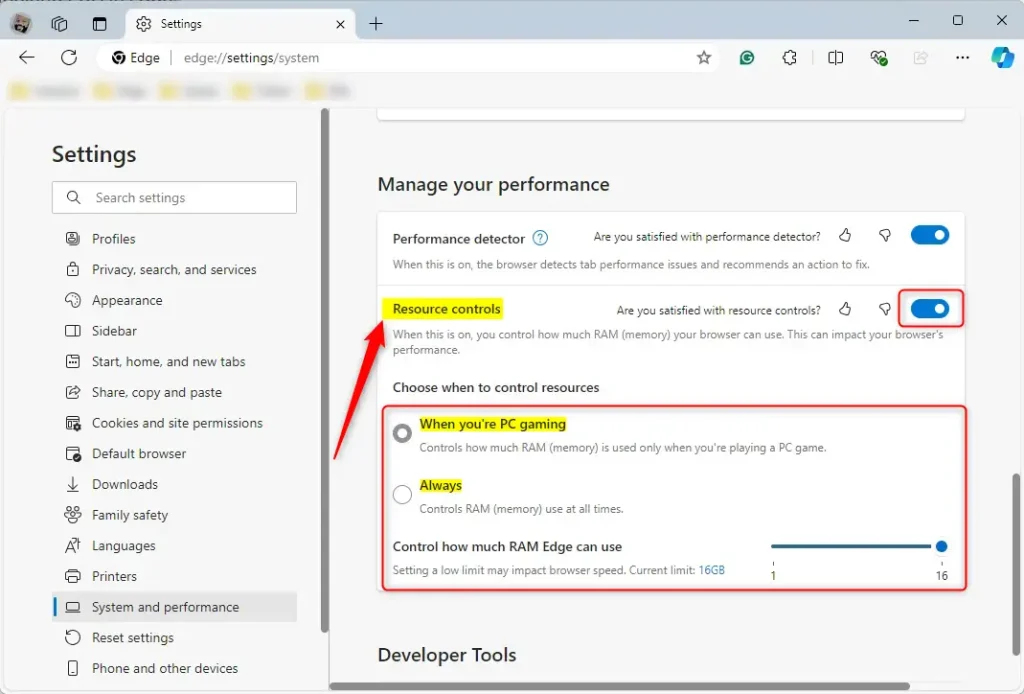
Once it hits the cap, Edge puts older tabs to sleep or discards them to stay within the limit. The tabs stay in your tab bar, and the page reloads when you click it. If you see this happening often, raise the slider a little.
Enable or disable Resource controls using Windows Registry Editor
You can also use the Windows Registry Editor, a database of system configuration settings, to apply these features system-wide for every user on the PC. This is an advanced method. You open the registry as an administrator, go to the Edge policy path, and create a DWORD value. It works on both Windows 11 Home and Pro. Back up the registry or create a restore point before you change it, because a wrong edit can cause problems.
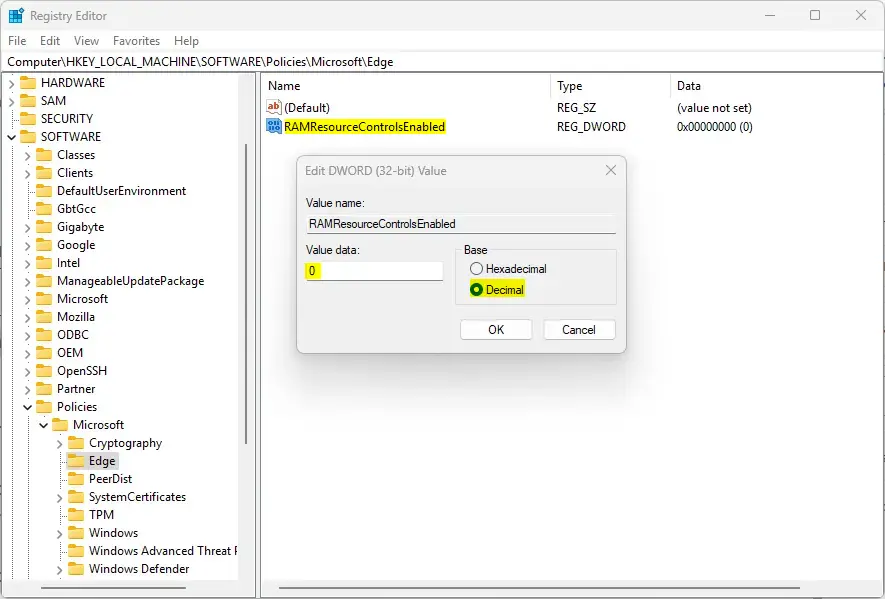
- Open the Windows Registry editor as an administrator. Right-click it and choose Run as administrator, then click Yes if User Account Control asks for permission.
- Go to this path: Computer\🗝️HKEY_LOCAL_MACHINE\
SOFTWARE\ . If the Edge key doesn’t exist, right-click the Microsoft key, select New Key, and name it Edge.Policies\ Microsoft\ Edge - Right-click in the right pane, select New DWORD (32-bit) Value. A new entry appears with its name ready to edit.
- Name it MemorySaverEnabled.
- Double-click it and set the value to 0 to disable the feature for everyone on the computer. Click OK.
To undo this, delete the MemorySaverEnabled value you created. Edge then goes back to using each person’s own settings.
Restarting the computer helps these changes take effect. This matters most for the registry method, since policies are read when Edge starts. At the very least, close all Edge windows and open the browser again.
Reference: Microsoft.com
Conclusion
These settings let you balance browser speed against system stability. Memory Saver handles inactive tabs on its own, and a manual RAM limit adds a hard cap on top of it. Used together, they keep Edge fast without slowing down your other important tasks. If something feels off, such as tabs reloading too often, loosen the limit or switch Memory Saver to Balanced.
Have a question about this guide?
Answered by AI from this guide. Good questions may be added to this page — please don't include personal details.
Did this guide fix your problem?

About the Author
Richard
Tech Writer, IT Professional
Richard is a writer at Geek Rewind who turns complex IT tasks into clear, step-by-step guides. He draws on years of hands-on experience in system administration and enterprise IT operations, focusing on Windows, Linux and WordPress: the problems people actually run into, and the fixes that work. His server and WordPress guides come from systems he runs himself. Richard builds and maintains the platform behind Geek Rewind, from its Ubuntu servers and Nginx configuration to its custom WordPress plugins. Many new tutorials start with readers' questions, and he's always glad to answer them in the comments.
No comments yet — be the first to share your thoughts!