How to Name Browser Windows in Microsoft Edge


Naming a browser window in Microsoft Edge lets you give it a custom title such as “Work” or “Shopping”. You can then tell your windows apart at a glance on Windows 10 and Windows 11. It helps most when you keep several Edge windows open for different jobs and don’t want to click through each one to find the right tabs.
The feature is built into Edge, so you don’t need an extension or any extra software. The setup takes a few clicks. It works the same on Windows 10 and Windows 11, and it works with Home and Pro editions alike.
Right-click the title bar and select “Name window” to enter a custom name. You can also find this option under the three dots menu, in “More tools.” This helps you quickly identify different browser windows.
Name a window in Microsoft Edge
The quickest way is to right-click the title bar at the top of the Edge window and choose Name window. You can also reach the same option from the Settings and more (Alt+F) menu, the three-dot icon. Both methods are covered below.
Method 1: the title bar
- Open Microsoft Edge.
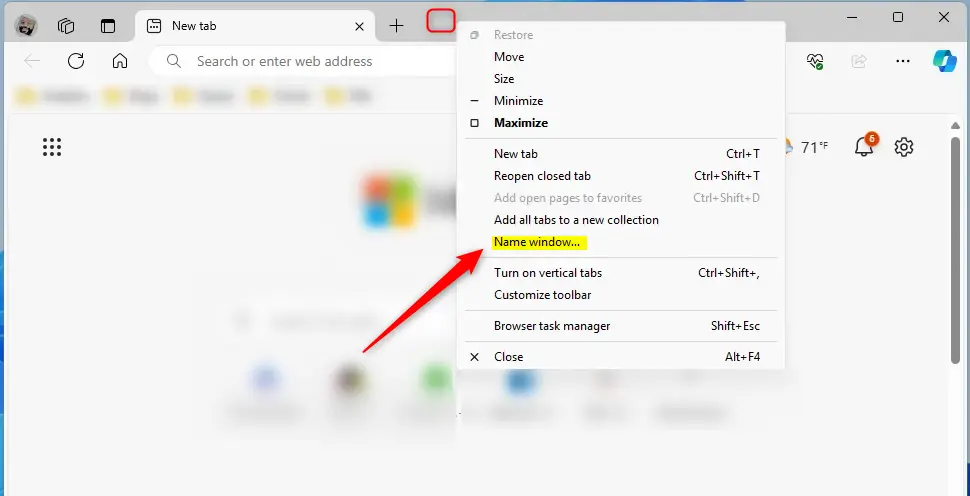
- Right-click an empty part of the title bar at the very top of the window. Don’t click on a tab itself, because that opens the tab menu instead. A context menu appears.
- Click “Name window“. A small box opens with a text field.
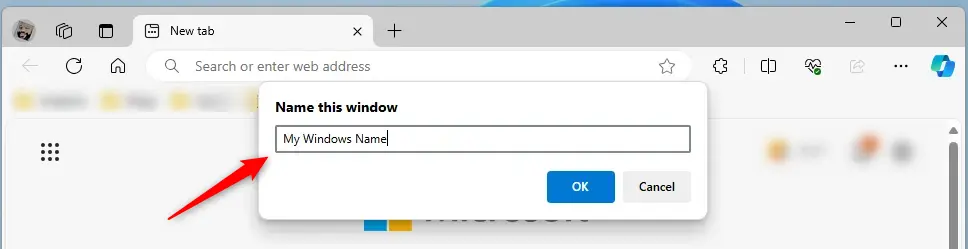
- Type the label you want, for example Work or Shopping. Short names are easier to read in the taskbar.
- Click “OK“. The box closes and the new name now shows in the window’s title.
Method 2: the Edge menu
Use this if you can’t right-click the title bar, or if you simply prefer the menu.
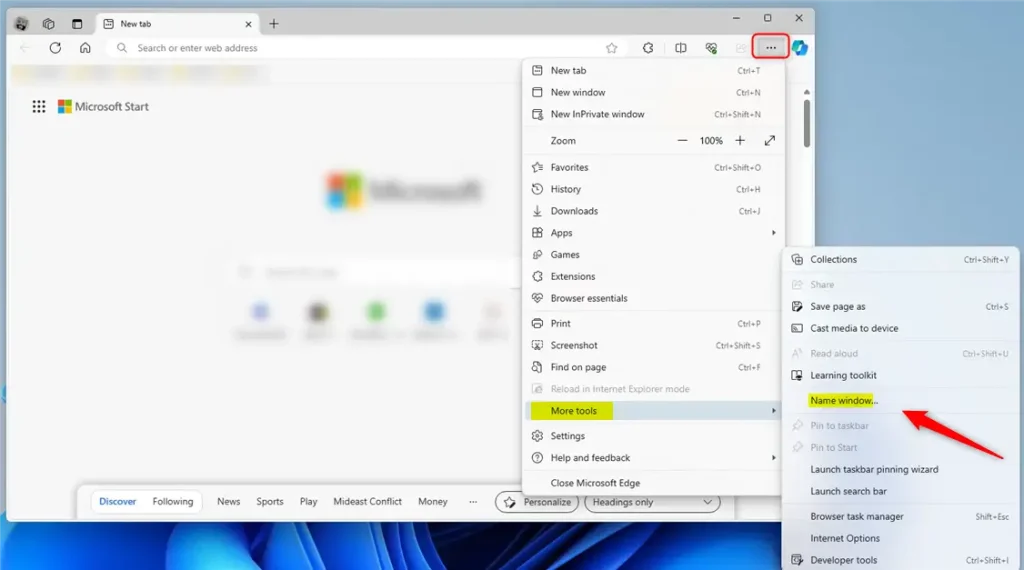
- Click the Settings and more (Alt+F) icon, the three dots at the top right of the window. The main Edge menu opens.
- Select More tools. A submenu opens.
- Click Name window, type your label, and click "OK".
To check the result, hover the mouse pointer over the Microsoft Edge icon on the taskbar. Each open Edge window appears as a preview, and the previews carry the custom names you set. This is the main benefit of the feature, because you can pick the right window without opening the others first.
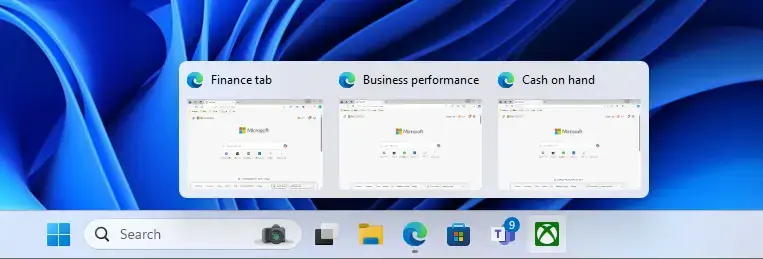
Your window now displays its new name. Repeat the steps in each window you want to label. Every Edge window keeps its own name, so you can give each one a different label.
If you want to change a name, open Name window again, type the new label, and click "OK". To remove a name, open the same box, clear the text, and click "OK"; the window should go back to its default title. The name belongs to that window, so after you close and reopen Edge, check whether it is still there and set it again if it isn't.
If Name window is missing from the menu, Edge is probably out of date. Update it from Settings and more > Help and feedback > About Microsoft Edge, then restart the browser. No Windows restart is needed for this feature.
Reference:
Conclusion:
- Naming windows in Microsoft Edge can significantly improve your browsing experience by helping you quickly identify and access the right window.
- Naming a window is straightforward, whether using the right-click method on the title bar or accessing the option through the "Settings and more" menu.
- Following the steps outlined in this article, you can efficiently manage multiple open windows in Microsoft Edge and enhance your productivity while browsing.
Have a question about this guide?
Answered by AI from this guide. Good questions may be added to this page — please don't include personal details.
Did this guide fix your problem?

About the Author
Richard
Tech Writer, IT Professional
Richard is a writer at Geek Rewind who turns complex IT tasks into clear, step-by-step guides. He draws on years of hands-on experience in system administration and enterprise IT operations, focusing on Windows, Linux and WordPress: the problems people actually run into, and the fixes that work. His server and WordPress guides come from systems he runs himself. Richard builds and maintains the platform behind Geek Rewind, from its Ubuntu servers and Nginx configuration to its custom WordPress plugins. Many new tutorials start with readers' questions, and he's always glad to answer them in the comments.
No comments yet — be the first to share your thoughts!