How to Delete Profiles (Profile 2) in Microsoft Edge


Microsoft Edge user profiles let multiple people share one browser while keeping bookmarks, passwords, and history separate. Extra profiles like “Profile 2” often appear by accident, for example when you click a sign-in prompt or add a second email address.
Deleting an unwanted profile takes less than a minute from the browser settings. Removing old profiles clears out clutter, frees up disk space, and stops personal data from sitting on a shared or public computer. Before you start, note that deletion can’t be undone. If the profile holds bookmarks or saved passwords you still need, export or copy them first.
Access Edge settings by typing edge://settings/profiles into the address bar. Click the three dots next to the profile you want to remove and select “Delete”. Confirm by clicking “Remove profile”.
Delete Profile 2 from Microsoft Edge
To delete Microsoft Edge’s “Profile 2,” you first need to open that profile. Once “Profile 2” is active, you go to its settings and remove it from there. Working this way makes sure the correct profile disappears and your main profile stays untouched. Check the profile name carefully before you delete anything, because Edge names new profiles “Profile 2,” “Profile 3” and so on, and it’s easy to mix them up.
Latest Update
Microsoft Edge makes it simple to delete Microsoft Edge profile data on modern browser versions, though older builds might place these controls in slightly different menus. Before you start, make sure to back up any important bookmarks or saved passwords because you cannot recover them once the profile is gone.
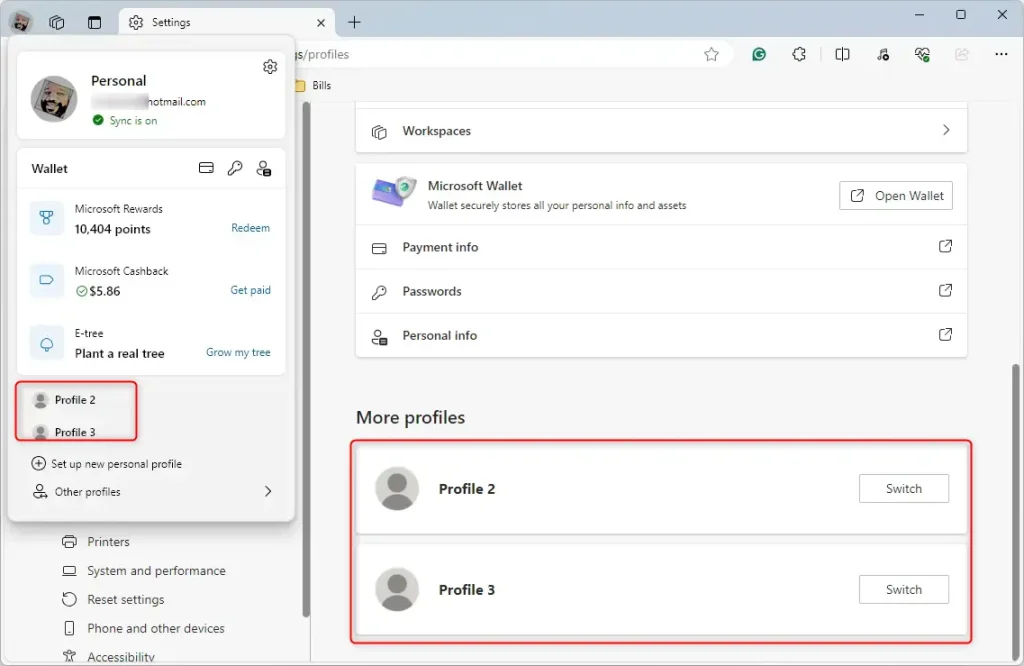
- Click your current profile icon in the top-left corner of the Edge window, next to the address bar. On some versions the icon sits at the top right instead.
- Choose the profile you want to remove from the menu. You should see a list of every profile signed in or set up in this browser.
You can also open the profile settings page by typing an address directly into Edge. This is handy if the profile icon is hidden or the menu doesn’t show the profile you want.
- Click the address bar, type
edge://settings/profile, and press Enter.
This page lists all the profiles currently configured in the Microsoft Edge browser, so it’s a good place to confirm exactly which ones exist before you remove anything.
- Find Profile 2 in the list and click the Switch button next to its name.
A new Edge window opens for Profile 2. From here you can manage its settings or remove it completely. If nothing seems to happen, check the taskbar, because the new window sometimes opens behind the current one.
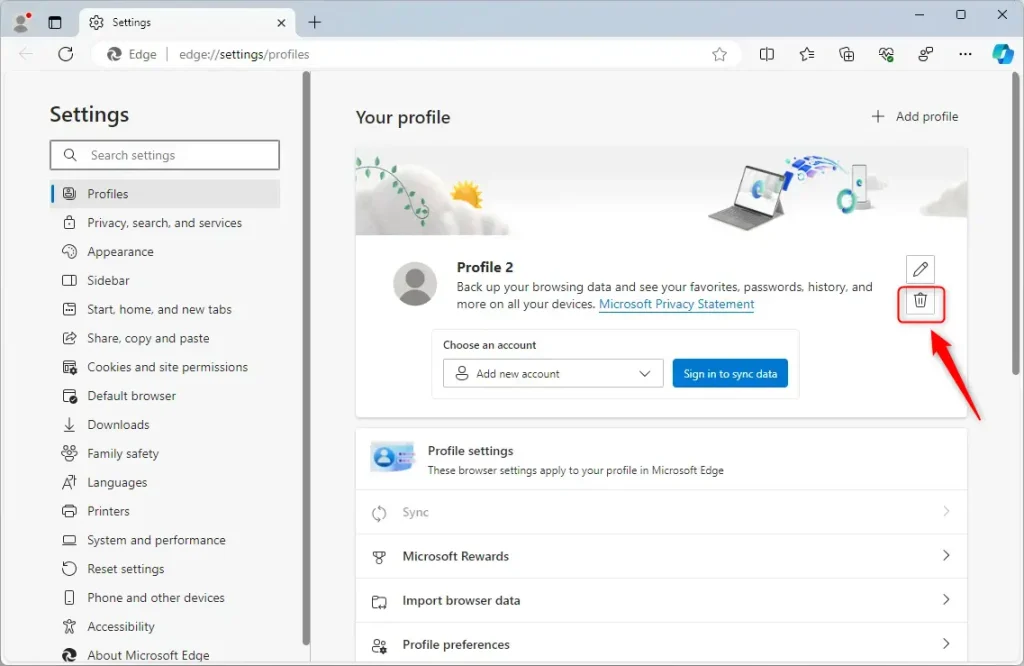
- Once the switch finishes, click the Delete button on the profile page.
The label can vary slightly between Edge versions. If you don't see a Delete button, look for a three-dot menu on the profile card and choose the remove option there.
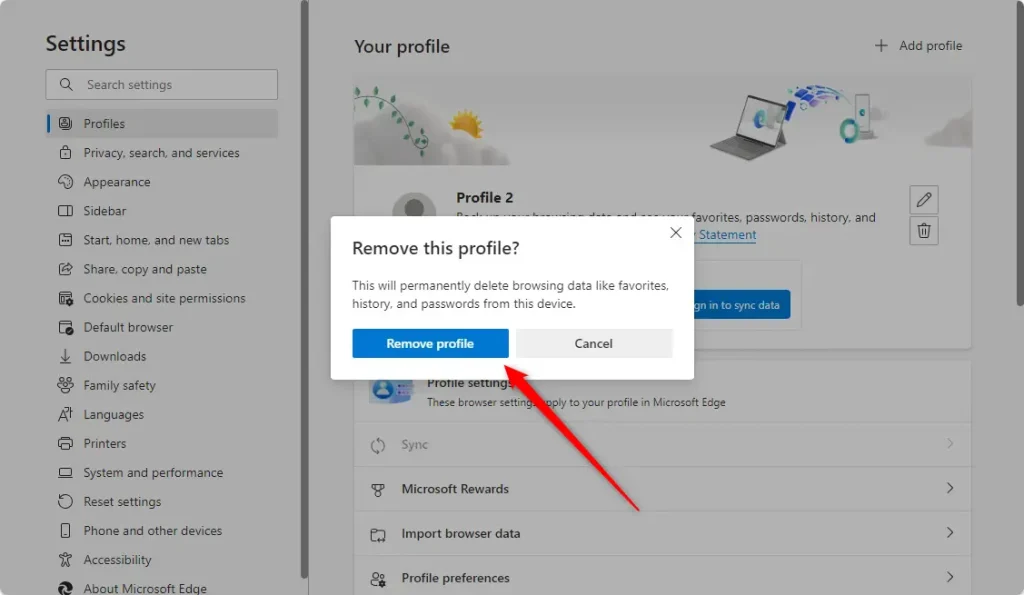
- When prompted, click the Remove profile button to finish the deletion.
Edge asks for confirmation after you click "Remove profile," which gives you a final chance to back out. If you go ahead, all data associated with that profile vanishes permanently: history, saved passwords, bookmarks, cookies and extensions on this computer. If the profile was signed in with sync turned on, your synced data may still exist in that Microsoft account and on your other devices. Removing the profile here only clears the local copy. Files you downloaded to your Downloads folder are normally left alone, but check anything important before you confirm. No restart is needed afterwards.
Repeat the same steps for any other profile you want to remove: switch to it, then delete it. Don't try to delete the profile you rely on every day, because you can't get its data back.
That covers everything you need to clear out extra profiles. Open the profile list once more afterwards to confirm that only the profiles you want are left.
Conclusion:
- Deleting user profiles in the Microsoft Edge browser is a simple process that involves a few straightforward steps.
- Following the guide, users can easily switch to the profile they wish to delete and remove.
- Feel free to reach out through the comments form below if you encounter any errors or have additional queries.
Have a question about this guide?
Answered by AI from this guide. Good questions may be added to this page — please don't include personal details.
Did this guide fix your problem?

About the Author
Richard
Tech Writer, IT Professional
Richard is a writer at Geek Rewind who turns complex IT tasks into clear, step-by-step guides. He draws on years of hands-on experience in system administration and enterprise IT operations, focusing on Windows, Linux and WordPress: the problems people actually run into, and the fixes that work. His server and WordPress guides come from systems he runs himself. Richard builds and maintains the platform behind Geek Rewind, from its Ubuntu servers and Nginx configuration to its custom WordPress plugins. Many new tutorials start with readers' questions, and he's always glad to answer them in the comments.
No comments yet — be the first to share your thoughts!