How to Install Oracle Java JDK on Windows 11


Oracle Java Development Kit (JDK) is a software package that gives you the tools you need to write and run Java apps on Windows 11. Installing Oracle JDK 21, a long-term support (LTS) release, sets up the compiler and command-line tools required for your programming projects. This guide covers the download, the installer, the JAVA_HOME and Path environment variables, and a quick test to confirm everything works.
Download the JDK installer from Oracle’s website and run it. Follow the on-screen prompts, accepting default settings. After installation, edit system environment variables to set JAVA_HOME and add the JDK’s bin directory to the Path.
Prerequisites
Before you begin, make sure you have the following. All three items are quick to check, and missing one of them is the most common reason an install fails halfway through.
- Administrative Rights: You must have an administrator account on your Windows 11 PC to install software and modify system environment variables. If you are signed in with a standard account, Windows will ask for an administrator password at the prompt. Without one, the installer and the system variable steps will not complete.
- Storage Space: Ensure you have at least 500MB of free disk space. The JDK itself takes less than that, but the installer also needs room to unpack its files.
- Internet Connection: Required to download the JDK installer. The installer is a few hundred megabytes, so a stable connection saves you from a broken download.
Oracle JDK vs. OpenJDK: Which Should You Choose?
When installing Java JDK on Windows 11, you’ll encounter two primary options: Oracle JDK and OpenJDK.
Both are built from the same Java source code, and the tools you use day to day (java, javac and so on) work the same way. The differences are mostly about licensing and support. Oracle JDK is Oracle’s own build and comes with Oracle’s license terms. For JDK 21, that is the Oracle No-Fee Terms and Conditions. Read those terms if you plan to use the JDK in a business or in production. OpenJDK builds come from other vendors, such as Eclipse Temurin or the Microsoft Build of OpenJDK, and are free under an open-source license.
This guide uses Oracle JDK. If you already know your project needs a specific vendor, install that one instead, and the environment variable steps later still apply.
Downloading and Installing Java
Installing Java JDK on Windows 11 starts by downloading the correct installer from the official Oracle website and running the setup wizard. You need administrator permissions to complete this setup. Follow the standard on-screen prompts and keep the default installation path to avoid future configuration problems.
Always download from Oracle’s own Java downloads page. Copies from third-party sites can be outdated or bundled with other software.
- Open Oracle’s Java downloads page in your browser and pick the JDK 21 tab.
- Select the Windows tab. You should now see the Windows download options.
- Click the link for the x64 Installer (the file ending in .exe). Most Windows 11 PCs are 64-bit, so this is the right choice. Your browser saves the file, usually to the Downloads folder.
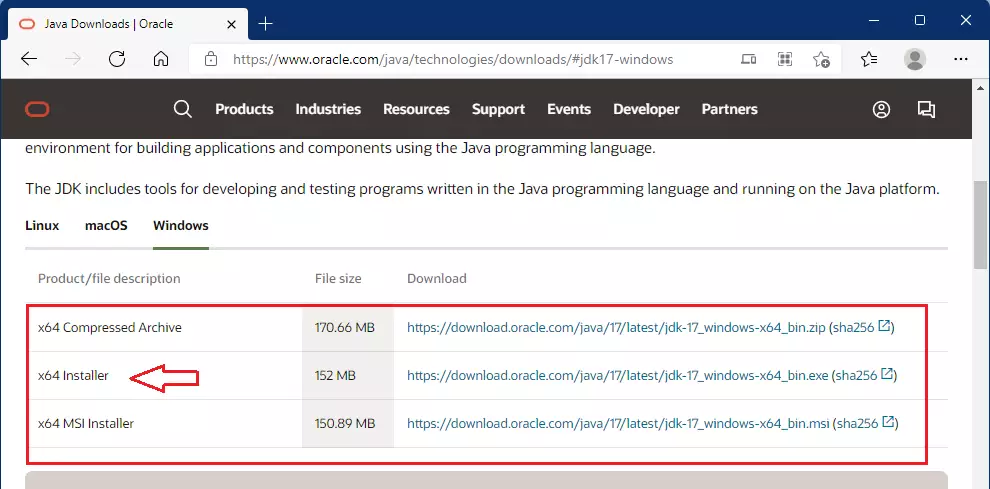
Now run the installer with administrator rights.
- Open the folder that holds the downloaded installer.
- Right-click the file and choose Run as administrator. On Windows 11 you may need to click Show more options first.
- If User Account Control asks whether to allow changes, click Yes. The Java setup wizard should now open.
- Click Next on the welcome screen.
- Leave the destination folder at its default and click Next. Keeping the default makes the later steps match this guide.
- Wait while the files are copied. A progress bar shows the status.
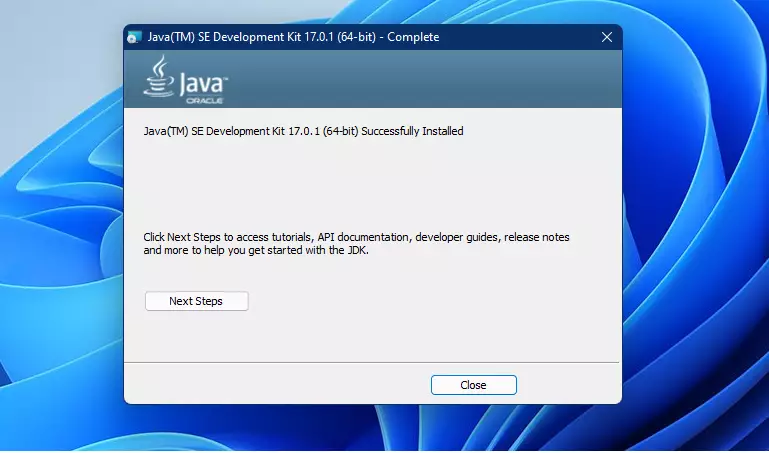
When the installation completes, click Close. The wizard shuts down and Java is now on your PC. Java will not run from the command line yet, because Windows does not know where to look for it. The environment variables below fix that.
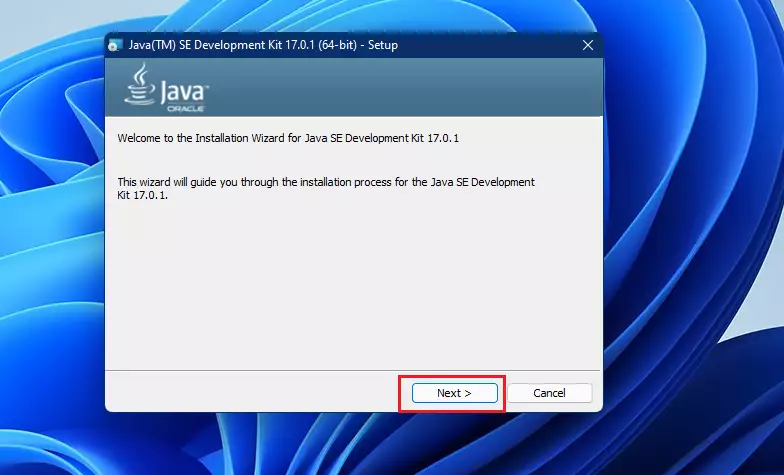
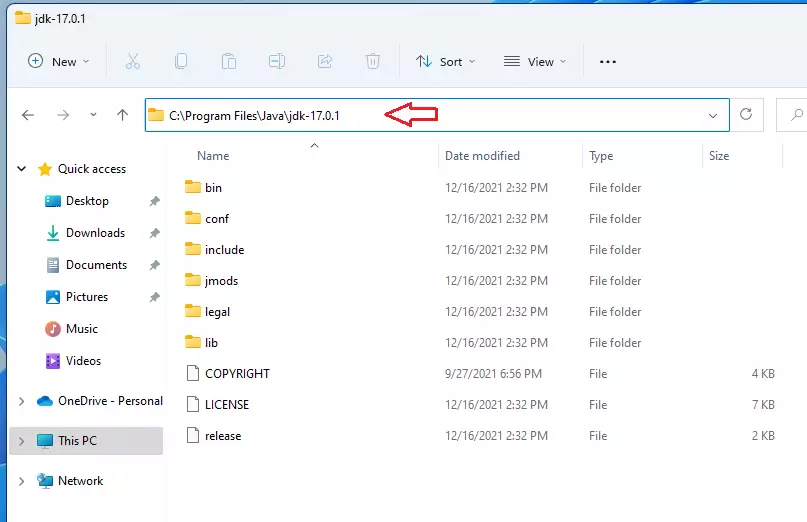
Java will install to C:\Program Files\Java\jdk-version-number. Click Close when the installation finishes.
Open File Explorer and browse to that location to confirm the folder exists. Note the exact folder name, such as jdk-21 followed by any version numbers. You will paste this path into the environment variables in the next sections, so it has to match exactly.
Configuring Environment Variables
Setting up the JAVA_HOME environment variable tells Windows 11 and your coding tools where to find your Java installation. You add this variable through the system settings by creating a new system variable, naming it JAVA_HOME, and pasting the exact folder path of your Java folder.
Many build tools and editors, such as Maven, Gradle and some IDEs, read JAVA_HOME to locate the JDK. Setting it now saves you from errors later. You need an administrator account for the System variables section. If you only see User variables options, you are not signed in as an administrator.
- Click the Start button and type environment variables.
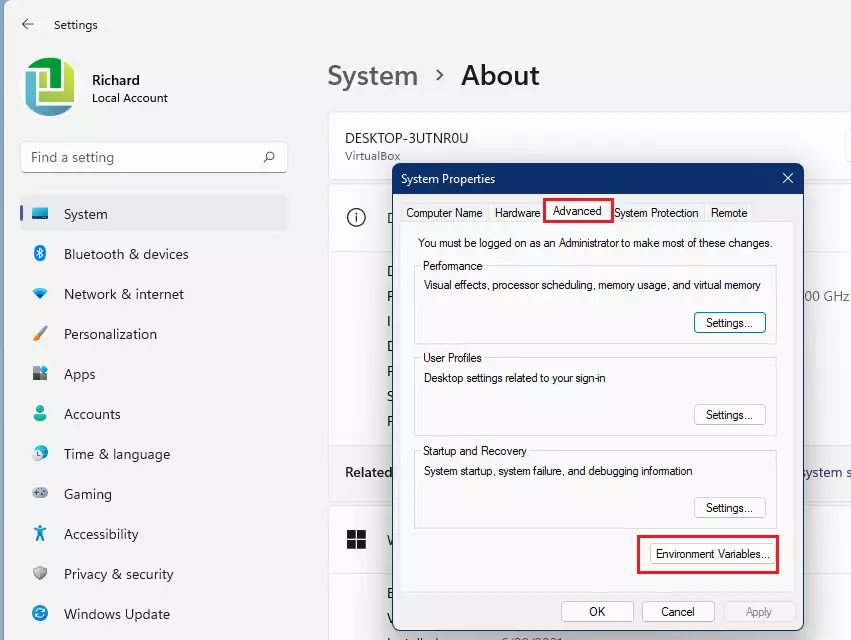
- Choose Edit the system environment variables from the results. The System Properties window opens on the Advanced tab.
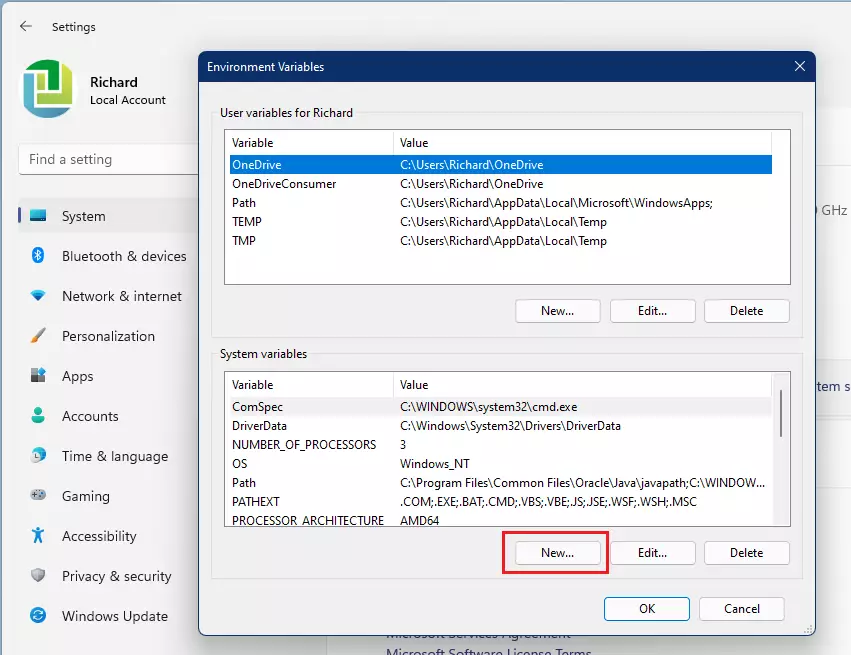
- Click the Environment Variables button at the bottom. The Environment Variables window opens with two lists, one for your user and one for the system.
- Under System variables, click New. A small dialog box appears with two fields.
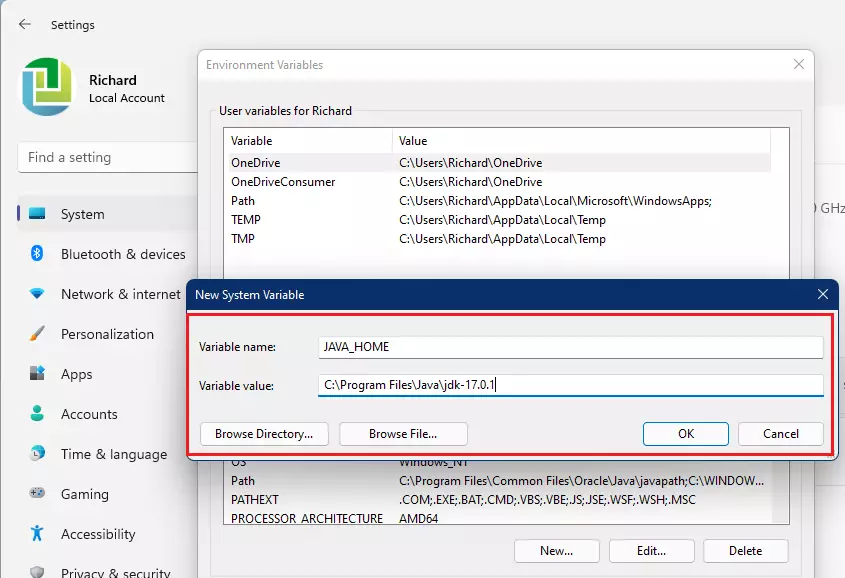
- In the Variable name box, enter JAVA_HOME.
- In the Variable value box, enter your installation path (e.g., ‘📁C:\
Program Files\ ’). Use the real folder name from your own install, for example the jdk-21 folder if you installed JDK 21. Do not add a trailing backslash, and do not add \bin here.Java\ jdk-17 - Click OK. JAVA_HOME now appears in the System variables list.
Leave the Environment Variables window open, because you need it for the Path step. If you want to undo this later, select JAVA_HOME in the list and click Delete.
The Path variable lists the folders Windows searches when you type a command. Adding the JDK to it lets you run java and javac from any folder.
- In the System variables list, find Path and select it.
- Click Edit. A list of existing entries opens. Do not delete or change any of them.
- Click the New button to add a new entry. A blank line appears at the bottom of the list.
- Type the full path to the bin folder inside your Oracle Java Development Kit (JDK) installation, for example 📁C:\
Program Files\ . The folder that holds java.exe and javac.exe is bin, so the path should end there. This step ensures Windows 11 can find the Java tools.Java\ jdk-17\ bin - Click OK in the Edit window, then OK in the Environment Variables window, then OK in System Properties. If you skip the last OK, the change is not saved.
To undo this, reopen the Path list, select the Java entry and click Delete.
%JAVA_HOME%\bin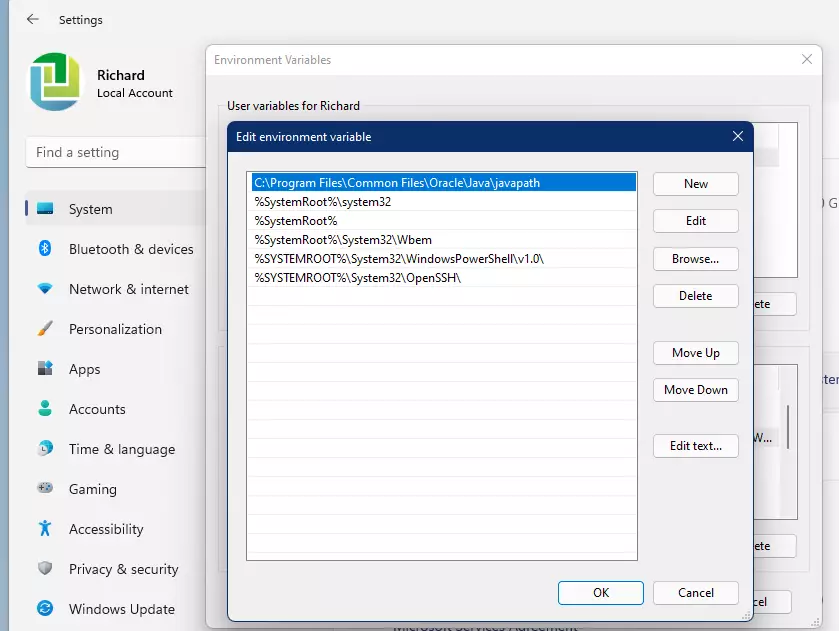
Verifying the Installation
Open Command Prompt or PowerShell and type these commands. Use a window you opened after saving the environment variables. A window that was already open will not see the changes. Press Enter after each command and run them one at a time.
java -version
javac -version
If the install worked, each command prints version information for the JDK you installed, and the version number should match the one you downloaded. If you see an error saying the command is not recognized, go to the troubleshooting section below.
Troubleshooting Installation
Fixing a java -version command that does not work on Windows 11 usually requires checking your file paths and restarting your Command Prompt. If your computer still cannot find Java, verify that you typed the path correctly and closed all open command windows to load the new settings.
Work through these checks in order. They cover almost every case.
- Path Typos: Ensure your
JAVA_HOMEpath matches your actual installation folder exactly. Compare it with the folder you see in File Explorer, including the version number in the folder name. Also check that the Path entry ends in bin and has no extra spaces. - Restart Terminal: Always close and reopen your Command Prompt after changing environment variables so the system can refresh the settings. If it still fails in a fresh window, sign out of Windows and back in, or restart the PC.
- Permissions: Ensure you ran the installer as an administrator. If you are not sure, run the installer again as an administrator. It will repair the install, and your settings stay in place.
Summary
To install Java JDK on Windows 11, you'll download the installer, run it as an administrator, and set up your JAVA_HOME and Path environment variables. Then open a new Command Prompt or PowerShell window and run the two version commands to confirm Java works. Once both print a version number, the JDK is ready for your projects.
Have a question about this guide?
Answered by AI from this guide. Good questions may be added to this page — please don't include personal details.
Did this guide fix your problem?

About the Author
Richard
Tech Writer, IT Professional
Richard is a writer at Geek Rewind who turns complex IT tasks into clear, step-by-step guides. He draws on years of hands-on experience in system administration and enterprise IT operations, focusing on Windows, Linux and WordPress: the problems people actually run into, and the fixes that work. His server and WordPress guides come from systems he runs himself. Richard builds and maintains the platform behind Geek Rewind, from its Ubuntu servers and Nginx configuration to its custom WordPress plugins. Many new tutorials start with readers' questions, and he's always glad to answer them in the comments.
No comments yet — be the first to share your thoughts!