How to Enforce BitLocker Encryption on Removable Drives

BitLocker encryption on removable drives locks down USB sticks and portable hard drives so no one can read the files without a password. In this tutorial you set a policy that controls how Windows encrypts those drives. Once it is in place, users no longer pick the method themselves.
Windows 11 Pro, Enterprise, and Education support this setup through the built-in Group Policy tool, a system settings editor. Windows 11 Home does not include Group Policy Editor, so Home users should use the Registry Editor method later in this guide. A consistent policy helps protect your private data if you lose a drive. Note that it sets how a drive is encrypted. It does not encrypt a drive until someone turns on BitLocker for it.
Configure BitLocker encryption for removable drives via Group Policy. Navigate to Computer Configuration Administrative Templates Windows Components BitLocker Drive Encryption Removable Data Drives. Double-click “Enforce drive encryption type on removable data drives” and select your preferred encryption method.
What is BitLocker Encryption on Removable Drives?
BitLocker removable drive encryption scrambles the data on USB sticks and external hard drives so nobody can read it without your password or recovery key. If you lose a portable drive, the person who finds it can’t open your files. That matters for both personal and work data.
- Full Encryption: Encrypts the entire drive, including the empty space. This takes longer, and the time grows with the size of the drive. It is the safer choice for a drive that has been used before, because deleted files may still be recoverable from free space that was never encrypted.
- Used Space Only Encryption: Encrypts only the parts of the drive where files are saved. This is much faster, especially on a new or mostly empty drive. It encrypts less data, and BitLocker encrypts new files as you add them.
By default, Windows asks which encryption type you want when you first set up BitLocker on a removable drive. The policy below removes that question and applies your choice every time.
How to Enforce One Encryption Type Using Group Policy
Group Policy Editor lets you enforce one BitLocker encryption type, so every user on the computer gets the same security method. You lock in either full disk encryption or the faster used-space-only method. This policy only applies to drives that are encrypted after you set it. Drives that are already encrypted keep the type they were given.
- Press the Start button, type
Edit group policy, and open the Local Group Policy Editor. If nothing shows up in the search results, you are probably on Windows 11 Home, which doesn’t include this tool. Use the Registry Editor method below instead. You also need to be signed in as an administrator. - In the left pane, go to this folder path:
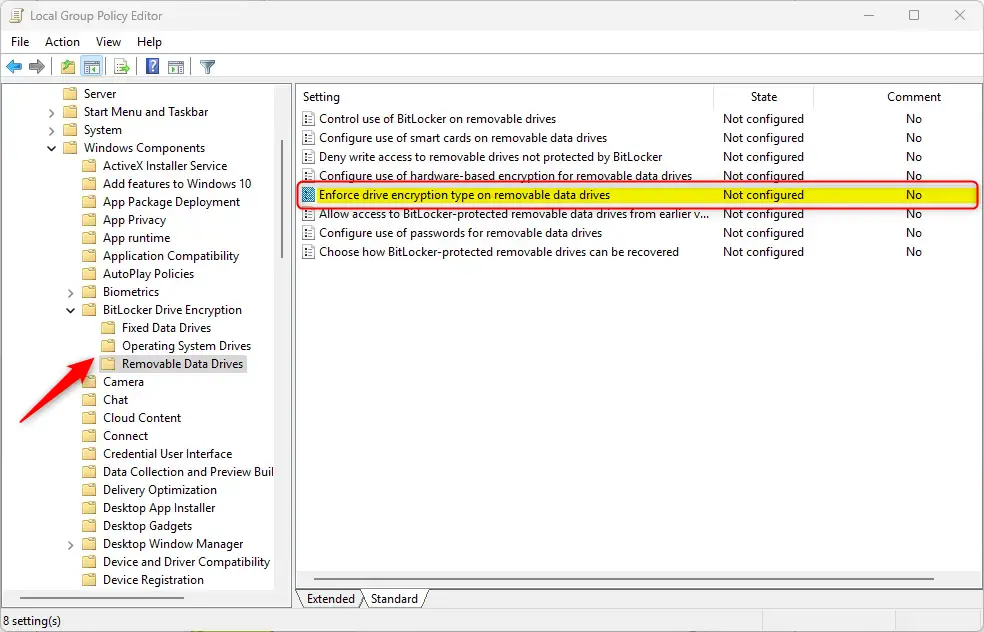
Computer Configuration > Administrative Templates > Windows Components > BitLocker Drive Encryption > Removable Data Drives - On the right side, double-click
Enforce drive encryption type on removable data drives. A settings window opens with the options Not Configured, Enabled, and Disabled at the top left. - Choose one of these options:
- Not Configured (or Disabled): Windows will ask you which encryption type to use every time.
- Enabled: You pick one encryption type in the options box below, and Windows will not ask users anymore. Choose this to enforce a type. The drop-down choices become available once you select it.
- With Enabled selected, open the drop-down list and select
Full encryptionto always encrypt the whole drive. - Or select
Used space only encryptionto encrypt only the used space. Pick one of the two, not both. - Disabled: Same as Not Configured; the user chooses the encryption type. Pick this, or Not Configured, if you want to undo the enforcement later.
- Click
OKto save. The window closes, and the setting now shows as Enabled (or whichever state you chose) in the policy list. - Restart your PC to apply the change. This makes sure the policy is picked up before you encrypt any drive.
How to Enforce Encryption Type Using the Windows Registry
Registry Editor is an alternative way to enforce the BitLocker encryption type. It is the method to use on Windows 11 Home, where Group Policy Editor is missing. You write the configuration value directly into the system database, so every removable drive follows your chosen profile. This is the advanced method. A wrong change in the registry can cause problems, so back up the registry or create a restore point first.
- ⚠️ Admin privileges required: Press Start, type
regedit, and open the Registry Editor (run as administrator). Accept the User Account Control prompt if it appears. - Navigate to this key:
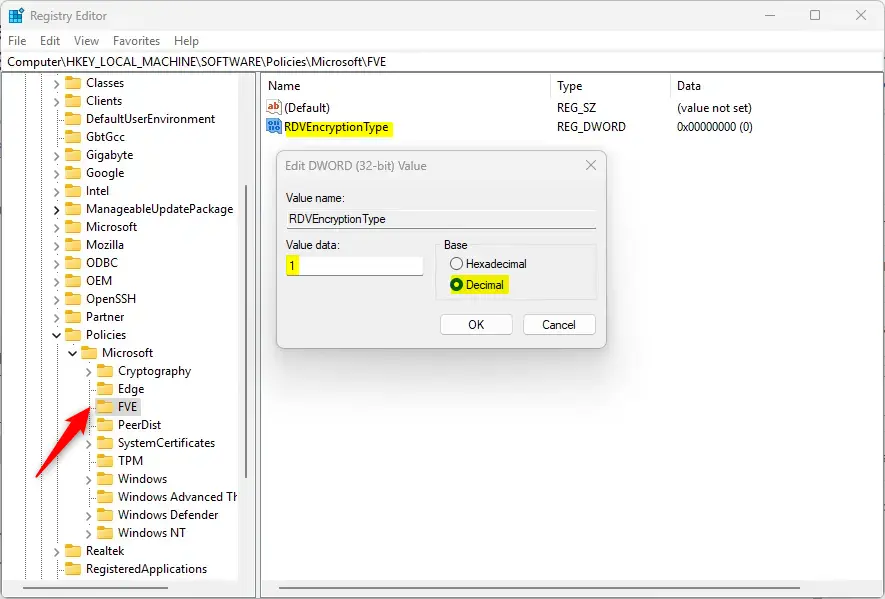
HKEY_LOCAL_MACHINE\SOFTWARE\Policies\Microsoft\FVEIf part of the path is missing, the key doesn't exist yet, so create the missing folders (keys) one level at a time. - In the right pane, look for a value named
RDVEncryptionType. If it doesn't exist, create it:- Right-click an empty area in the right pane, choose
New, then selectDWORD (32-bit) Value. - Name it
RDVEncryptionTypeA new value appears in the list with the name field ready to edit, so type the name and press Enter.
- Right-click an empty area in the right pane, choose
- Double-click
RDVEncryptionTypeand set its value data to:1to enforce Full encryption2to enforce Used space only encryption
- Click
OKand close the Registry Editor. The new value should now show your number in the Data column. - Restart your computer to apply the change.
To undo the registry change, delete the RDVEncryptionType value. This restores the default behavior, and Windows will prompt for your preferred encryption method again. Restart the PC afterward so the change takes effect. If you used Group Policy instead, set the policy back to Not Configured to get the same result.
Summary
- BitLocker protects your data on removable drives by encrypting it, so a lost drive can't be read without the password or recovery key.
- You can choose between full encryption, which is slower but covers the whole drive, or encrypting only used space, which is faster.
- You can force a specific encryption type so users won't be asked every time. Use Group Policy on Pro, Enterprise, and Education, or the Registry Editor on any edition, including Home.
- These steps keep your data safer with the encryption method you prefer, and you can reverse them at any time.
BitLocker protection for removable drives keeps your portable data safe by scrambling files, and you choose between full disk encryption and the used-space-only method. You can enforce your preferred setting for all users with either Group Policy or the Registry Editor. Restart the PC after any change, and test with a spare USB drive before you roll the setting out widely.
Was this guide helpful?

About the Author
Richard
Tech Writer, IT Professional
Richard is a writer at Geek Rewind who turns complex IT tasks into clear, step-by-step guides. He draws on years of hands-on experience in system administration and enterprise IT operations, focusing on Windows, Linux and WordPress: the problems people actually run into, and the fixes that work. His server and WordPress guides come from systems he runs himself. Richard builds and maintains the platform behind Geek Rewind, from its Ubuntu servers and Nginx configuration to its custom WordPress plugins. Many new tutorials start with readers' questions, and he's always glad to answer them in the comments.




No comments yet — be the first to share your thoughts!