How to Encrypt Files in Windows 11
This guide shows you how to lock (encrypt) and unlock (decrypt) your files and folders in Windows 11, keeping your private information safe.
Right-click a file or folder, select Properties, click Advanced, and check “Encrypt contents to secure data.” This is only available on Windows 11 Pro and higher.
What is Encryption?
Encryption in Windows 11 acts like a secure box for your digital files. Encryption scrambles your data, allowing only you to read it. This process protects private information if your computer is lost or stolen, making files unreadable to anyone without the correct key.
Why encrypt your files? If your computer is lost or stolen, encrypted files stay private and safe.
What happens when you encrypt a folder? Any new files you put inside will automatically be locked too.
Important Things to Know
Some files cannot be encrypted. These include compressed files (ZIP), system files, main folders, or files that Windows needs to run.
How to Lock or Unlock Files and Folders Using Properties
The best way to lock or unlock files and folders is using the Properties menu.
Steps to Encrypt (Lock) a File or Folder:
- Find the file or folder you want to protect.
- Right-click on it and click Properties.
- In the General tab, click the Advanced… button.
- Check the box that says Encrypt contents to secure data.
- Click OK to close the Advanced Attributes window.
- Click OK or Apply in the Properties window.
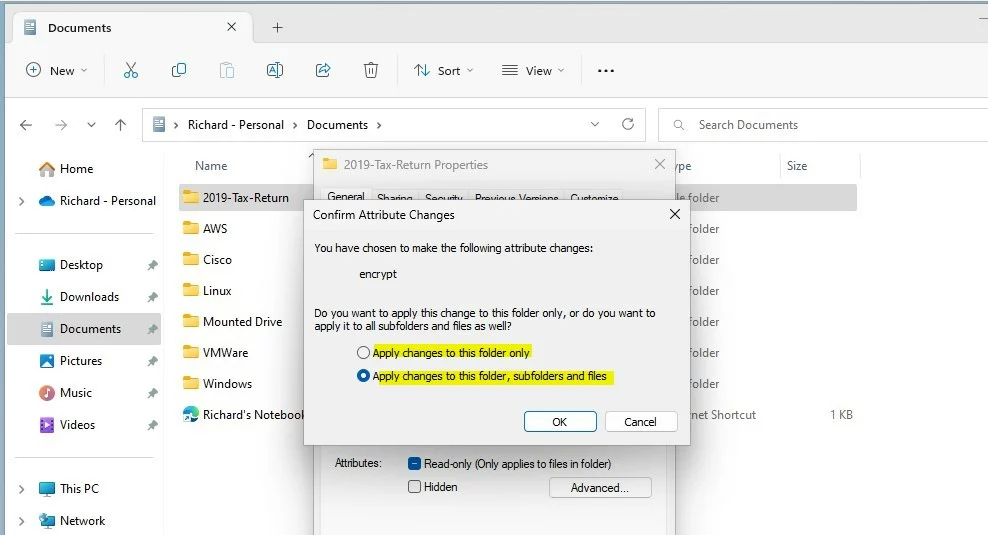
- Choose if you want to encrypt just this folder or file, or also everything inside it. Then click OK.
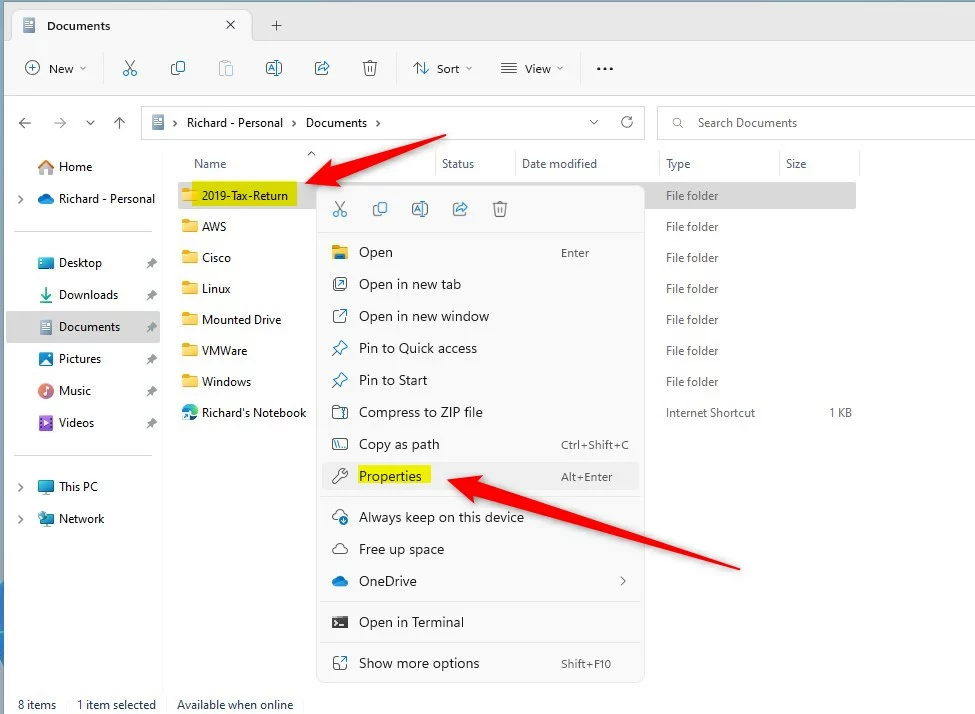
Encrypting files in Windows 11 is simple and helps protect your private information. To lock a file or folder, find it, right-click, and select Properties. Then, go to the General tab, click Advanced, and check the box to ‘Encrypt contents to secure data’.
Image: Right-click your folder or file and choose Properties.
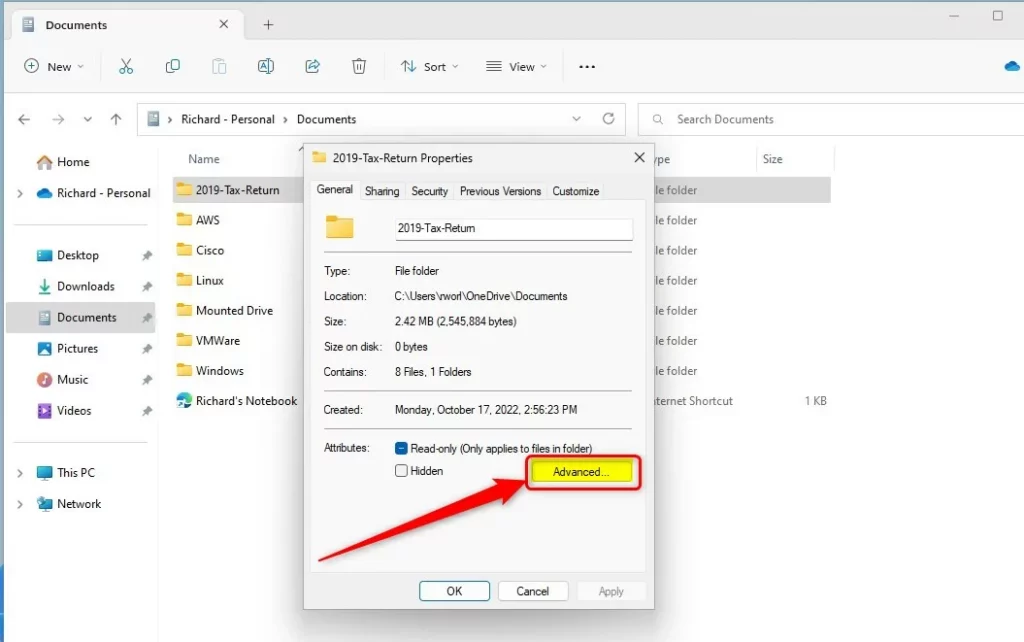
Encrypting files in Windows 11 is simple and helps protect your private information. To lock a file or folder, find it, right-click, and select Properties. Then, go to the General tab, click Advanced, and check the box to ‘Encrypt contents to secure data’.
Image: Click the “Advanced” button.
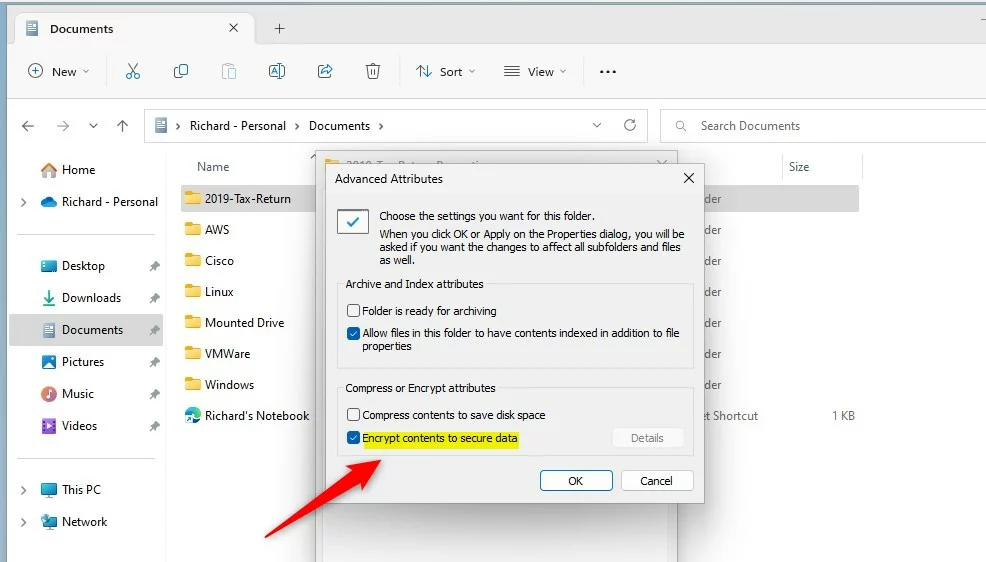
Encrypting files in Windows 11 is simple and helps protect your private information. To lock a file or folder, find it, right-click, and select Properties. Then, go to the General tab, click Advanced, and check the box to ‘Encrypt contents to secure data’.
Image: Check “Encrypt contents to secure data”.
Encrypting files in Windows 11 is simple and helps protect your private information. To lock a file or folder, find it, right-click, and select Properties. Then, go to the General tab, click Advanced, and check the box to ‘Encrypt contents to secure data’.
File encryption in Windows 11 offers two choices: encrypt only the selected folder, or encrypt the folder and all its contents, including subfolders. This choice helps control how much data the encryption process covers.
How to Decrypt (Unlock) a File or Folder
How to Lock or Unlock Files and Folders Using Commands
You can also lock or unlock files and folders using a command-line tool like Windows Terminal, PowerShell, or Command Prompt.
To Open Windows Terminal:
To Encrypt (Lock) a File
Use this command:
cipher /e "FullFilePathHere"Replace FullFilePathHere with your file’s location. For example:
cipher /e "C:\Users\UserName\SecretDocument.txt"To Decrypt (Unlock) a File
Use this command:
cipher /d "FullFilePathHere"Example:
cipher /d "C:\Users\UserName\SecretDocument.txt"To Encrypt (Lock) a Folder and Everything Inside
Use this command:
cipher /e /s:"FullFolderPathHere"Example:
cipher /e /s:"C:\Users\UserName\SecretDocument"To Decrypt (Unlock) a Folder and Everything Inside
Use this command:
cipher /d /s:"FullFolderPathHere"Example:
cipher /d /s:"C:\Users\UserName\SecretDocument"Summary
Encrypting files in Windows 11 is an easy way to protect your private documents. By locking your files, you ensure sensitive data stays secure even if your computer is lost or stolen. This basic security step keeps your information private and safe from unauthorized access.- Encryption helps keep your private files safe from others.
- You can encrypt or decrypt files easily using Properties or commands.
- Encrypting files is a good idea if your computer is lost or stolen.
- If you have Windows 11 Home, encryption with this method is not available. Consider upgrading to Windows 11 Pro.
- Stay safe and protect your data!
Does 🪟 Windows 11 have file encryption?
Encrypted File System isn’t available on Windows 11 Home Edition. It’s important to know that Encrypted File System is unavailable on Windows 11 Home Edition, so you might consider upgrading to Windows 11 Pro for this feature.
Was this guide helpful?
100% of readers found this helpful (1 votes)

About the Author
Richard
Tech Writer, IT Professional
Richard, a writer for Geek Rewind, is a tech enthusiast who loves breaking down complex IT topics into simple, easy-to-understand ideas. With years of hands-on experience in system administration and enterprise IT operations, he’s developed a knack for offering practical tips and solutions. Richard aims to make technology more accessible and actionable. He's deeply committed to the Geek Rewind community, always ready to answer questions and engage in discussions.


No comments yet — be the first to share your thoughts!