How to Enable or Disable the Sudo Command in Windows 11

The sudo command in Windows 11 lets you run administrator-level commands directly from a standard console window, without opening a separate elevated prompt. Microsoft introduced it in Windows 11 Insider Build 26052 to speed up admin tasks in Command Prompt and PowerShell. It is included in Windows 11 version 24H2 and later, and it works the same on Home and Pro.
You can turn the feature on or off in the Settings app whenever you need to, or with Windows Terminal or the Registry Editor. Sudo is off by default, so you have to enable it before the command does anything. Changing the setting needs an administrator account, and Windows will show a UAC prompt if you are signed in as a standard user.
Open Settings System For Developers, toggle Enable sudo to On, and select your preferred mode from the dropdown: In a new window, With input disabled, or Inline. No restart required.
What Are the Different Ways sudo Can Work?
- In a new window: This opens a new window to run the command with administrator rights. The original window stays untouched, and you see the UAC prompt before the new window starts. This is the most cautious mode.
- With input disabled: The command runs in the same window but doesn’t accept input while running. Output still appears in your console. Use it for commands that run to completion without asking you anything.
- Inline: The command runs in the same window and accepts input, like on Linux or Mac. It is the most convenient mode and the closest to the Linux experience. It also keeps the elevated command attached to your normal, non-elevated console, so use it only on a PC you trust.
Windows 11 sudo has three operating modes that control how administrator commands run. You can open commands in a new window, run them in the current window with input disabled, or run them inline so you can still type responses.
Pick the mode that fits your workflow. If you run quick, one-off commands, “In a new window” is the safest choice. If you run scripts that need no input, “With input disabled” keeps everything in one place. If you want the Linux-style experience, choose “Inline”. You can switch modes at any time with any of the methods below.
How to Enable sudo Using Windows Settings
The Settings app is the quickest way to turn on sudo. You don’t need command-line tools or registry changes. Once you flip the switch under the developer options, your PC is ready to run administrator commands directly from the console.
Run Windows Update , restart, and check again.
- Open the Settings app. You can do this by:
- Clicking the Start button and then Settings, or
- Pressing Windows key + I on your keyboard.
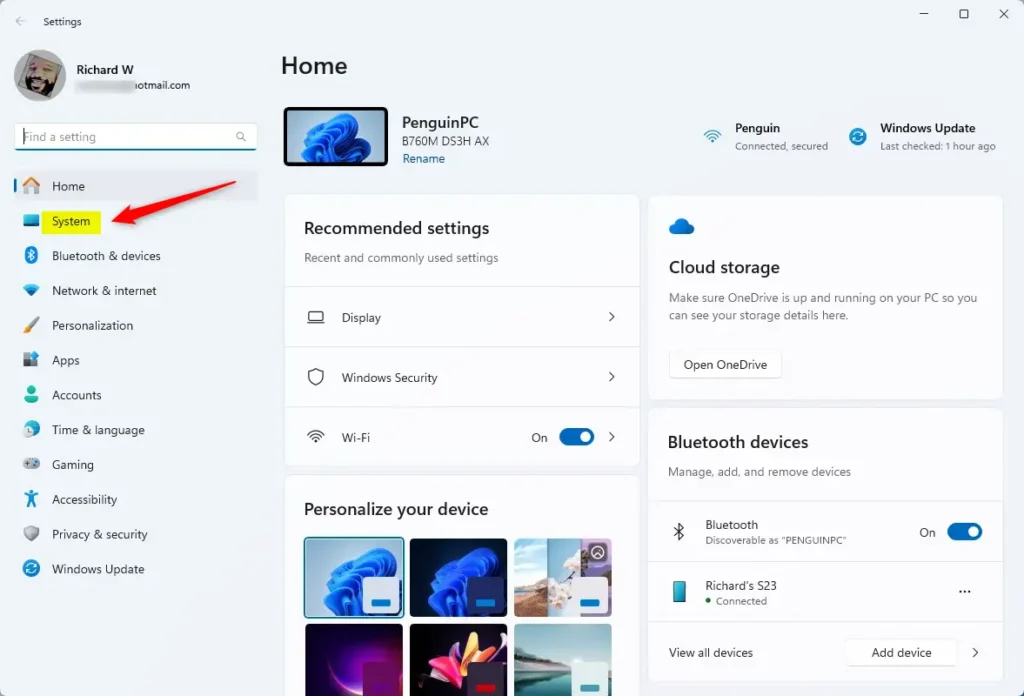
- In Settings, click on System on the left side. The System pages open on the right.
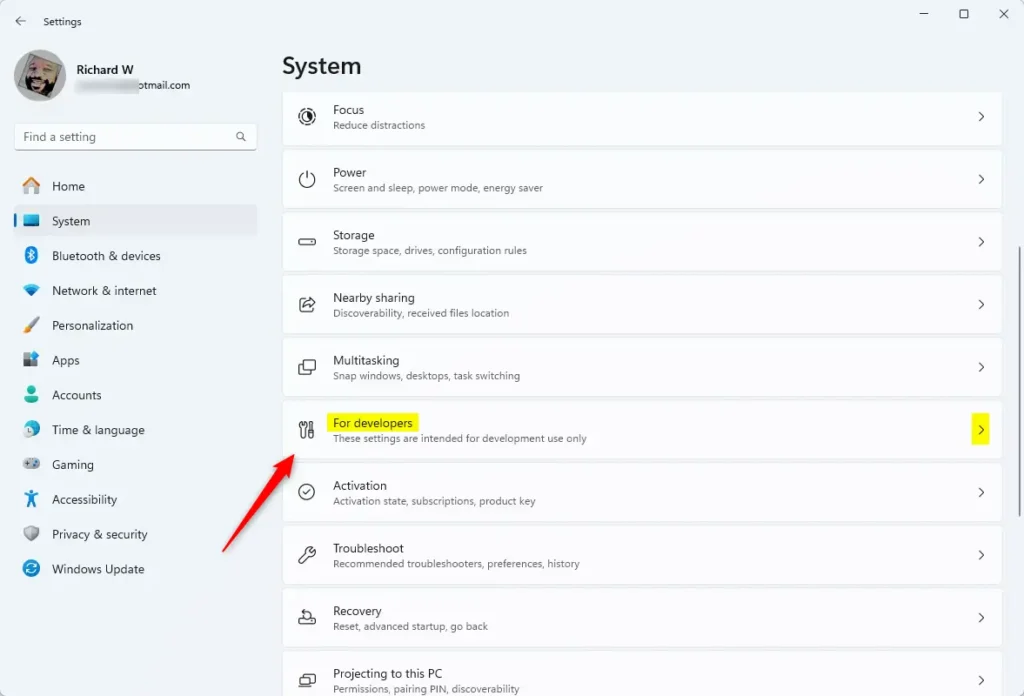
System in the Settings app - On the right side, scroll down, then find and click For Developers. You should now see a list of developer options.
For Developers tile in the Settings app - Find the option for Enable sudo and turn the switch to On to enable it. Approve the UAC prompt if one appears. The switch should now show On, and a mode dropdown appears under it.
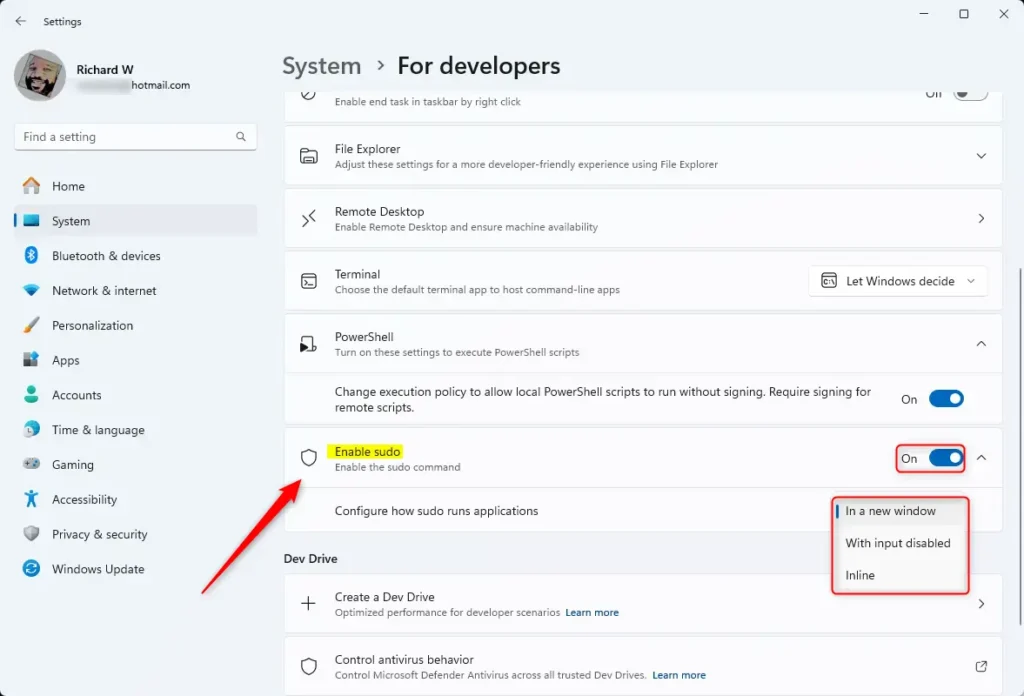
Enable sudo in the Settings app You can also pick how you want sudo to work by selecting one of the three modes from the dropdown:
- In a new window
- With input disabled
- Inline
No restart is needed. If sudo isn't recognized in a console you already had open, close it and open a new one.
- To turn off sudo, switch the Enable sudo toggle to Off. This is also how you undo the change. You can turn it back on at any time.
How to Enable or Disable sudo Using Windows Terminal (Command Prompt)
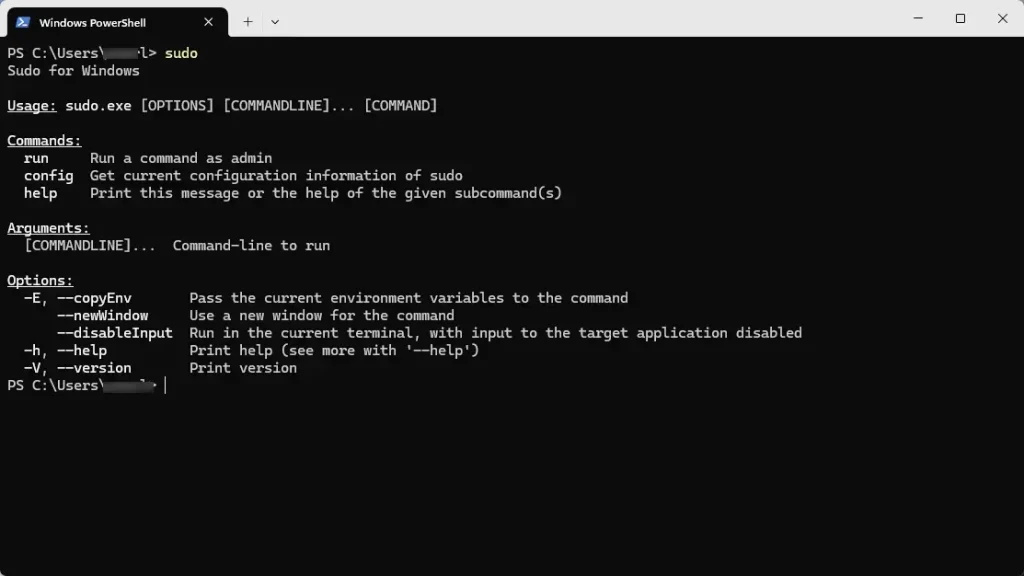
Windows Terminal lets you enable or disable sudo with command-line instructions. You can run a command to turn the feature on in your preferred mode, or turn it off when you no longer need it. This gives you direct control without clicking through the Settings app, and it is handy for scripting or remote sessions.
First, open Terminal with administrator rights:
- Right-click the Start button.
- Choose Terminal (Admin) and approve the UAC prompt. You should now see a Terminal window with elevated rights.
- Run one of the commands below in either a PowerShell or Command Prompt tab.
Enable sudo in "In a new window" mode: use this command if you want each elevated command to open in its own window.
sudo config --enable forceNewWindowEnable sudo in "With input disabled" mode: use this command if you want elevated commands to run in the current window without accepting input.
sudo config --enable disableInputEnable sudo in "Inline" mode: use this command if you want elevated commands to run in the current window and accept input.
sudo config --enable normalDisable sudo command: run this command to turn sudo off again. You can switch back to any of the modes above at any time.
sudo config --disableEnable or Disable sudo Using Windows Registry Editor
The Registry Editor lets you enable or disable sudo by changing one registry value. You go to the right key and set the data value to turn the feature on or off. This is the advanced method, and it suits you if you manage several systems or prefer editing the registry directly.
Before you start, create a restore point or export the key so you can roll back.
- Open the Registry Editor. Approve the UAC prompt if one appears.
- Go to this folder path. You can paste it into the address bar at the top of the Registry Editor window, or expand the folders in the left pane one by one:
Computer\HKEY_LOCAL_MACHINE\SOFTWARE\Microsoft\Windows\CurrentVersion\Sudo - Look for a value named Enabled on the right side. Double-click it to change its number. A small dialog opens with a Value data box.
- Type one of these numbers in Value data to choose a mode, then click OK:
- 1 – "In a new window" mode
- 2 – "With input disabled" mode
- 3 – "Inline" mode
- 0 – Disable sudo
- If you don't see Enabled, right-click on a blank space in the right pane, choose New DWORD (32-bit) Value, name it Enabled, and set its value to one of the numbers above.
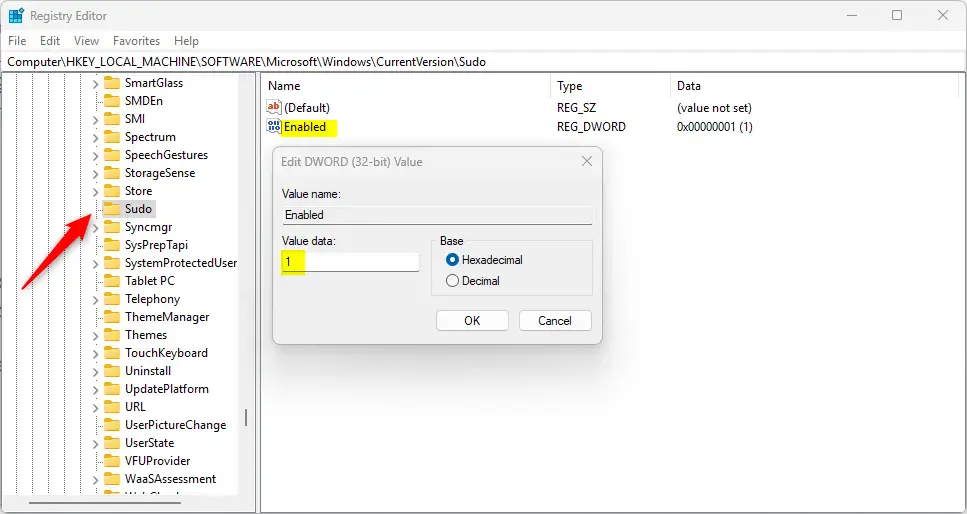
Enable or disable sudo in Registry Editor - After making changes in the Registry, restart your computer for them to take effect. To undo the change later, set Enabled back to 0 and restart again.
Summary
Turning on sudo in Windows 11 lets you run commands as admin straight from the command line. It saves time, and you don't have to stay signed in to a full administrator session or open a separate elevated window every time. Pick the mode that matches how you work, and switch it off when you no longer need it. For more details, you can visit the official Microsoft blog.
Was this guide helpful?

About the Author
Richard
Tech Writer, IT Professional
Richard is a writer at Geek Rewind who turns complex IT tasks into clear, step-by-step guides. He draws on years of hands-on experience in system administration and enterprise IT operations, focusing on Windows, Linux and WordPress: the problems people actually run into, and the fixes that work. His server and WordPress guides come from systems he runs himself. Richard builds and maintains the platform behind Geek Rewind, from its Ubuntu servers and Nginx configuration to its custom WordPress plugins. Many new tutorials start with readers' questions, and he's always glad to answer them in the comments.




No comments yet — be the first to share your thoughts!