How to Add or Remove WMIC Command Feature in Windows 11

WMIC (Windows Management Instrumentation Command-line) is a tool that lets you check and change computer settings using text commands. Microsoft removed it by default starting in Windows 11 version 22H2. On newer builds such as 24H2, it is an optional feature that is not installed unless you add it.
Windows PowerShell handles most modern system tasks now. Older scripts, installers and hardware tests still call WMIC, though, and they fail if it is missing. If your older tools need it, you can add the feature back and remove it again later.
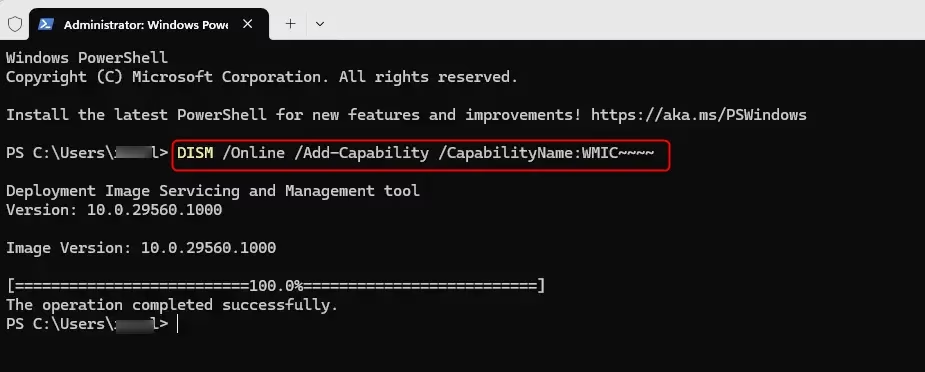
Right-click the Start button , select Terminal (Admin), then paste DISM /Online /Add-Capability /CapabilityName:WMIC~~~~ and press Enter to add WMIC. To remove it, use DISM /Online /Remove-Capability /CapabilityName:WMIC~~~~ instead. Restart your PC to apply the change.
Why You Might Need This
Trimming down a Windows 11 installation often involves removing optional components like WMIC. If a script or legacy tool needs it later, you can reinstall it with a single command. Once the feature is back, you can manage computers from the command line with WMIC again.
The steps are the same on Windows 11 Home and Pro.
Important: Admin Rights Required
If you open the terminal without admin rights, the command will fail with an access error. Close the window and reopen it as administrator. Adding the feature may also need an internet connection, because Windows can download it through Windows Update .
How to Add or Remove WMIC Using Commands
- Right-click the Start button and select Terminal (Admin). On some builds it is labelled Windows Terminal (Admin). Click Yes if the User Account Control prompt appears. A terminal window opens, usually with a Windows PowerShell tab.
- Choose your shell. PowerShell is fine. If you prefer Command Prompt, click the down arrow next to the plus tab and select Command Prompt. Either one runs the commands below.
- To add WMIC, copy and paste the following command into the terminal, then press Enter.
Wait for the progress to finish. You should see a message that the operation completed successfully.DISM /Online /Add-Capability /CapabilityName:WMIC~~~~ - To remove WMIC, copy and paste the following command instead, then press Enter.
Again, wait for the success message. Run only one of the two commands, depending on what you want.DISM /Online /Remove-Capability /CapabilityName:WMIC~~~~ - Close Windows Terminal when you are finished.
To undo either change, run the other command in an admin terminal.
What Happens Next?
Restart your PC to apply the changes fully, especially if a script or app still behaves as if WMIC is in its old state. After the restart, WMIC is available to your scripts and tools if you added it. If you removed it, anything that depends on it will report that the command is not found.
Summary
WMIC on Windows 11 is an optional feature for the command line. It lets you check computer hardware and software details using text commands. Microsoft removed it by default in newer Windows updates, but you can turn it back on if older scripts or apps still need it. If nothing on your PC depends on it, you can leave it off or remove it again.
References:
Have a question about this guide?
Answered by AI from this guide. Good questions may be added to this page — please don't include personal details.
Did this guide fix your problem?

About the Author
Richard
Tech Writer, IT Professional
Richard is a writer at Geek Rewind who turns complex IT tasks into clear, step-by-step guides. He draws on years of hands-on experience in system administration and enterprise IT operations, focusing on Windows, Linux and WordPress: the problems people actually run into, and the fixes that work. His server and WordPress guides come from systems he runs himself. Richard builds and maintains the platform behind Geek Rewind, from its Ubuntu servers and Nginx configuration to its custom WordPress plugins. Many new tutorials start with readers' questions, and he's always glad to answer them in the comments.
No comments yet — be the first to share your thoughts!