How to Automatically Save Photos to OneDrive in Windows 11

Automatically saving photos and videos to OneDrive in Windows 11 means your pictures from cameras and phones upload to Microsoft’s cloud storage without you lifting a finger.
OneDrive is a service that syncs files between your computer and online storage, letting you see them on other devices or access them from anywhere.
This automatic saving feature works with many devices, including cameras, smartphones, and USB drives, ensuring your memories are backed up as soon as you connect them.
You can turn this setting on or off directly within the OneDrive app on your Windows 11 PC.
Enable the camera roll backup feature in Windows 11 settings to automatically save photos and videos to OneDrive. This syncs media from connected devices directly to your OneDrive’s Camera Roll folder.
Turn on or off save photos and videos from devices to OneDrive
As mentioned, you can have your photos and videos automatically uploaded to your OneDrive account without being prompted each time.
Here’s how to set that up.
First, confirm that you have set up OneDrive in Windows 11.
Once OneDrive is set up, launch it from the Start menu. Alternatively, you can navigate to the OneDrive executable file located at “C:Program FilesMicrosoft OneDriveOneDrive.exe“.
You can also access the OneDrive icon through the Taskbar overflow area.
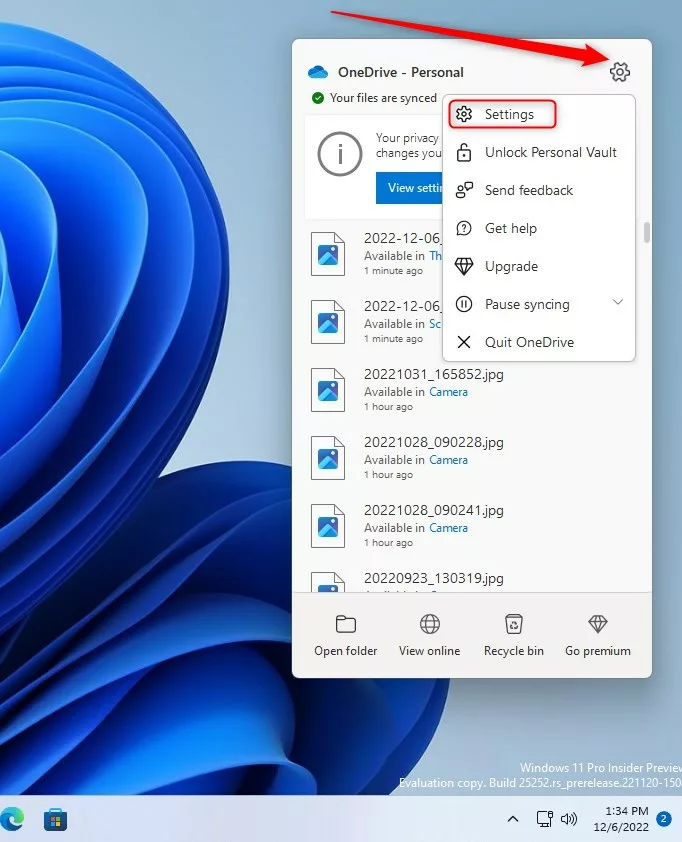
With the OneDrive app open, click the Help & Settings (gear) icon, then select Settings.
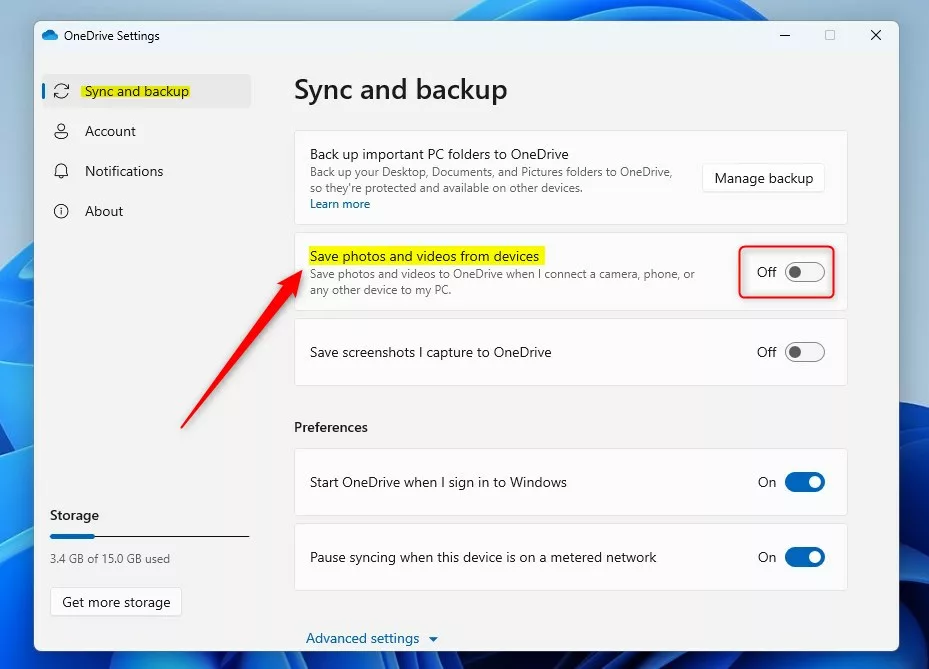
In the Settings pane, under the Sync and backup section, toggle the switch to the On position for “Save photos and videos from devices“.
To turn this feature off, simply toggle the switch back to the Off position.
That completes the process!
Reference:
Conclusion:
- Enabling or disabling the “Save photos and videos from devices to OneDrive” feature in the OneDrive app for Windows 11 is a straightforward process.
- Following the outlined steps, users can effortlessly manage the automatic upload of photos and videos to their OneDrive account.
- This feature enhances convenience by ensuring seamless synchronization across devices and easy access to multimedia content.
- Please utilize the comment section below the article for additional assistance or feedback.
Was this guide helpful?

About the Author
Richard
Tech Writer, IT Professional
Richard, a writer for Geek Rewind, is a tech enthusiast who loves breaking down complex IT topics into simple, easy-to-understand ideas. With years of hands-on experience in system administration and enterprise IT operations, he’s developed a knack for offering practical tips and solutions. Richard aims to make technology more accessible and actionable. He's deeply committed to the Geek Rewind community, always ready to answer questions and engage in discussions.


[…] phone and computer in one place, starting with Windows build 23435 in File Explorer. If you use OneDrive Camera Roll Backup, your mobile photos sync automatically. By editing the registry, you can show or hide this folder […]
[…] Explorer, introduced in Windows build 23435. It makes looking at your photos easier. If you use OneDrive Camera Roll Backup on your phone, those photos show up here […]