

This article explains how to turn the new “Recall & Snapshots” feature on or off in Windows 11.
What is Recall & Snapshots?
Recall & Snapshots is an AI feature in Windows 11. Think of it like your computer’s memory. It takes pictures of your screen automatically. Then you can search through these pictures to find things you’ve seen before on your PC.
Why would you use this? Imagine you saw something on your screen last week but can’t remember where. Recall helps you find it fast.
What happens when it’s on? Your PC takes a snapshot every 5 seconds. It only saves the snapshot if something changed since the last one. This saves storage space.
Do You Meet the Requirements?
Your PC needs these minimum specs to use Recall:
- A Copilot+ PC
- 16 GB RAM
- 8 logical processors
- 256 GB storage capacity
Important: You need at least 50 GB of free storage to start using Recall. If your PC drops below 25 GB of free space, snapshots stop saving automatically.
Method 1: Turn Recall On or Off Using Settings
This is the easiest way. Here’s how:
- Open the Settings app. Click the Start menu and select Settings. Or press the Windows key + I on your keyboard.
- When Settings opens, click Privacy & security on the left side.
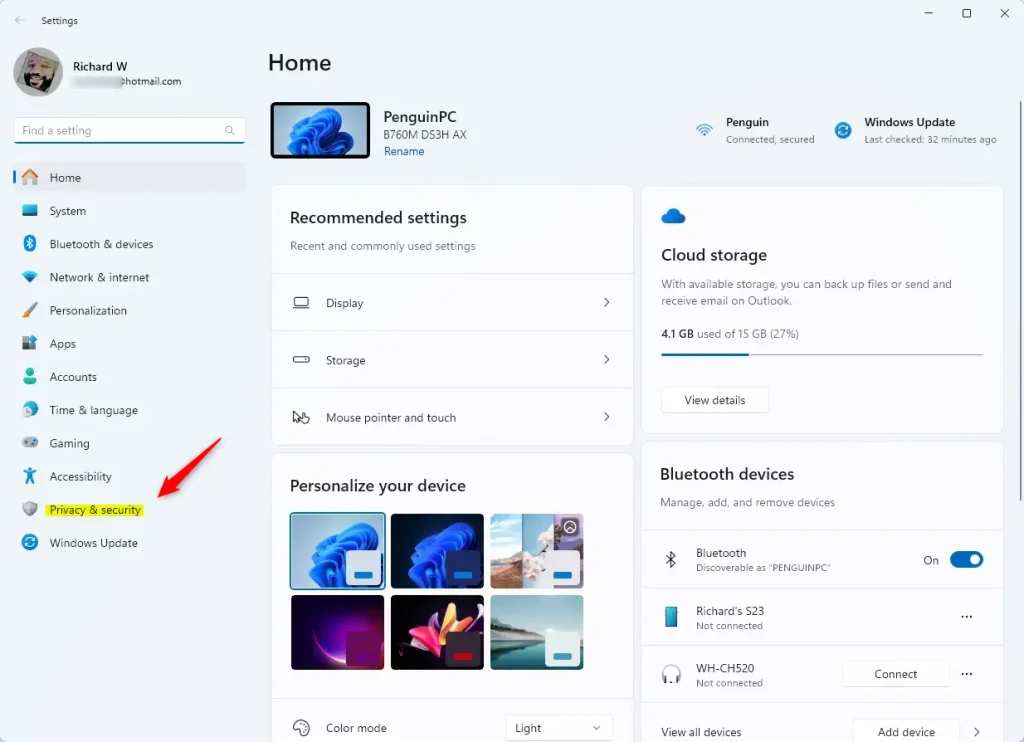
- On the right, click Recall & snapshots to open its settings.
- Find the “Save snapshots” tile. Toggle the switch to turn snapshots On or Off.
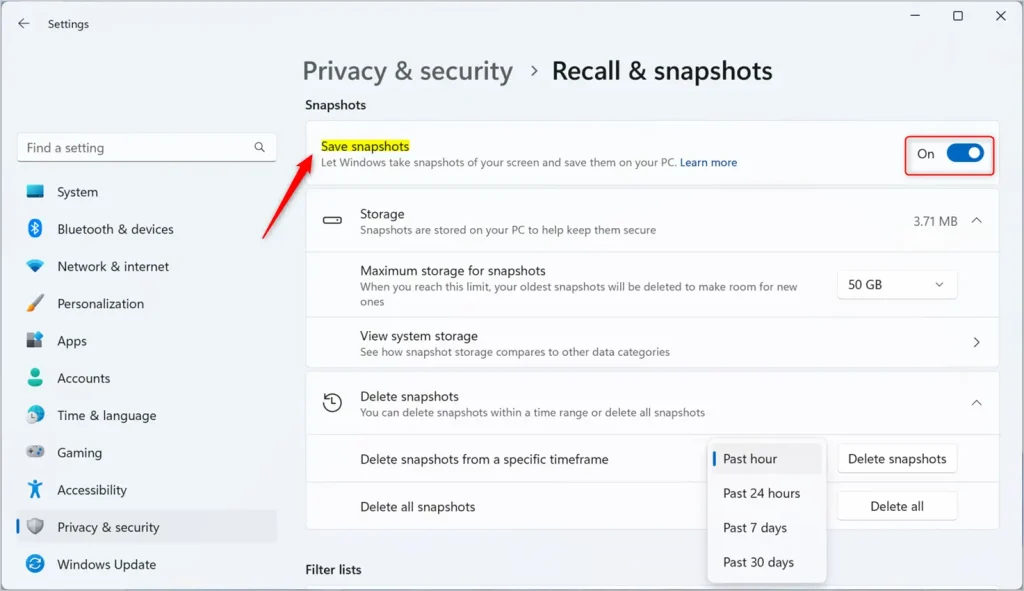
- Close the Settings app when you’re done.
Method 2: Turn Recall On or Off Using Group Policy Editor
This method uses a more advanced tool. Follow these steps:
- ⚠️ Admin privileges required. Open the Local Group Policy Editor. Search for “Edit group policy” in the Start menu and click it.
- Navigate to these folders in order:
- User Configuration
- Administrative Templates
- Windows Components
- Windows AI
- On the right side, find and double-click “Turn off Saving Snapshots for Windows”.
- A window opens. Choose one of these options:
- Not Configured (default) – Same as Disabled. Snapshots are saved.
- Enabled – Windows stops saving snapshots. You can’t search or browse your activity history.
- Disabled – Windows saves snapshots. You can search and browse your activity history.
- Click OK to save your changes.
- You may need to restart your PC for the changes to take effect.
Summary
Recall & Snapshots is a useful Windows 11 feature that captures your screen automatically. You can search through these snapshots to find things you’ve seen before. Turning it on or off is simple. Use the Settings app for an easy approach, or use Group Policy Editor if you want more control. Just remember: you need a Copilot+ PC with at least 16 GB of RAM and 50 GB of free storage to use this feature.
Frequently Asked Questions
What is the Recall & snapshots feature in Windows 11?
How do I enable Recall & snapshots in Windows 11?
What are the system requirements for using Recall & snapshots?
Can I turn off Recall & snapshots once it's enabled?
How can I manage Recall & snapshots using the local group policy editor?
Reference: Microsoft

Leave a Reply