How to Enable or Disable Memory Compression in Windows 11

Memory compression in Windows 11 reduces the size of idle data sitting in your RAM (random access memory) to create more free space for active apps and games. This built-in feature runs automatically in the background on systems with 4GB or more of RAM to keep your PC fast during heavy multitasking.
Turning memory compression on or off lets you control how Windows handles your system memory using Windows PowerShell if your computer struggles with performance issues.
You can enable or disable memory compression in Windows 11 using PowerShell. Open Windows Terminal as administrator and run Set-MMAgent -MemoryCompression $true to enable, or Set-MMAgent -MemoryCompression $false to disable. Restart your computer after running the command.
Why use memory compression?
This feature helps your PC run more apps at once by shrinking data stored in memory.
What happens when done?
Enabling memory compression in Windows 11 reduces physical RAM usage by packing unused data into smaller spaces, which helps your system run multiple apps smoothly. Turning it off stops the packing process, freeing up processing power but forcing Windows to rely more heavily on your storage drive, which can cause slowdowns when your computer is busy.
How to check your current status
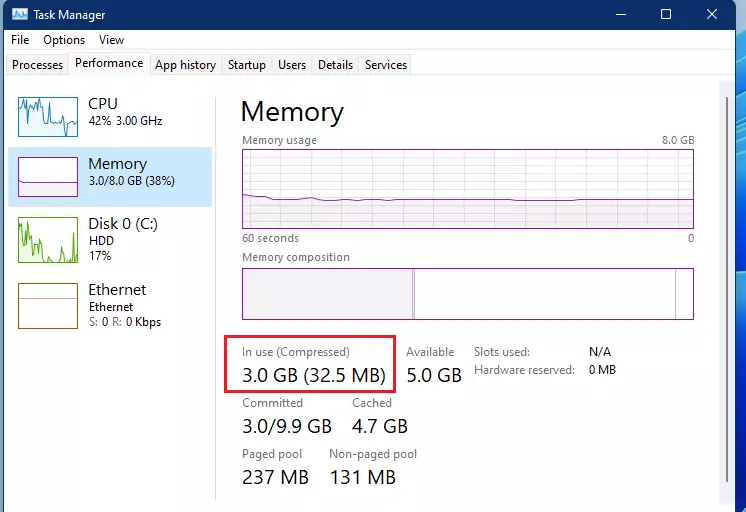
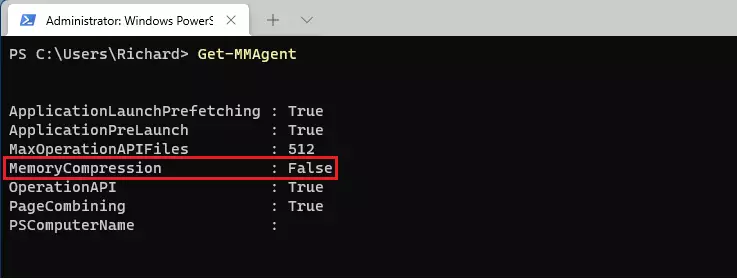
Checking your memory compression status in Windows 11 takes just a few seconds using either Task Manager or PowerShell. Task Manager lets you view the exact amount of compressed data currently in use on the Memory performance tab, while running the Get-MMAgent command in PowerShell gives you a direct readout of whether the feature is turned on.
PowerShell provides real-time system insights for verifying memory compression status in Windows 11. Open Windows Terminal as an administrator, select the PowerShell tab, and run Get-MMAgent to check your status.
Memory compression in Windows 11 activates with a command in Windows Terminal. If the status shows 'False', meaning it's off, here's how to turn it on. Open Windows Terminal as an administrator, select the PowerShell tab, and type the command to enable memory compression.
If memory compression status shows as False, turning memory compression on is possible. Open Windows Terminal as administrator, then ensure you are in the PowerShell tab. Enter this command to turn memory compression on.
Set-MMAgent -MemoryCompression $true
How to disable memory compression
To turn this feature off, open Windows Terminal as administrator and select the PowerShell tab. Enter this command:
Set-MMAgent -MemoryCompression $false
Performance, SysMain, and RAM Latency
Memory compression in Windows 11 uses a small amount of your processor's power to shrink and unshrink data. This usually doesn't have a significant impact on performance.
Troubleshooting Performance Degradation
Reverting these settings becomes necessary if your computer feels slower afterward. Open PowerShell as administrator and enter Set-MMAgent -MemoryCompression $true and restart your PC. If issues persist, check your Task Manager to see if a specific app is consuming too much memory.
Summary
Memory compression is a key feature in Windows 11. It helps your PC run smoother by shrinking data in your RAM, and generally, leaving it enabled delivers optimal speed.
Was this guide helpful?

About the Author
Richard
Tech Writer, IT Professional
Richard is a writer at Geek Rewind who turns complex IT tasks into clear, step-by-step guides. He draws on years of hands-on experience in system administration and enterprise IT operations, focusing on Windows, Linux and WordPress: the problems people actually run into, and the fixes that work. His server and WordPress guides come from systems he runs himself. Richard builds and maintains the platform behind Geek Rewind, from its Ubuntu servers and Nginx configuration to its custom WordPress plugins. Many new tutorials start with readers' questions, and he's always glad to answer them in the comments.



No comments yet — be the first to share your thoughts!