How to Enable or Disable “Display File Icon on Thumbnails” in Windows 11

The “Display file icon on thumbnails” setting in Windows 11 controls the small app badges, such as a tiny Word or PDF logo, that sit on top of your file pictures and document previews. Windows turns it on by default, so you can see at a glance which program opens a given file type.
If the badges clutter your folders, you can turn the setting off in the File Explorer options menu in about three clicks. If a system update hides the badges, use the same menu to turn it back on. The registry and PowerShell methods below give the same result. All three work on both Windows 11 Home and Pro.
Open File Explorer , click the three horizontal dots on the top toolbar, choose Options, select the View tab, and uncheck Display file icon on thumbnails. Click Apply and OK to save your changes and remove the tiny program badges from your file previews.
Method 1The Quick Way Using File Explorer
The simplest way to change this setting is the Folder Options window in File Explorer . You open any folder, go to the three-dot menu, choose Options, and switch to the View tab. The setting is a checkbox in the Advanced settings list. Checked means the badges show. Unchecked means they are hidden.
Don’t confuse it with the nearby checkbox Always show icons, never thumbnails. That one turns off picture previews completely, so there is no thumbnail left to put a badge on. If you expect badges and see none, check that this box is cleared as well.
- Open File Explorer . Press
Windows Key + Eon your keyboard. A File Explorer window opens. You can also click the folder icon on your taskbar if you prefer the mouse. - Click the three horizontal dots (
...) in the toolbar at the top of the File Explorer window. A secondary menu opens. If your window is narrow, this menu may hold more commands than usual. - Click Options at the bottom of that menu. The Folder Options window appears.
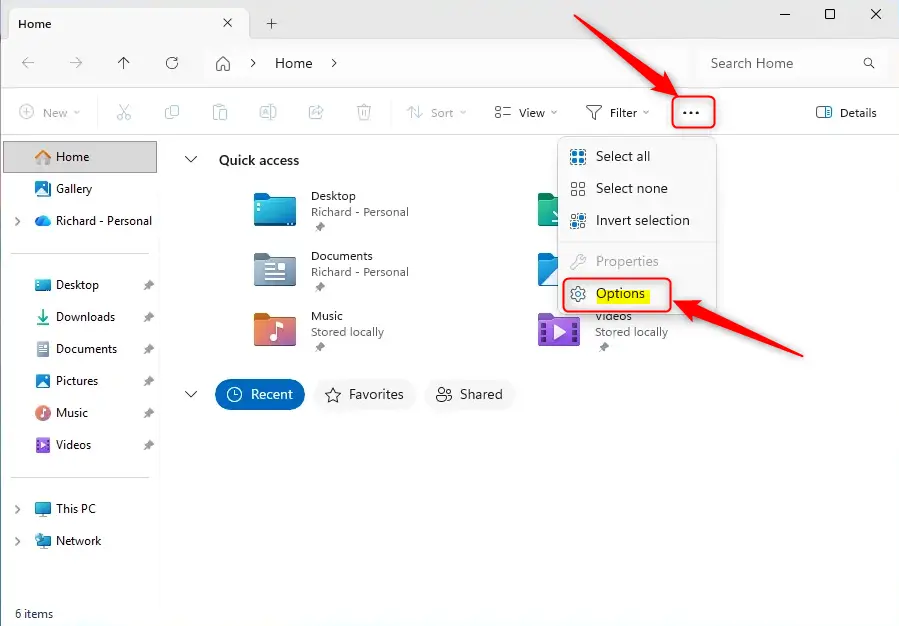
File Explorer options window showing folder open settings in Windows 11. - Click the View tab near the top of the window. You now see a long list of advanced folder settings.
- Scroll down the list until you find Display file icon on thumbnails. Clear the checkbox to remove the tiny program badges. Leave it checked to keep them.
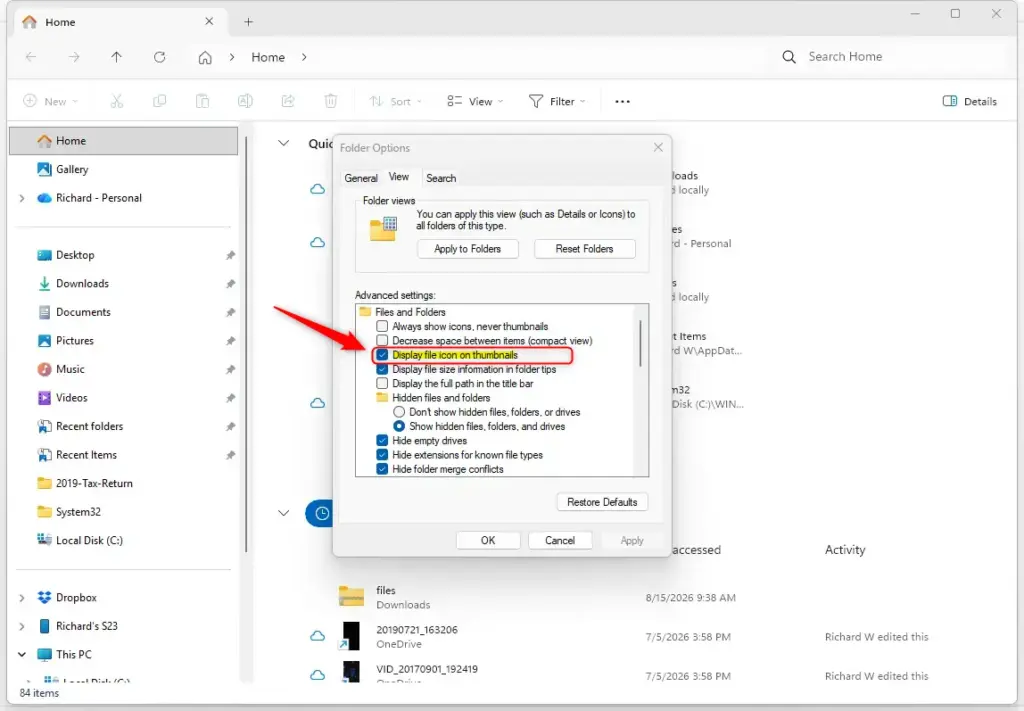
- Click Apply, then click OK to close the window. Your previews should update right away. If a folder still looks the same, press F5 or close and reopen it.
To undo the change, repeat the steps and set the checkbox back to how it was. You don’t need to restart Windows.
Method 2The Advanced Way Using Registry Editor
You can also make this change in Registry Editor by editing one value in the current user’s Explorer settings. This is useful if the checkbox in Folder Options doesn’t behave as expected, or if you are setting up several machines the same way. The key sits under 🗝️HKEY_CURRENT_USER\
Before you start, note that Registry Editor changes take effect immediately and there is no undo button. Only touch the value named in these steps. If you want a safety net, use File Export in Registry Editor to save a backup of the key first.
- Press
Windows Key + Ron your keyboard. The Run dialog box opens. - Type
regeditinto the text field and press Enter. If a User Account Control prompt appears, click Yes. Registry Editor opens. Warning: The registry is a powerful area of Windows. Change only the exact settings mentioned here so you don't break other features. - Copy this path, paste it into the address bar at the top of the Registry Editor window, and press Enter:
HKEY_CURRENT_USER\Software\Microsoft\Windows\CurrentVersion\Explorer\Advanced. The left pane jumps to the Advanced key, and its values appear in the right pane. - Look through the right pane for a value named
ShowTypeOverlay. If it is there, go to the next step. If it is missing, right-click an empty space in the right pane, point to New, choose DWORD (32-bit) Value, and name itShowTypeOverlay. The new value appears in the list. - Double-click
ShowTypeOverlay. The Edit DWORD (32-bit) Value box opens. Set Value data to0to disable the icon overlays, or to1to enable them. Click OK. - Restart File Explorer so the change takes effect. Press
Ctrl + Shift + Escto open Task Manager, find Windows Explorer in the list of processes, right-click it, and choose Restart. Your taskbar and desktop disappear for a moment and then come back. Open a folder with document previews to check the result.
To undo the change, set the value data back to the other number and restart File Explorer again. Signing out and back in also works if you'd rather not use Task Manager.
Method 3The Automated Way Using PowerShell
PowerShell does the same job with a short command, which is quick when you already have a terminal open or want to script the change. You paste a registry command, press Enter, and then restart the Windows shell so File Explorer reloads the setting.
- Open PowerShell as an administrator (this requires administrator privileges). Click the Start button, type
PowerShell, right-click the result, and select Run as administrator. Click Yes if User Account Control asks. A PowerShell window opens. - To hide the icon overlays, copy and paste this command into the PowerShell window and press Enter:
Set-ItemProperty -Path HKCU:\Software\Microsoft\Windows\CurrentVersion\Explorer\Advanced -Name ShowTypeOverlay -Value 0. If the command works, PowerShell returns to a new prompt with no error message in red. - To show the icons again, run this command instead:
Set-ItemProperty -Path HKCU:\Software\Microsoft\Windows\CurrentVersion\Explorer\Advanced -Name ShowTypeOverlay -Value 1. Use only one of the two commands. The last one you run is the setting that applies. - Restart the Windows shell. PowerShell edits the underlying setting directly, so File Explorer needs to reload before you see the change. Run this command right after your registry command:
Stop-Process -Name explorer -Force. Tip: Your taskbar and desktop will flash away and reappear after a second or so. This is normal and means File Explorer reloaded.
One caution: this setting lives in the current user's registry. If you elevate with a different administrator account, the command may change that account's settings instead of yours. If nothing changes, use the File Explorer or Registry Editor method while signed in as yourself.
Summary
You can manage the "Display file icon on thumbnails" setting in Windows 11 with File Explorer, Registry Editor, or PowerShell. The Folder Options checkbox is the easiest choice for most people. The registry and PowerShell methods are handy when you need a repeatable fix. Whichever you use, you can switch the setting back at any time.
Have a question about this guide?
Answered by AI from this guide. Good questions may be added to this page — please don't include personal details.
Did this guide fix your problem?

About the Author
Richard
Tech Writer, IT Professional
Richard is a writer at Geek Rewind who turns complex IT tasks into clear, step-by-step guides. He draws on years of hands-on experience in system administration and enterprise IT operations, focusing on Windows, Linux and WordPress: the problems people actually run into, and the fixes that work. His server and WordPress guides come from systems he runs himself. Richard builds and maintains the platform behind Geek Rewind, from its Ubuntu servers and Nginx configuration to its custom WordPress plugins. Many new tutorials start with readers' questions, and he's always glad to answer them in the comments.
No comments yet — be the first to share your thoughts!