How to Enable or Disable Click to Do in Windows 11
Click to Do in Windows 11 lets you take action on on-screen text instantly. This feature finds specific things like addresses or phone numbers you highlight. Then, it opens the right app, like Maps or your phone app, without you having to copy and paste.
Click to Do looks at text or pictures you select. It can then help you open links, set up calendar events, or do other quick tasks. This saves you time by removing extra steps.
You can use Click to Do to easily add dates and times to your calendar. This feature is currently in preview for Copilot+ PCs and part of the Windows Insider Program.
Enable or disable Click to Do in Windows 11 via Settings. Open Settings, go to Privacy & security, then select Click to Do (preview) to toggle it on or off. Changes may require a restart.
Enable or Disable Click to Do
Turning the Click to Do feature on or off is possible using the Windows 11 Settings app. Open Settings, go to Privacy & security, and find the Click to Do (preview) option to make your choice.
Method 1Using the Settings App
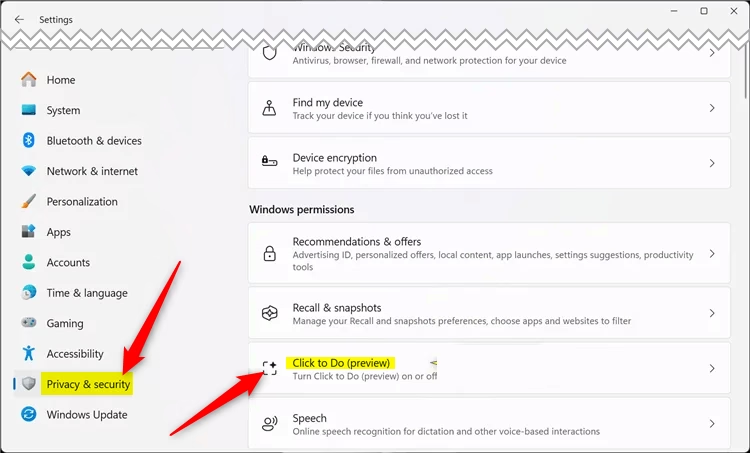
Turning the Click to Do feature on or off is possible using the Windows 11 Settings app . Open Settings, click ‘Privacy & security,’ and then look for ‘Click to Do (preview)’ under ‘Windows permissions’ to change the setting.
To open Settings , click the Start menu and select Settings, or use the Windows key + I shortcut. Once Settings is open, click ‘Privacy & security’ on the left.
Then, find and select ‘Click to Do (preview)’ under ‘Windows permissions’ on the right. On the Click to Do settings page, toggle the button to turn the feature on or off.
A ‘Restart Now’ prompt may appear.
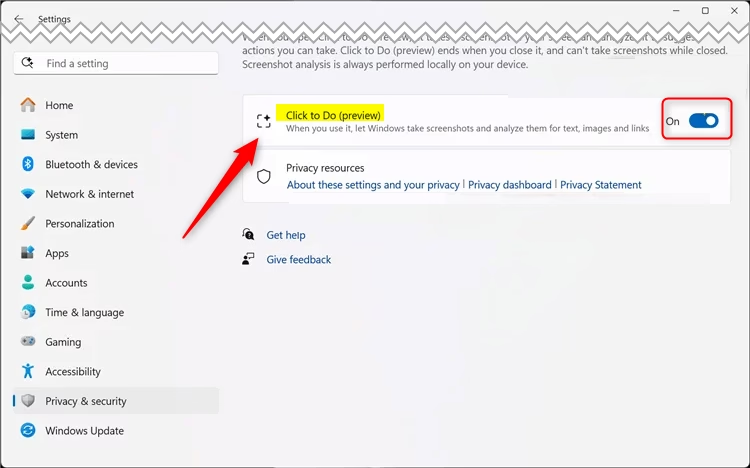
A computer restart might be necessary for the changes to take effect.
Method 2Using Group Policy Editor
The Local Group Policy Editor offers more control and lets you manage Click to Do on multiple computers. To open the Local Group Policy Editor, search for ‘Edit group policy’ in the Start menu . You will then find the specific setting to turn Click to Do on or off.
Alternatively, the Local Group Policy Editor can enable or disable the “Click to Do” feature. Open the Local Group Policy Editor by searching for “Edit group policy” on the Start menu .
Then, navigate to these folders:
Computer Configuration > Administrative Templates > Windows Components > Windows AI
In the right-hand pane labeled “Windows AI details,” find and double-click the “Disable Click to Do” setting.
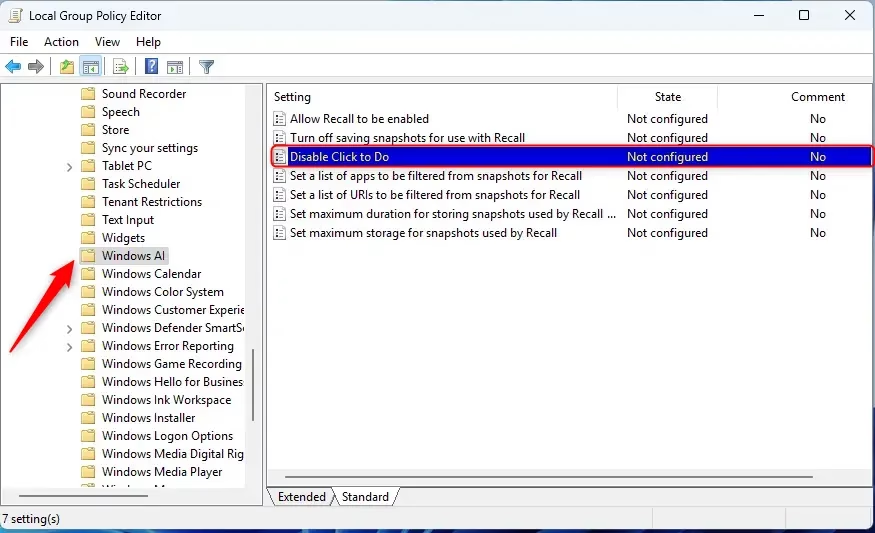
A new window will appear for “Disable Click to Do.” Choose one of these options:
- Not Configured (default) – Same as Disabled.
- Enabled – Click to Do component and entry points will not be available to users.
- Disabled – Users will have Click to Do available on their device.
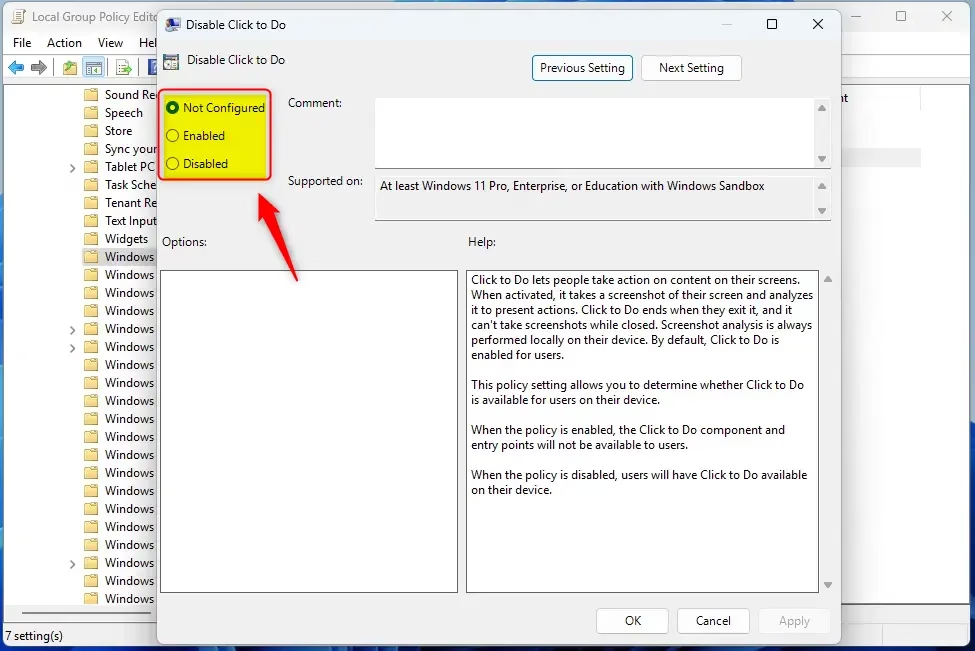
Click OK to save your changes.
Method 3Using the Registry Editor
If you’re comfortable making changes to your system’s configuration, you can use the Windows Registry Editor to turn the Click to Do feature on or off. Before you start, it’s a good idea to back up your registry or create a System Restore point, then open the Registry Editor to find the correct setting.
The Windows Registry Editor offers another method for enabling or disabling the “Click to Do” feature. Remember to back up your registry before making any changes, or create a System Restore point as a precaution.
First, open the Windows Registry and navigate to this folder path:
Computer\HKEY_CURRENT_USER\Software\Policies\Microsoft\Windows\WindowsAIDouble-click and open the DisableClickToDo name and set the value to 1 to disable the “Click to Do” feature.
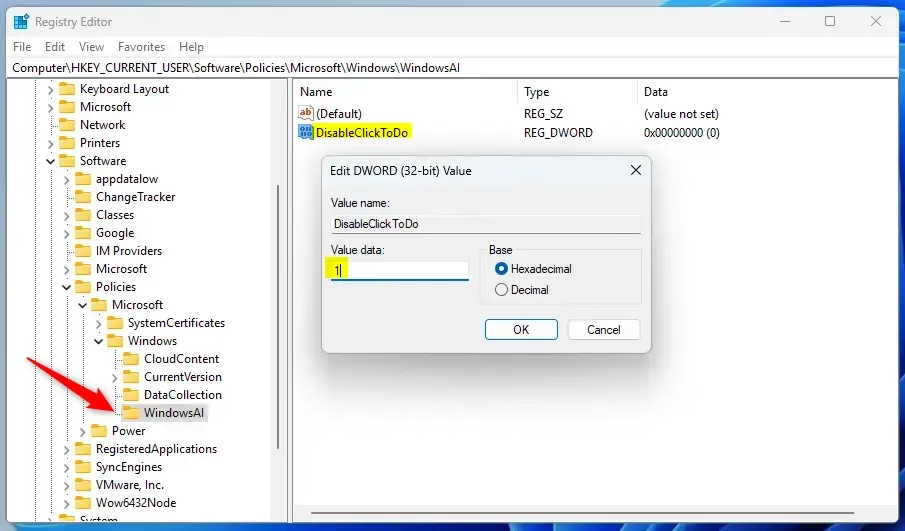
To use the feature again and revert Windows to its original settings, delete the DisableClickToDo item you created.
A computer restart might be necessary for the changes to take effect.
That should do it!
Reference
Summary
Click to Do is a handy feature that helps you interact with content more quickly. You can turn it on or off using Windows Settings , the Group Policy Editor, or the Registry Editor, depending on what works best for you.
How do I enable Click to do in 🪟 Windows 11?
Open Settings , then go to > Privacy & security Click to Do. Set the Click to Do setting to: On: Click to Do is enabled (default) Off: Click to Do is disabled.
How to use Microsoft Click to Do?
Use Windows key + mouse click or Windows key + Q to enter Click to Do and take actions on what you clicked.
Was this guide helpful?

About the Author
Richard
Tech Writer, IT Professional
Richard, a writer for Geek Rewind, is a tech enthusiast who loves breaking down complex IT topics into simple, easy-to-understand ideas. With years of hands-on experience in system administration and enterprise IT operations, he’s developed a knack for offering practical tips and solutions. Richard aims to make technology more accessible and actionable. He's deeply committed to the Geek Rewind community, always ready to answer questions and engage in discussions.


No comments yet — be the first to share your thoughts!