How to Enable Hyper-V on Windows 11

Hyper-V is a built-in tool in Windows 11 Pro, Enterprise, and Education editions. It lets you run virtual machines to test apps or try other operating systems on your PC.
You can run another operating system inside a window on your main desktop, and your own files stay untouched. Windows 11 Home does not include Hyper-V in its Windows Features list, so Home users need a workaround (or an upgrade to Pro) before they can start. Everything below assumes a current version of Windows 11.
Open Settings Apps Optional features, search for Hyper-V, select it and click Install. Restart your PC when prompted. Hyper-V is then ready to use. Note: only Windows 11 Pro, Enterprise, and Education include Hyper-V; Home edition requires an upgrade.
What is Hyper-V?
Hyper-V lets you create virtual computers on your own PC. Each one acts like a separate computer inside your real one, with its own virtual disk, memory, and operating system. If a virtual machine crashes or gets infected, your main Windows install is not affected. You can delete the virtual machine and start again.
- Trying new software safely without risking your main computer. If the software misbehaves, you throw away the virtual machine and nothing on your real PC changes.
- Learning how other operating systems work, such as another version of Windows or a Linux distribution, without changing how your PC boots.
- Running programs that only work on other systems, such as older software that will not run properly on Windows 11.
Before You Start: Check Virtualization Support
Virtualization support must be enabled in your BIOS or UEFI firmware before you can enable Hyper-V on Windows 11. Most modern processors support it, but motherboard manufacturers often turn it off by default. Hyper-V will not install or run properly without hardware virtualization turned on.
You can check whether it is already on without leaving Windows. Press Ctrl+Shift+Esc to open Task Manager , click the Performance tab, and select CPU. Look for Virtualization in the details below the graph. If it says Enabled, you can skip the firmware steps. If it says Disabled, follow the steps below.
Be aware that Task Manager may also show Enabled when Hyper-V is already installed, because Windows is then already using the virtualization features. That is not a problem.
To check and turn it on:
- Restart your computer and enter the BIOS/UEFI settings. This is usually done by pressing Delete, F2, or F10 while your PC starts up. The right key is often shown on the first screen after power-on. You should now see the firmware setup screen instead of Windows loading.
- Look for an option named Virtualization Technology, Intel VT-x, or AMD-V. On some AMD boards it is called SVM Mode. It is often under an Advanced, CPU Configuration, or Overclocking menu, so check each one if you do not see it straight away.
- Make sure it shows Enabled. If it says Disabled, select it and change it to Enabled.
- Save and exit the BIOS. Your PC will restart and boot into Windows. The menu usually offers Save and Exit, and the F10 key often does the same thing. You can turn the setting off again later by repeating these steps.
If you are unsure about this step, your PC or motherboard manual gives the best guidance, because firmware menus differ a lot between makers. You can also search online for the exact steps for your model. Use a phrase like "how to enable virtualization on" followed by your PC or motherboard model:
[your PC model]A search like that usually returns the exact steps for your hardware.
Turn On Hyper-V via Windows Features
Windows Features is the easiest way to enable Hyper-V on Windows 11 without using the command line. You open the built-in dialog for turning Windows features on or off, check the box for Hyper-V and all its sub-options, and let Windows install the required system files. Then you restart your computer to finish the setup.
Check your edition under Settings System About.
The restart is required. Hyper-V is not active until the PC has rebooted, and the first restart may take a little longer than usual while Windows finishes the changes.
Here's how:
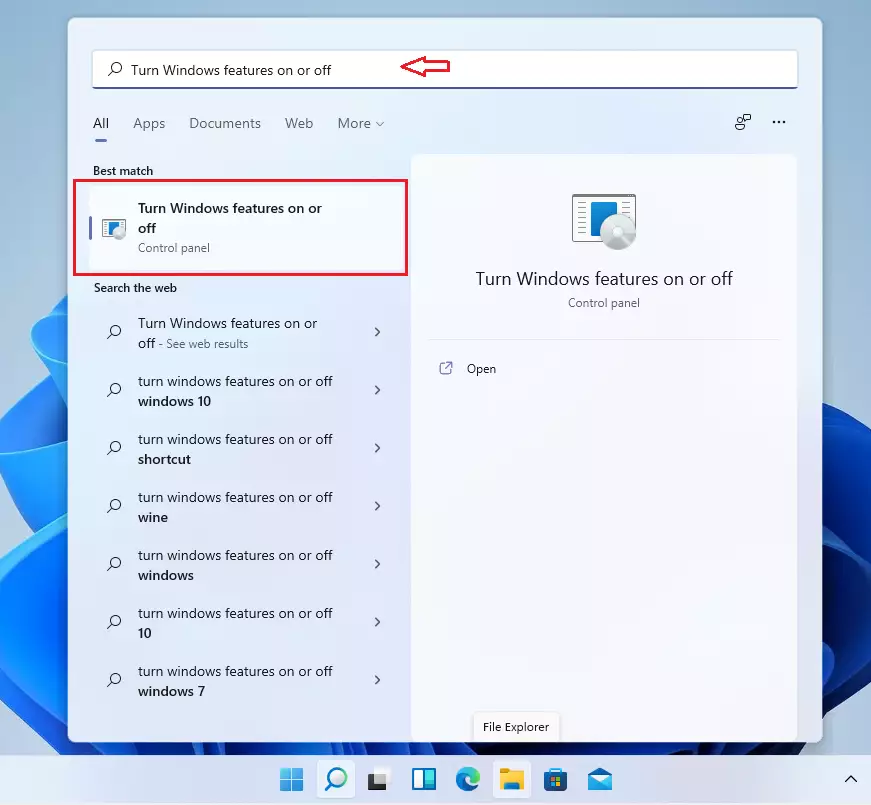
- Click the Start button (Windows icon) and type
Turn Windows features on or off, then click the matching result. The Windows Features dialog should open with a list of features. - In the window that opens, scroll down and find Hyper-V. The list is in alphabetical order, so it sits a little below the middle. Click the small plus sign next to it if you want to see the sub-options.
- Check the box next to Hyper-V. Also check its two sub-boxes: Hyper-V Management Tools and Hyper-V Platform. If the main box shows a filled square instead of a tick, only some parts are selected, so expand it and tick everything.
- Click OK. A progress window appears while Windows searches for and applies the required files.
- Windows will prepare the feature. Then it will ask you to restart your PC. Save any open work, then click Restart now. To undo this later, open the same dialog, clear the Hyper-V box, click OK, and restart again.
Alternative: Enable Hyper-V Using Command Prompt
Command Prompt lets you enable Hyper-V on Windows 11 quickly by running a single deployment tool (DISM) command with administrator rights. You open the command console as an administrator, paste the command, and press Enter. Windows then configures and turns on the virtualization platform without any clicking through menus.
This method is handy if you set up several PCs or prefer typing to clicking. It needs the same edition as the other methods, so it will not work on Windows 11 Home.
Here's how:
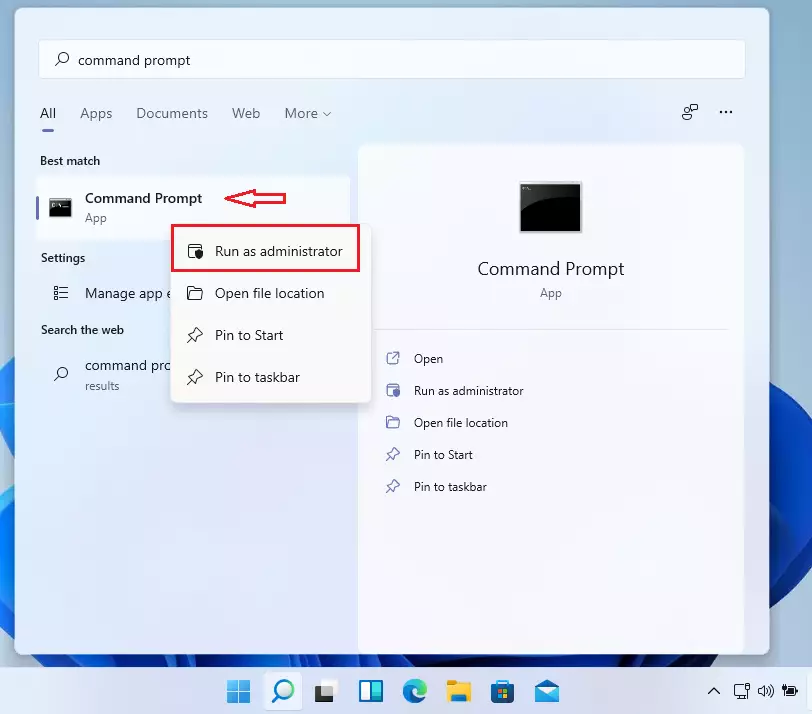
- Click Start and type
Command Prompt. Command Prompt should appear at the top of the results. - Right-click Command Prompt and choose Run as administrator. If a User Account Control prompt appears, click Yes. %%FLAG_ADMIN%% The window title should now start with "Administrator". If it does not, close it and try again, because the command will fail without admin rights.
- Copy and paste this command and press Enter:
DISM /Online /Enable-Feature /All /FeatureName:Microsoft-Hyper-V
A progress bar will count up to 100%. This can take a few minutes. - When it finishes, it will ask if you want to restart. Type
Yand press Enter to reboot your PC. Save your work first, because the restart happens straight away. Hyper-V is only active after this reboot.
Another Way: Enable Hyper-V Using PowerShell
PowerShell provides a fast command-line method to enable Hyper-V on Windows 11 using a single administrator command. You launch Windows PowerShell with administrator privileges, run the feature enablement cmdlet, and let the system install the necessary files. After a restart you can start building virtual machines.
The result is the same as the Windows Features method, so use whichever you are more comfortable with. Like the other methods, it needs Pro, Enterprise, or Education.
Here's how:
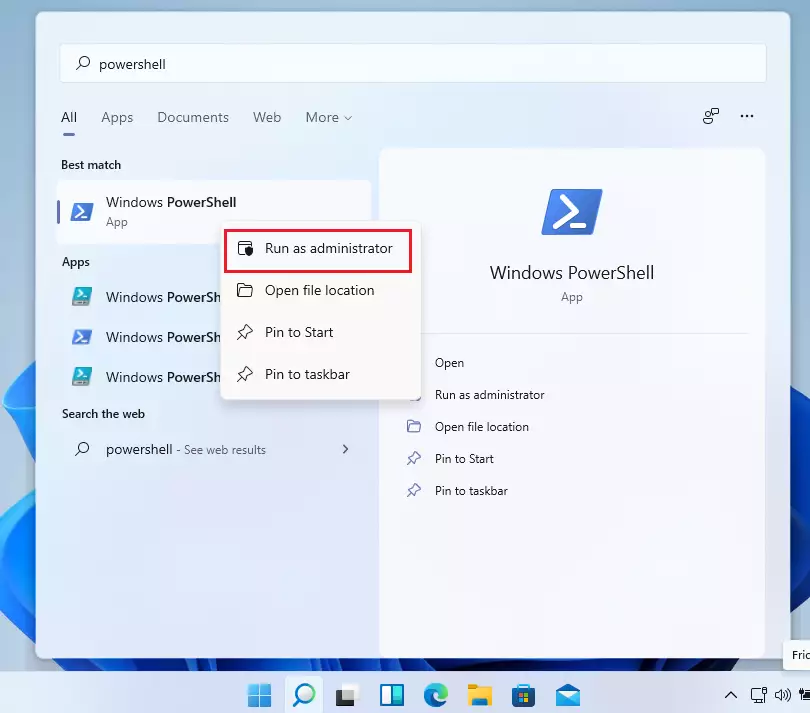
- Click Start and type
PowerShell. Windows PowerShell should appear in the results. - Right-click Windows PowerShell and select Run as administrator. %%FLAG_ADMIN%% Click Yes if User Account Control asks for permission. A blue PowerShell window opens, and "Administrator" appears in its title bar.
- Type or paste this command and press Enter:
Enable-WindowsOptionalFeature -Online -FeatureName Microsoft-Hyper-V -All
PowerShell shows a progress indicator while it installs the feature. Pasting is easier than typing, because a small typo will make the command fail. - When it finishes, restart your computer if asked. If it does not ask, restart anyway, because Hyper-V does not start working until the PC has rebooted.
How to Create a Virtual Machine Using Hyper-V
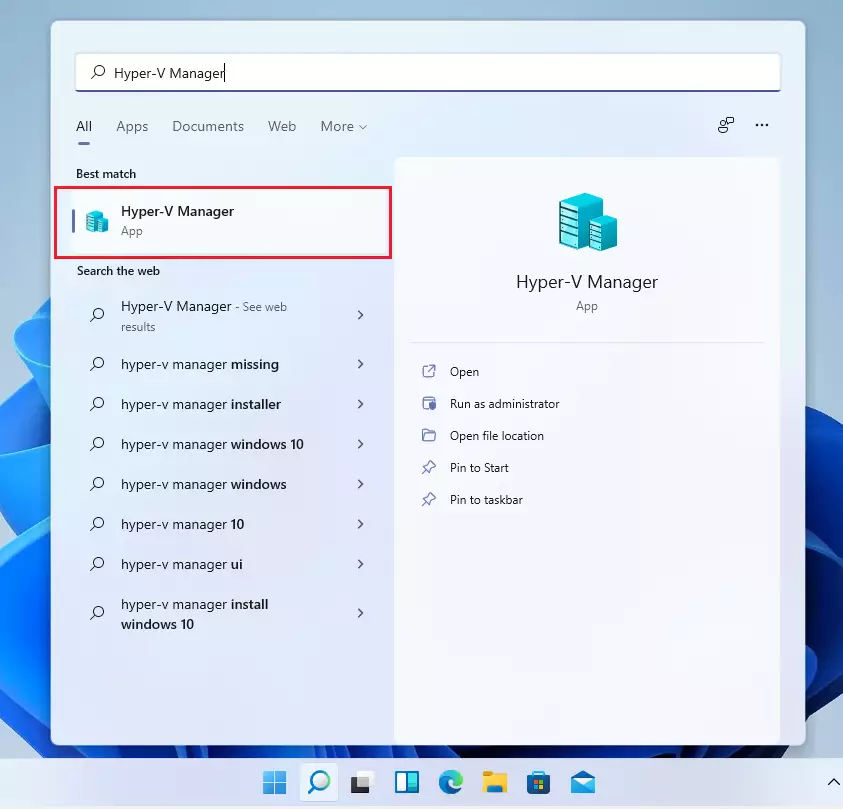
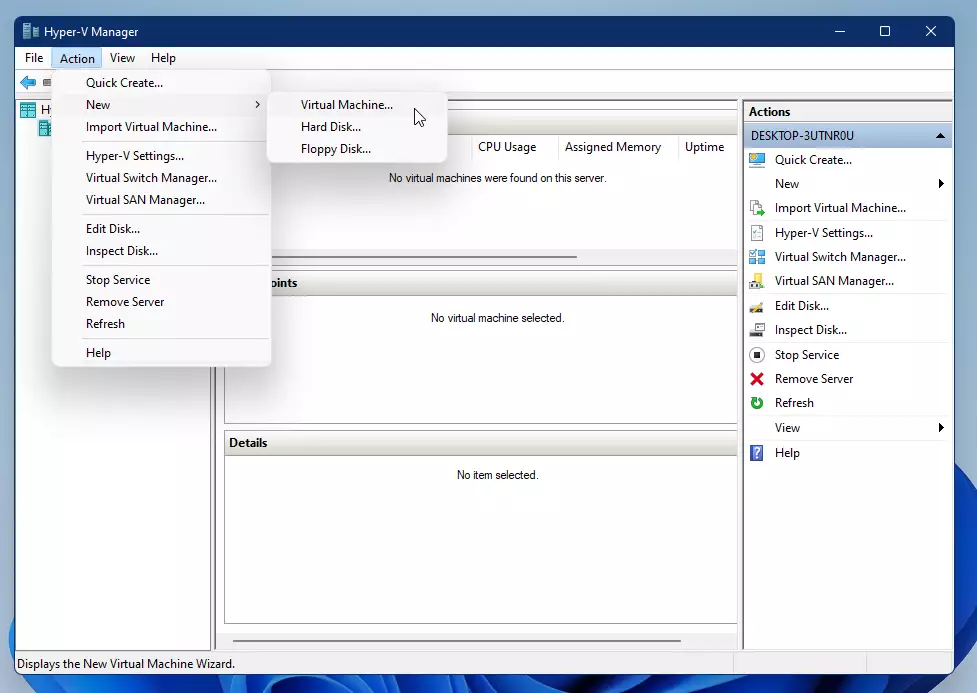
Hyper-V Manager is where you build and run virtual machines once you enable Hyper-V on Windows 11. You open the manager from the Start menu and launch the new virtual machine wizard. Then you follow the on-screen steps to assign memory, connect a virtual hard disk, and install an operating system.
Have an installation file for the operating system ready before you start. This is usually an ISO file for Windows or Linux, which you will point the new virtual machine at.
Here's how:
- Click Start and search for
Hyper-V Managerand open it. If it does not appear, the feature has not finished installing, or you have not restarted since enabling it. Restart and look again. Your own PC should be listed in the left pane of the window. - In the Hyper-V Manager window, click Action New Virtual Machine. The New Virtual Machine Wizard opens. Select your PC's name in the left pane first if the Action menu looks empty.
- Follow the on-screen wizard to set up your new virtual machine. You'll choose things like the name, how much memory (RAM), and disk size. Give the virtual machine only what your PC can spare, because that memory is not available to Windows while the machine runs. For most modern operating systems, choose Generation 2 when the wizard asks. When it asks for installation media, point it at your ISO file.
- Once done, you can start your virtual machine and install an operating system inside it. Right-click the new machine in the list, choose Connect, and then start it. A window opens that behaves like a monitor attached to the virtual PC, and the installer runs inside it.
Summary
Enabling Hyper-V on Windows 11 gives you the tools to run multiple operating systems inside virtual machines on your computer. First check that virtualization is on in your firmware. Then turn on the feature through Windows Features, Command Prompt, or PowerShell, and restart. After that you can use Hyper-V Manager to build and run your first virtual PC.
- Hyper-V lets you run multiple virtual computers on your Windows 11 PC.
- You need to make sure virtualization is enabled in your BIOS before turning on Hyper-V.
- You can enable Hyper-V using Windows Features, Command Prompt, or PowerShell, on Windows 11 Pro, Enterprise, or Education. All three methods need a restart.
- After enabling it, you can create virtual machines to test new software or try other operating systems.
- This is a safe way to explore different systems without buying extra hardware.
- Want to learn more about Hyper-V or virtual machines? Check out Microsoft’s official Hyper-V guide.
Have a question about this guide?
Answered by AI from this guide. Good questions may be added to this page — please don't include personal details.
Did this guide fix your problem?

About the Author
Richard
Tech Writer, IT Professional
Richard is a writer at Geek Rewind who turns complex IT tasks into clear, step-by-step guides. He draws on years of hands-on experience in system administration and enterprise IT operations, focusing on Windows, Linux and WordPress: the problems people actually run into, and the fixes that work. His server and WordPress guides come from systems he runs himself. Richard builds and maintains the platform behind Geek Rewind, from its Ubuntu servers and Nginx configuration to its custom WordPress plugins. Many new tutorials start with readers' questions, and he's always glad to answer them in the comments.
No comments yet — be the first to share your thoughts!