How to Enable Dolby Vision HDR in Windows 11

- 5 steps
- Includes a restart or sign-out
Dolby Vision HDR in Windows 11 changes how games and movies look. Blacks get darker and highlights get brighter, so the picture looks more realistic. The format carries extra scene data that lets the display adjust colors and brightness more precisely.
You need three things: a compatible monitor or TV, a compatible graphics card, and the free Dolby Access app from the Microsoft Store. Check all three before you start. If one is missing, the option may not appear in Settings, or it may appear greyed out.
Open Settings, go to System Display, then open the HDR section and turn on Use HDR for your Dolby Vision display. Windows often selects Dolby Vision automatically when supporting hardware connects, so you may not need to change anything. The screen may flicker for a second, and no restart is needed.
What is Dolby Vision HDR?
Dolby Vision is an advanced High Dynamic Range (HDR) format. HDR expands the range of contrast and color a screen can show. Dolby Vision works with Windows 11 on supported hardware and improves contrast, brightness, and color accuracy. Dark areas look deeper and highlights look brighter. The difference is most obvious in movies, streaming video, and games that support HDR.
An ordinary monitor with no HDR support will not show it, however you set Windows up. If one link in the chain is weak, Windows may hide the HDR controls or grey them out.
Windows often selects Dolby Vision automatically when supporting hardware connects to the system, so on many machines you do not have to do anything. You can still control it yourself from the Settings app. That is useful if the picture looks wrong, if you share the PC with someone who prefers the standard look, or if the display was not detected correctly.
How to Turn On or Off Dolby Vision HDR in 🪟 Windows 11
You can turn the display mode on or off manually from the main Settings app in a few clicks. The control sits in your display options, so you can switch it on whenever you want better picture quality for compatible games and streaming media, and switch it off again just as easily.
The steps below apply to current Windows 11. Home and Pro editions use the same screens, so there is no difference between them. You do not need to restart the PC. The screen may flicker or go black for a second when the mode changes, which is normal.
Follow these steps to enable Dolby Vision HDR in Windows 11 from the Settings app.
- Open Settings. Click the Start button (Windows icon) at the bottom of your screen, then click Settings. You can also press
Windows key + Ion your keyboard to open it quickly. The Settings window should now be open with a list of categories on the left. - Go to System Display. In the Settings window, click System in the menu on the left, then click Display on the right. You should now see your screen layout, brightness, scale, and resolution options.
- Open the HDR section. Scroll down the Display page until you see the HDR section or tile, then click it. If you cannot find it, your display or its connection is probably not reporting HDR support to Windows. See the tip further down.
- Turn on Use HDR for your Dolby Vision display. Under the HDR settings, click Use HDR to expand more options. If more than one monitor is connected, select the one that supports Dolby Vision first. Then check the box or turn the switch on. The screen may blink briefly and then look brighter or more saturated. If the toggle is greyed out, the selected display does not support HDR, or the cable or port is limiting it. To undo the change, come back to this page and turn the same option off.
- Close Settings. Your display should now show brighter, richer colors with Dolby Vision HDR enabled. Open an HDR video or game to check. Ordinary desktop content can look a little washed out while HDR is on, which is expected.
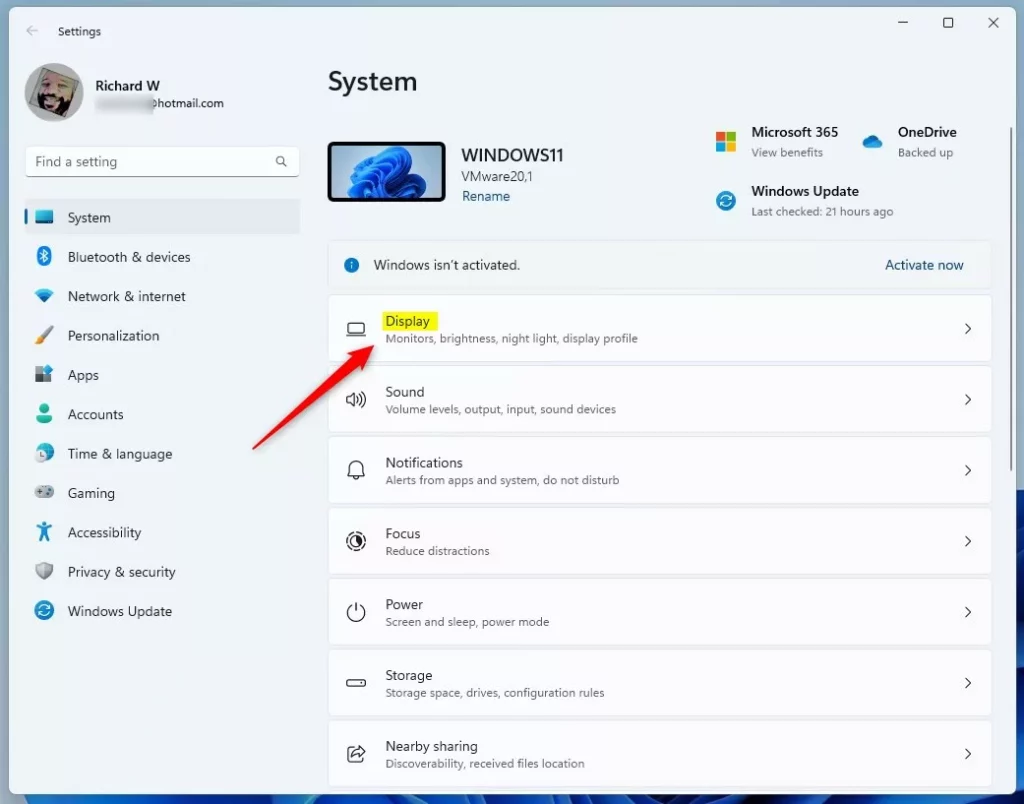
Open Display Settings in Windows 11
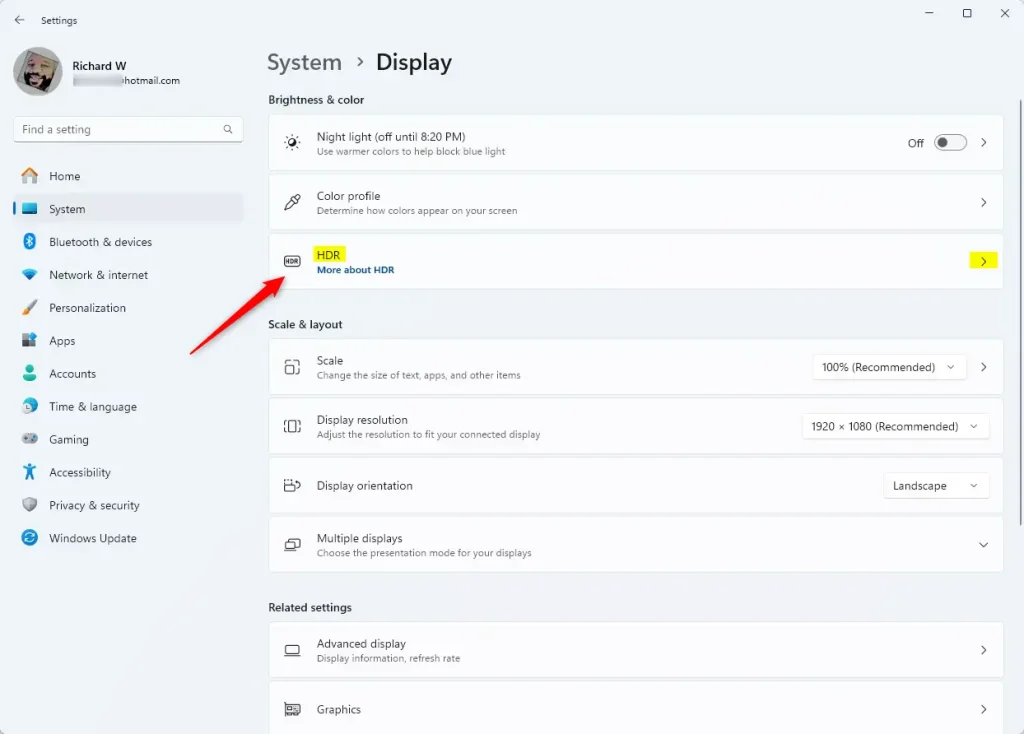
Find and open the HDR section
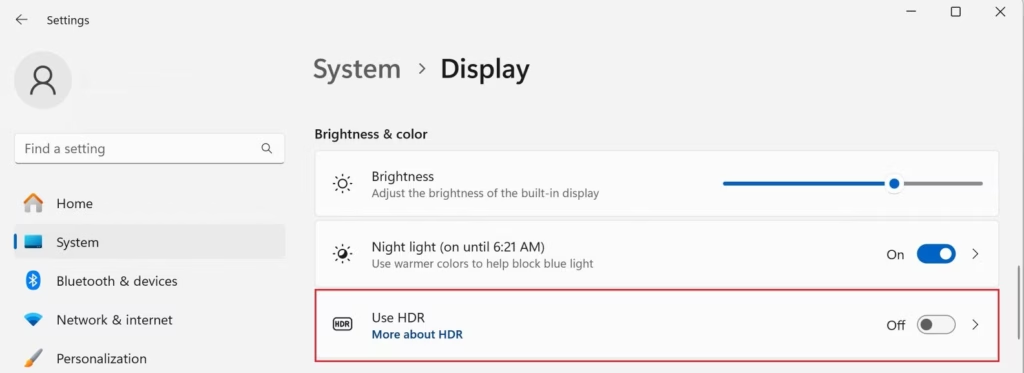
Turn on the “Use HDR” option
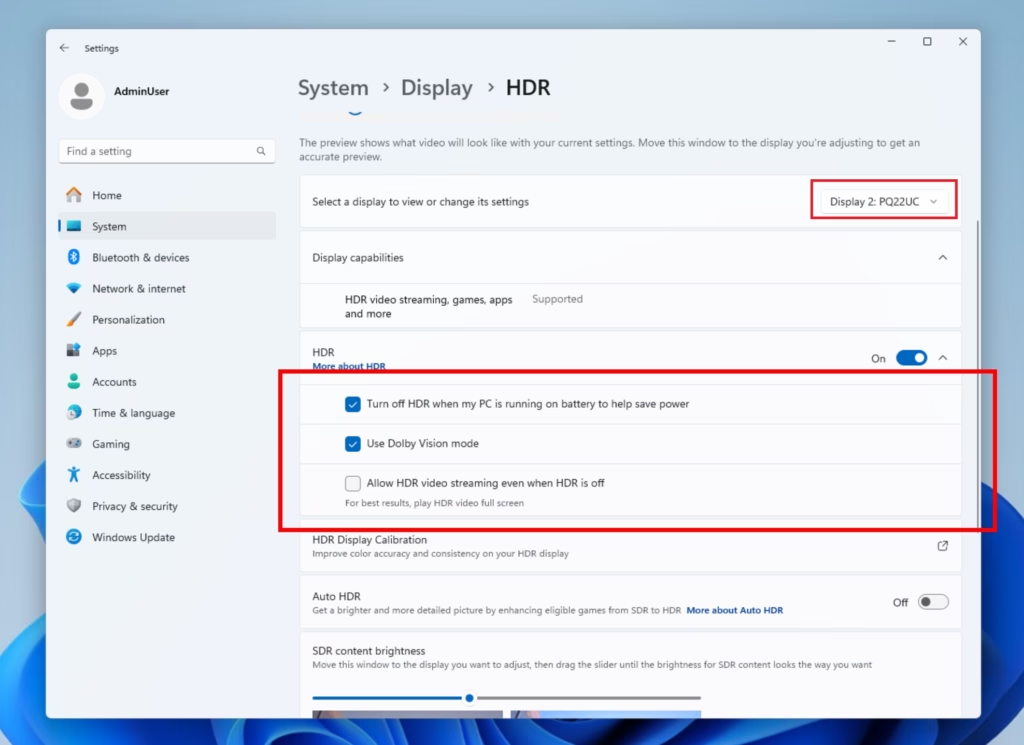
Select your Dolby Vision display and enable it
Before you give up, check three things. First, make sure the display is connected with a cable and port that can carry HDR. Second, check that HDR is enabled in the display's own on-screen menu, since some TVs and monitors ship with it off. Third, update your graphics driver, because driver updates often restore missing display capabilities. Then reopen Settings and look again.
Why Use Dolby Vision HDR?
- Better Picture QualityColors look more vivid and bright, and the gap between the darkest and brightest parts of the picture is wider. Movies and games become more enjoyable, especially dark scenes and bright highlights such as sunlight or explosions.
- Automatic SetupWindows 11 will use Dolby Vision if your hardware supports it, so you often get the benefit without changing anything.
- Easy to UseYou can turn Dolby Vision on or off anytime in the Settings app. If you do not like the result, switching it off takes seconds and needs no restart.
- Works with Multiple ScreensChoose which display gets Dolby Vision if you have more than one. This helps when you pair an HDR-capable screen with an older monitor that cannot show HDR.
- Quick AccessAll the controls are in one place, under System and then Display, so managing your display is simple.
Dolby Vision HDR on your Windows 11 computer gives you better picture quality: deeper blacks, brighter highlights, and more realistic colors for movies and games. The operating system handles most of the setup automatically when you connect compatible hardware. You get the improved picture without complex calibration tools. If something looks off, the HDR page in Settings is the first place to check.
Summary
Dolby Vision improves overall picture quality by making colors stand out and highlights brighter. With supported hardware, turning the feature on or off is quick. If the option is missing, check the display, the cable, and the graphics driver, in that order.
More Info
For official details from Microsoft, visit their blog: Microsoft Blog: Windows 11 Insider Preview Build
Have a question about this guide?
Answered by AI from this guide. Good questions may be added to this page — please don't include personal details.
Did this guide fix your problem?

About the Author
Richard
Tech Writer, IT Professional
Richard is a writer at Geek Rewind who turns complex IT tasks into clear, step-by-step guides. He draws on years of hands-on experience in system administration and enterprise IT operations, focusing on Windows, Linux and WordPress: the problems people actually run into, and the fixes that work. His server and WordPress guides come from systems he runs himself. Richard builds and maintains the platform behind Geek Rewind, from its Ubuntu servers and Nginx configuration to its custom WordPress plugins. Many new tutorials start with readers' questions, and he's always glad to answer them in the comments.
No comments yet — be the first to share your thoughts!