How to Download Fonts for All Languages in Windows 11

Global fonts in Windows 11 let your PC show text correctly in many writing systems, including Arabic, Thai, and Chinese. Without the right font, you see empty boxes or question marks instead of characters. Windows stores all its fonts in the 📁C:\
On Windows 11 version 22H2 and newer, you can add the extra language fonts through the Settings app, so you don’t have to hunt for font files online. This works the same on Home and Pro. You need an internet connection and an account with permission to install features. A standard account may be asked for administrator credentials.
Open Settings , navigate to Personalization Fonts, and click “Download fonts for all languages” under Related settings. Alternatively, use the Control Panel under Appearance and Personalization Fonts and select the same download option. This installs fonts for numerous languages.
Step 1Open Windows Settings
First, open the Settings app. There are two ways to do it:
- Click the Start button (the Windows icon on the taskbar ), then click Settings.
- Or press Win+I on your keyboard. This is faster once you are used to it.
The Settings window should now be open, with a list of categories on the left.
Step 2Go to Personalization > Fonts
Next, go to the fonts page:
- Click Personalization in the left-hand menu.
- On the right, click the Fonts tile.
You should now see the Fonts page, with your installed fonts and the options for getting more.
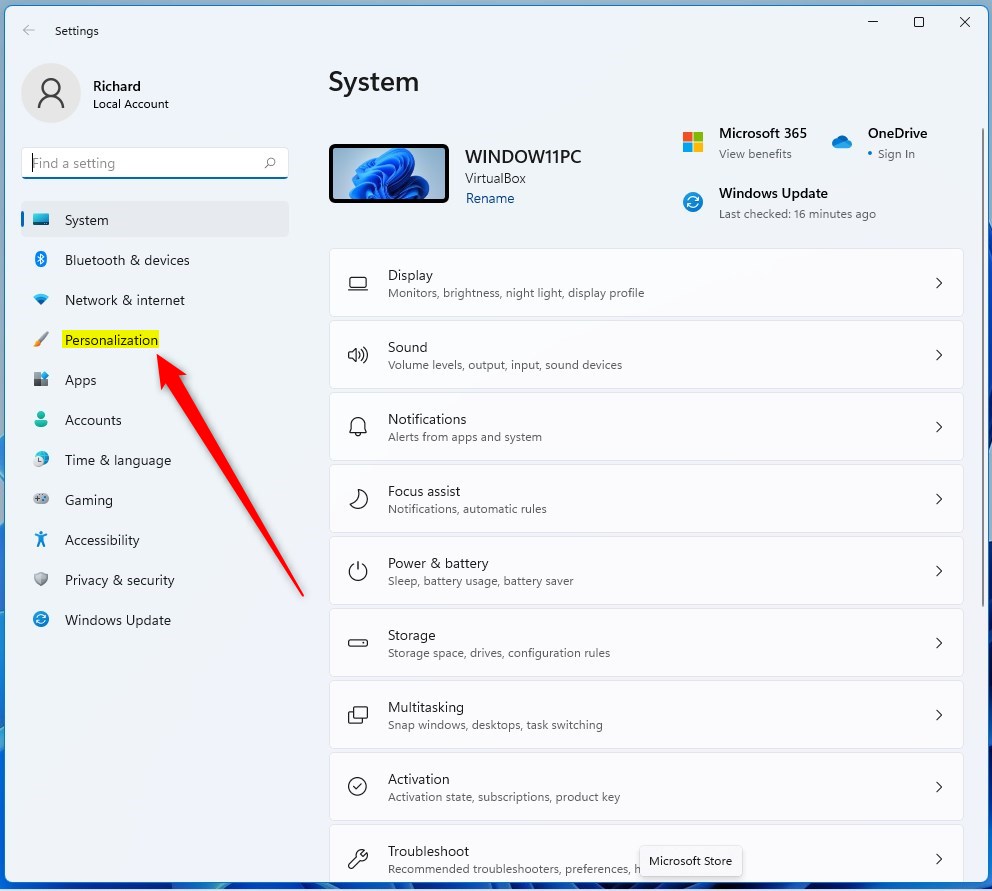
Windows 11 Personalization Settings
This is the Fonts settings page:
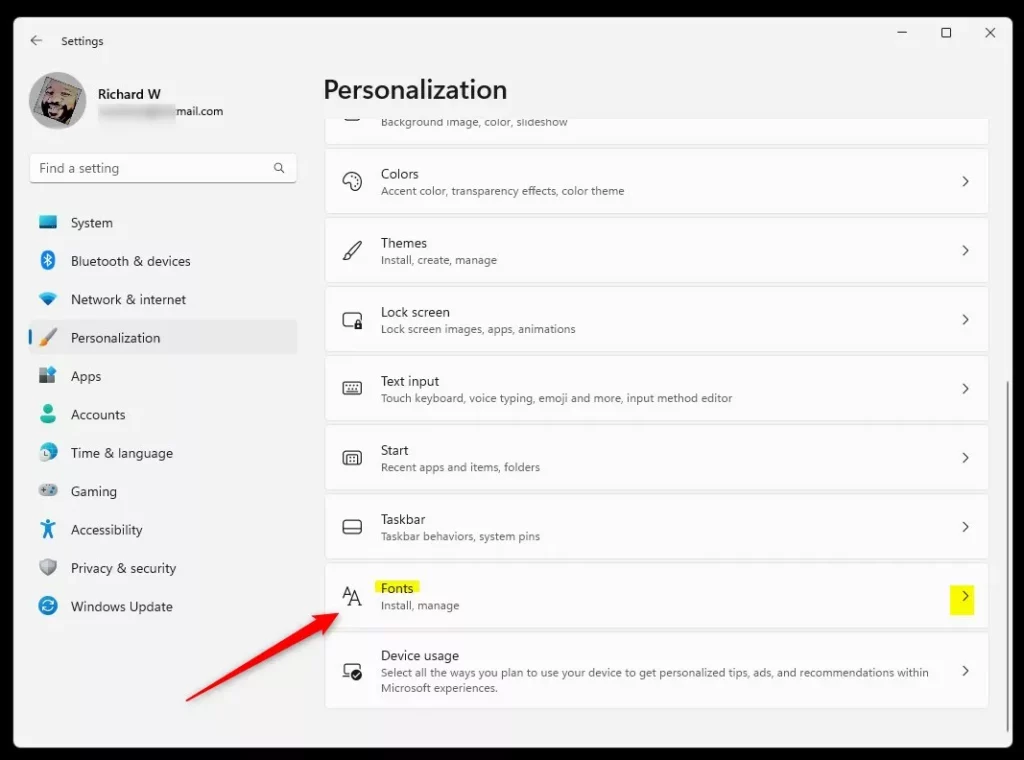
Fonts Settings in Windows 11
Step 3Download Fonts for All Languages
To download the full set of language fonts from Settings:
- Open Settings Personalization Fonts, as described above.
- Find the Download fonts for all languages button and click it.
- Read the prompt that appears and confirm it by clicking Yes or OK. The download starts.
- Wait for the download to finish, then close the Settings app.
If you don't see the button, your Windows build may not show it on this page. Use the Control Panel method below instead. The option may also be missing if the fonts are already installed.
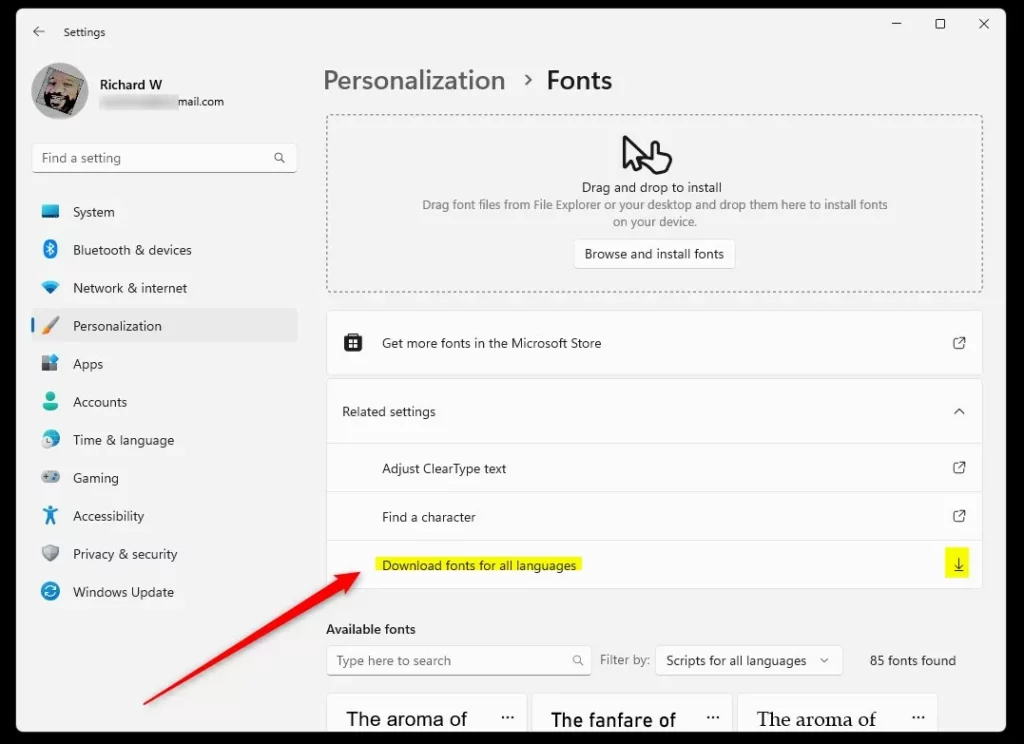
Download fonts for all languages button
A restart is normally not needed. If an app that was already open still shows boxes instead of characters, close it and reopen it so it picks up the new fonts.
Alternative Way: Use the Control Panel
If you prefer the classic Control Panel, or the button is missing in Settings, you can get to the same option there:
- Type Control Panel in the Start menu search box and open it.
- Go to Appearance and Personalization Fonts If your Control Panel is in Large icons or Small icons view, click Fonts directly.
The Fonts window should open and list the fonts installed on your PC.
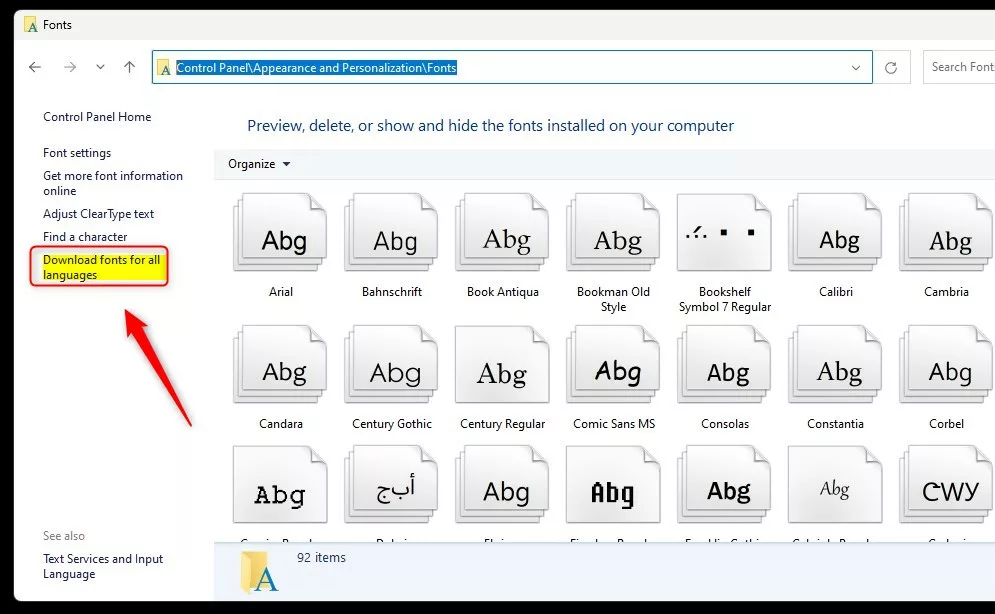
Fonts section in Control Panel
- In the left pane, click the link Download fonts for all languages.
- Click OK to confirm. Windows starts downloading the fonts.
This link is only shown when there are language fonts that haven't been installed yet. If it isn't there, you may already have them.
Important Notes
Only download the fonts for all languages if you actually need them. The files take up a lot of disk space, so check your free storage before you start. A drive that is nearly full can slow the whole system down.
- The download uses a large amount of disk space. Make sure you have enough free space first.
- Windows has more fonts to manage, which can slow your PC down a little, especially on older hardware.
- Only download all fonts if you really work with many different languages. If you need just one or two, adding those languages individually is the lighter option.
- To undo it, supplemental language fonts are usually listed in Settings System Optional features, where you can uninstall them. You can also remove individual fonts from the Fonts folder in Control Panel.
Summary
With the full font set installed, text from around the world displays correctly, without missing characters or empty boxes. That makes your PC more useful for reading documents, browsing foreign websites, and writing in several languages.
What's the outcome? Your computer has fonts for languages from around the world, and text in different languages displays correctly on screen.
- You can download all fonts from the Settings app or from Control Panel.
- Check your disk space before you download.
- If an open app still shows boxes afterward, close it and reopen it.
Need more help? Check out this guide on how to install fonts on Windows 11.
Have a question about this guide?
Answered by AI from this guide. Good questions may be added to this page — please don't include personal details.
Did this guide fix your problem?

About the Author
Richard
Tech Writer, IT Professional
Richard is a writer at Geek Rewind who turns complex IT tasks into clear, step-by-step guides. He draws on years of hands-on experience in system administration and enterprise IT operations, focusing on Windows, Linux and WordPress: the problems people actually run into, and the fixes that work. His server and WordPress guides come from systems he runs himself. Richard builds and maintains the platform behind Geek Rewind, from its Ubuntu servers and Nginx configuration to its custom WordPress plugins. Many new tutorials start with readers' questions, and he's always glad to answer them in the comments.
No comments yet — be the first to share your thoughts!