How to configure kernel isolation memory integrity in Windows Security settings
Kernel isolation memory integrity blocks malicious software from slipping bad code into the core parts of Windows 10 and Windows 11. It is also called hypervisor-protected code integrity (HVCI). It uses a secure virtual environment to check that every driver and system file is safe before it loads.
Advertisement
You can turn it on and off in the Windows Security app. If you run computers for a business, you can manage it across a network with enterprise tools. This tutorial covers the app, Group Policy and the registry, then shows how to confirm the feature is running. The menu names below are for current Windows 11. Windows 10 is similar, but some options are missing, as noted where it matters.
⚡ Quick Answer
Open Windows Security, click Device security, then Core isolation details. Set the Memory integrity switch to On, approve the User Account Control prompt, and restart your 🔄 PC. The feature blocks unsafe drivers from accessing kernel memory once the restart completes.
Advertisement
Device Security in the Windows Security App
The Windows Security app shows the status of your hardware-backed defenses and whether your PC supports virtualization-based protections. Everything in this tutorial starts from the Device security page.
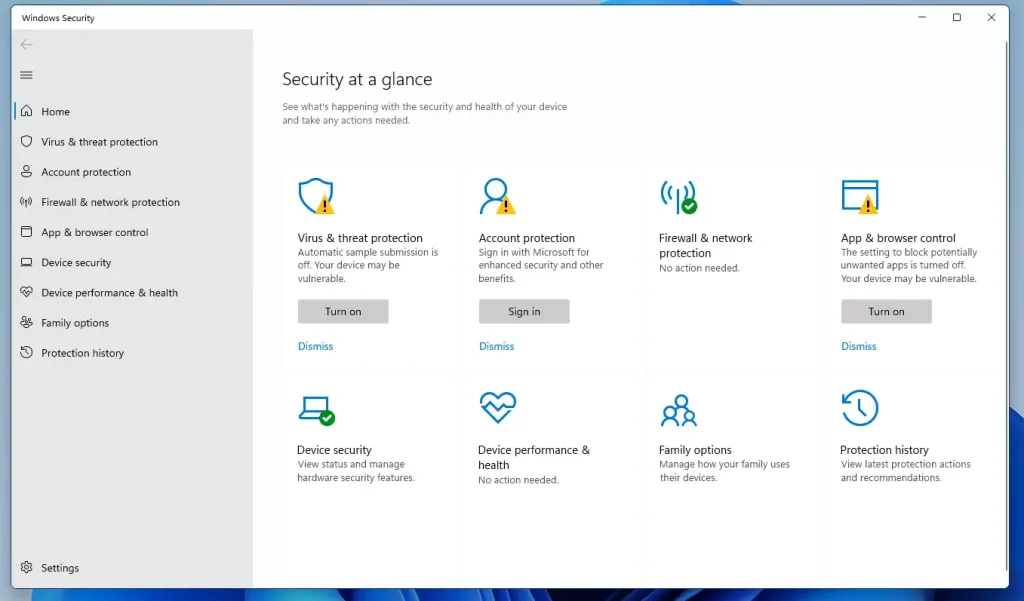
Press the Start key, type Windows Security, and press Enter. The Windows Security window opens.
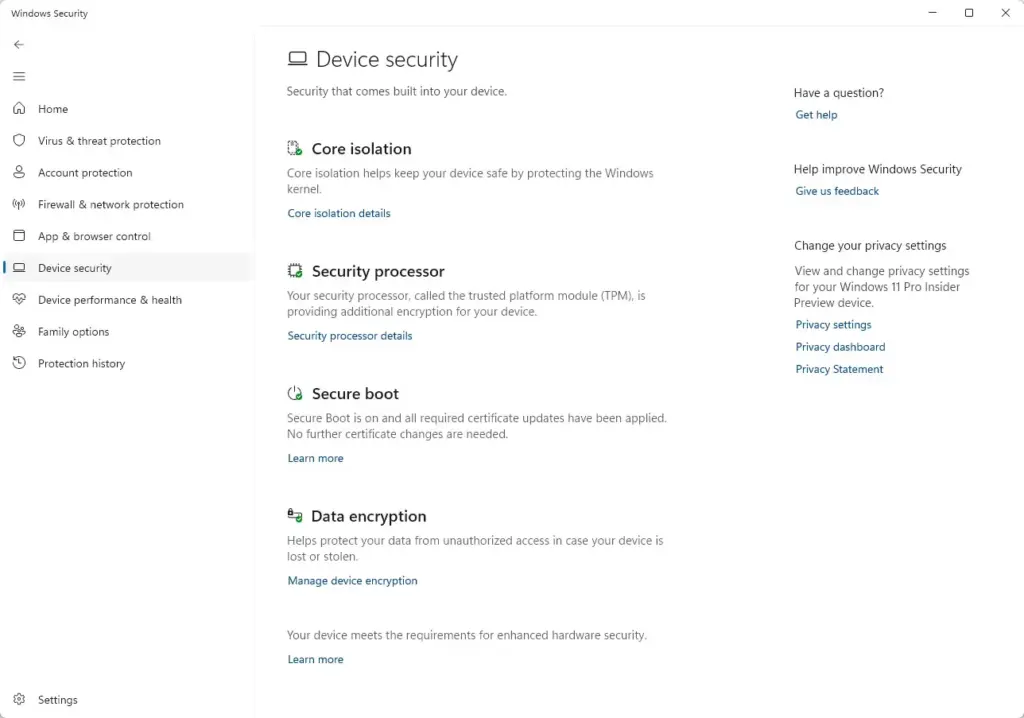
Click Device security in the left-hand pane, or in the main dashboard. The page lists the protections your hardware supports.
What you see here depends on your processor, your motherboard firmware and your Windows version. Typical sections are Core isolation, Security processor and Secure boot. If a section is missing, the hardware or firmware usually doesn’t support it, or it is turned off in the UEFI settings. It does not mean the app is broken.
Core isolation
Core isolation uses virtualization-based security (VBS), a technology that creates a secure, isolated memory region, to protect vital parts of the operating system. It keeps unauthorized software away from core system memory, even if someone gains administrator access to the machine.
Open Device security in the Windows Security app.
Under Core isolation, click Core isolation details. A page opens with the individual protection switches.
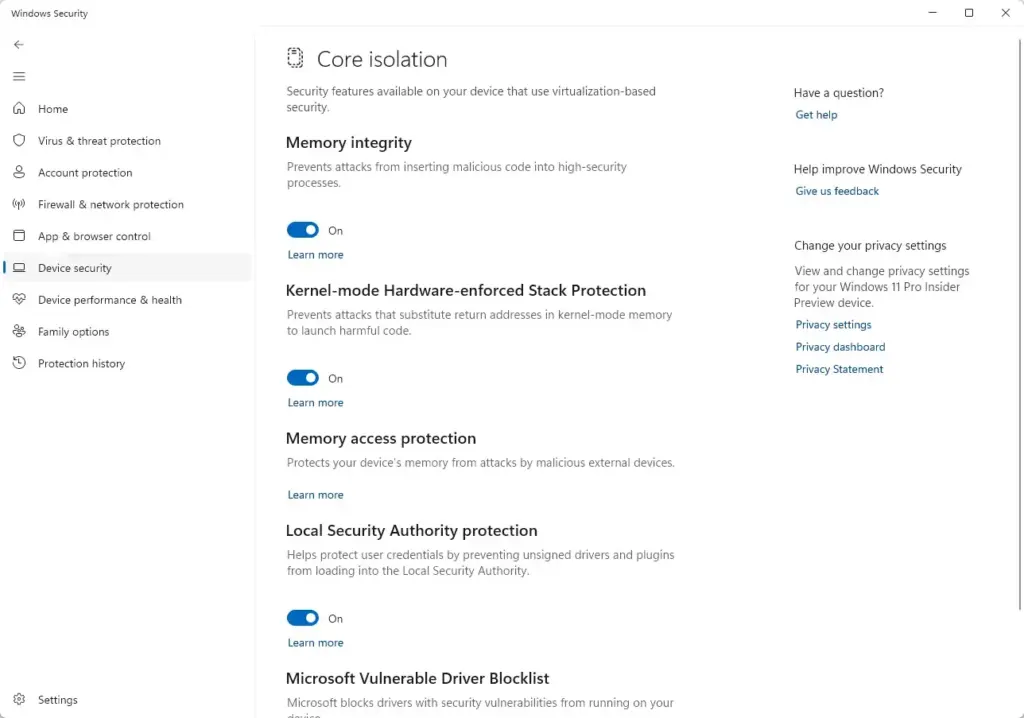
From this page you can turn individual integrity features on or off and see which protections your hardware currently supports. Only the options your system can use are shown. If a switch is greyed out, a policy set by an administrator may control it, or the hardware may not support it.
Advertisement
Memory integrity
Memory integrity stops malware from using low-level drivers to reach kernel memory, the core part of the operating system. With it on, every driver must pass strict security checks before it loads. That blocks unsafe code at startup.
Open the Windows Security app and click Device security.
Click Core isolation details.
Set the Memory integrity switch to On.
Approve the User Account Control prompt if one appears.
Restart the PC when Windows asks. The setting is not fully active until you do.
⚠️WarningIf the switch refuses to turn on, Windows has found incompatible drivers.
It shows a message and usually a Review incompatible drivers link that lists the driver files. You must update, remove or replace those drivers before memory integrity will activate. Check the device maker's site for a newer version first. Old drivers for printers, antivirus tools, virtual-machine software and hardware monitoring utilities are common causes.
To undo the change, set the switch back to Off and restart.
Kernel-mode Hardware-enforced Stack Protection
Kernel-mode Hardware-enforced Stack Protection uses the processor to watch call stacks and block advanced memory attacks. This helps stop attackers from hijacking system drivers and running harmful code.
Advertisement
Open Core isolation details in the Windows Security app.
Restart the PC if prompted. The feature needs a restart to finish initializing.
This option appears only on supported hardware, and it needs a recent version of Windows 11. It also relies on memory integrity being on. If you don't see it, your processor probably lacks the required capability. If it won't switch on, an incompatible driver is the likely cause, as with memory integrity.
Memory access protection
Memory access protection works with the input/output memory management unit (IOMMU) to block direct memory access (DMA) attacks from malicious external devices. If an unauthorized Thunderbolt or PCIe device tries to read or write system memory directly, this feature blocks the access and protects your data.
Where your system supports it, it appears on the Core isolation page, and the hardware must support it too. On many PCs, firmware settings such as Intel VT-d or AMD IOMMU must be turned on in UEFI. If you don't see the option, check your firmware settings or your PC maker's documentation.
Firmware protection
Firmware protection guards the system firmware and the UEFI (Unified Extensible Firmware Interface) against rootkits and low-level malware that try to survive reboots. It secures the boot components and validates firmware updates. That stops attackers from tampering with the motherboard's underlying instructions.
Advertisement
This protection depends heavily on hardware. It appears only on PCs that support it, and it often relies on specific firmware features. If it isn't listed on your Device security page, your PC doesn't offer it. Updating the BIOS or UEFI firmware from the PC maker is the usual way to get newer security features.
Local Security Authority protection
Local Security Authority protection stops unauthorized apps from injecting code into, or stealing memory from, the Local Security Authority Subsystem Service (LSASS). That service handles user logins and passwords. Turning it on helps keep your login credentials from being stolen.
Open Device security in the Windows Security app.
Click Core isolation details.
Find Local Security Authority protection.
Set the switch to On.
Restart the PC if Windows asks you to.
On some new Windows 11 installations this protection is already on. If the option is missing on your PC, your Windows version or hardware may not support it. A few older security tools and plug-ins that load into LSASS can stop working when it is on. If something breaks, turn the switch off and restart.
Credential Guard
Credential Guard uses VBS to isolate secrets such as NTLM password hashes and Kerberos ticket-granting tickets, so only privileged system software can reach them. This stops credential theft attacks from pulling session information out of memory.
Advertisement
Credential Guard is aimed at managed environments, and there is no switch for it on the Core isolation page. It is mainly configured through Group Policy (the same Turn On Virtualization Based Security policy covered below) or other enterprise tools. It is generally available on Enterprise and Education editions. It is also turned on by default on some newer, qualifying systems. To see whether it is running, use the verification steps near the end of this tutorial.
Microsoft vulnerable driver blocklist
The Microsoft vulnerable driver blocklist is a list of known drivers that have security flaws. When it is on, Windows refuses to load those drivers. That stops attackers from using them to get around kernel protections.
On supported systems you can see this setting on the Core isolation details page. Keep it on unless you have a specific, understood reason not to. If a legitimate device stops working after you enable it, the device's driver may be on the list. Look for an updated driver from the manufacturer instead of turning the protection off.
Security processor
The Security processor section refers to the Trusted Platform Module (TPM). A TPM is a dedicated cryptographic microcontroller, either a chip on the motherboard or built into the processor firmware. It secures the hardware with cryptographic keys that never leave the chip. Windows 11 requires TPM 2.0, and features such as BitLocker and Windows Hello use it.
Advertisement
Security processor details
Security processor details show diagnostic information about your TPM, including its specification version, the manufacturer and its status. This is a quick way to confirm that your PC has a working TPM and which version it is.
Open the Windows Security app and click Device security.
Under Security processor, click Security processor details.
Read the Specification version and the manufacturer information. For Windows 11, the version should be 2.0.
If you see no Security processor section at all, the TPM may be turned off in UEFI. It may also be named something else in your firmware menu, such as Intel PTT or AMD fTPM.
Security processor troubleshooting
If the security processor shows errors, communication failures or status warnings, the troubleshooting section offers options such as clearing the TPM or updating its firmware. Follow the on-screen instructions on the security processor page to deal with these faults.
⚠️WarningBe careful before you clear the TPM.
Clearing it erases the keys stored on it. If BitLocker or a similar feature relies on those keys, you could lose access to your data. Before you clear it, make sure you have your BitLocker recovery key saved somewhere safe, away from the PC. If the problem is a firmware fault, installing the PC maker's firmware update is usually safer than clearing.
Advertisement
Secure boot
Secure Boot is a UEFI security standard. It makes sure your PC boots using only software the original equipment manufacturer trusts. It checks bootloaders, operating system kernel files and option ROMs before they run, which stops unsigned malware from taking over the boot sequence.
The Secure boot entry on the Device security page tells you whether it is on. You can also confirm it in System Information (msinfo32), where it is listed as Secure Boot State. If it is off, you turn it on in your UEFI firmware settings, not in Windows. Secure Boot also requires the system to start in UEFI mode rather than legacy BIOS mode.
Hardware security capability
Hardware security capability summarizes how well your computer meets baseline device security requirements. It checks whether your system supports core isolation, VBS and DMA protection out of the box.
Use it to decide whether memory integrity is likely to work on a given PC. If the hardware doesn't meet the requirements, a missing option on the Core isolation details page is expected, and no setting will fix it.
PC Manager
PC Manager is a separate Microsoft app that complements Windows Security. It offers cleanup tools, system boost functions and health checks to help with performance and storage. It does not replace the protections described above. It is a general maintenance tool, so keep it separate from your security setup.
Enable memory integrity using Windows Security
Turning on memory integrity in the Windows Security app takes a few clicks. It works on Windows 11 Home and Pro alike, so it is the simplest method for a single PC.
Open the Start menu, type Windows Security, and press Enter. windows security glance dashboard
Click Device security in the left-hand navigation pane or the central dashboard. Windows Security › Device security
Click the Core isolation details link under the Core isolation heading. Windows Security › Device security › Core isolation The switches for the core isolation features appear.
Find the Memory integrity toggle.
Click the toggle to change it from Off to On. If Windows lists incompatible drivers, fix those first, then try again.
Restart your computer when prompted so the new kernel isolation settings take effect.
Enable memory integrity using Group Policy
Administrators can use the Local Group Policy Editor to turn on memory integrity on managed computers. The editor is included in Windows 11 Pro, Enterprise and Education. It is not available in Home. On Home, use the Windows Security app or the registry instead. Set the same policy through domain Group Policy or your management tool to cover many machines.
Press Windows Key + R, type gpedit.msc, and press Enter to open the Group Policy Editor.
In the left-hand tree, go to Computer Configuration›Administrative Templates›System›Device Guard.
Double-click Turn On Virtualization Based Security in the right-hand pane. The policy window opens.
Select the Enabled option.
Under the options, set Virtualization-Based Protection of Code Integrity, using the checkbox or dropdown, to enable it with or without UEFI lock.
Click Apply, then OK.
Restart the computer to enforce the policy.
Pick the lock option carefully. With UEFI lock, the setting is stored in firmware, so removing the policy later does not turn the feature off. Turning it off then takes extra steps on each machine. Without lock, you can reverse the change by setting the policy to Disabled or Not configured and restarting. Test on one machine before you roll out the lock option widely.
Enable memory integrity using registry
You can also turn on memory integrity by changing values in the Registry Editor. This works on Home as well as Pro. It is riskier than the other methods, because a wrong value can cause problems. Back up the registry or create a restore point before you start. If a Group Policy or management policy controls the same setting, it can override a manual registry change.
Press Windows Key + R, type regedit, and press Enter to open the Registry Editor. Approve the User Account Control prompt.
Navigate to the path: HKEY_LOCAL_MACHINE\SYSTEM\CurrentControlSet\Control\DeviceGuard
Create or modify the required DWORD values specified by your enterprise deployment documentation to enforce virtualization-based protection of code integrity. Use only the value names and data from that documentation.
Restart the computer to commit the changes.
If something goes wrong, restore the key from your backup or change the values back to their previous data, then restart.
Validate enabled VBS and memory integrity features
After you change the configuration, confirm that VBS and memory integrity are running. A setting can show as On in a policy or in the app without being active, for example when a restart is still pending or the hardware can't support it. The two methods below show what is actually running.
Use Win32_DeviceGuard WMI class
The Win32_DeviceGuard WMI class lets you check your security status from PowerShell. This is useful for scripting checks across several machines.
Open the Start menu, type PowerShell, right-click Windows PowerShell, and select Run as administrator.
Type the following command and press Enter: Get-CimInstance -ClassName Win32_DeviceGuard -Namespace root\Microsoft\Windows\DeviceGuard
Review the returned properties. Confirm that VirtualizationBasedSecurityStatus shows a value that indicates it is running. A value of 2 means running, 1 means enabled but not running, and 0 means off.
Check SecurityServicesRunning as well. A 2 in that list means memory integrity (hypervisor-enforced code integrity) is running, and a 1 means Credential Guard is running.
Use msinfo32.exe
System Information (msinfo32) gives a quick check without PowerShell.
Press Windows Key + R, type msinfo32, and press Enter.
In the System Summary window, scroll down the right-hand pane until you find Virtualization-based security.
Check that the status reads Running. Then look at the related lines, such as the running security services (Credential Guard, memory integrity) and Secure Boot State, to confirm they match what you configured.
If the status says it is not enabled or not running, restart the PC and check again. If it still isn't running, review the settings in this tutorial and look for incompatible drivers or disabled virtualization in UEFI.
What to do next
Memory integrity should now be active, whether you confirmed it in the Windows Security app or with a diagnostic tool. Next, you can turn on other hardware protections such as Local Security Authority protection. You can also look at how to manage which apps are allowed to run with App Control for Business.
📬 Get new Windows tips in your inbox
One email when we publish something worth your time. No spam, unsubscribe anytime.
Have a question about this guide?
Answered by AI from this guide. Good questions may be added to this page — please don't include personal details.
Richard is a writer at Geek Rewind who turns complex IT tasks into clear, step-by-step guides. He draws on years of hands-on experience in system administration and enterprise IT operations, focusing on Windows, Linux and WordPress: the problems people actually run into, and the fixes that work.
His server and WordPress guides come from systems he runs himself. Richard builds and maintains the platform behind Geek Rewind, from its Ubuntu servers and Nginx configuration to its custom WordPress plugins.
Many new tutorials start with readers' questions, and he's always glad to answer them in the comments.
One email when we publish a guide worth your time — new Windows features, the fixes that actually
work, and a heads-up when Microsoft breaks something. Unsubscribe in one click.
📬 Get new Windows tips in your inbox
One email when we publish something worth your time. No spam, unsubscribe anytime.


No comments yet — be the first to share your thoughts!