How to Change Narrator Voice in Windows 11
You can change the Narrator voice in Windows 11 to improve clarity and naturalness. Narrator is the built-in screen reader for Windows, designed to read your screen content aloud, assisting users with visual impairments.
By customizing Narrator’s voice, you can make navigating your PC more comfortable. Windows 11 provides multiple natural-sounding voices, such as Microsoft Aria, which you can easily download and select within Narrator’s settings.
Once you’ve made your adjustments, your computer will use your selected voice, along with your preferred speed and volume settings. This customization ensures a more efficient and pleasant interaction with Windows 11.
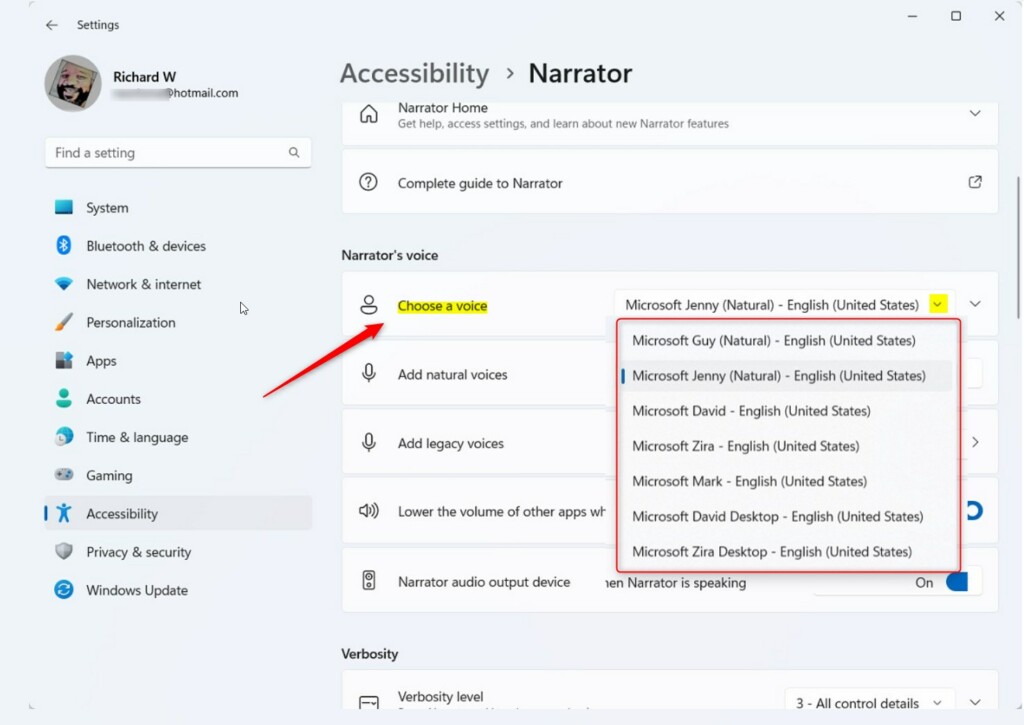
Open Settings, go to Accessibility, then Narrator. Under “Choose a voice,” select your preferred voice from the dropdown. You can also download additional natural voices by clicking “Add.
How to Change Narrator Settings
Changing Narrator settings in Windows 11 lets you adjust how the screen reader sounds, like its speed, pitch, and volume.
First, open the Windows Settings app. You can do this by clicking the Start menu and selecting Settings, or by pressing the Windows key + I to launch the Settings app.
When the Settings app opens, click Accessibility on the left menu.
Then, select the Narrator tile on the right.

On the Accessibility > Narrator page, find the “Choose a voice” section. Click the drop-down menu to see available voices and pick your favorite.
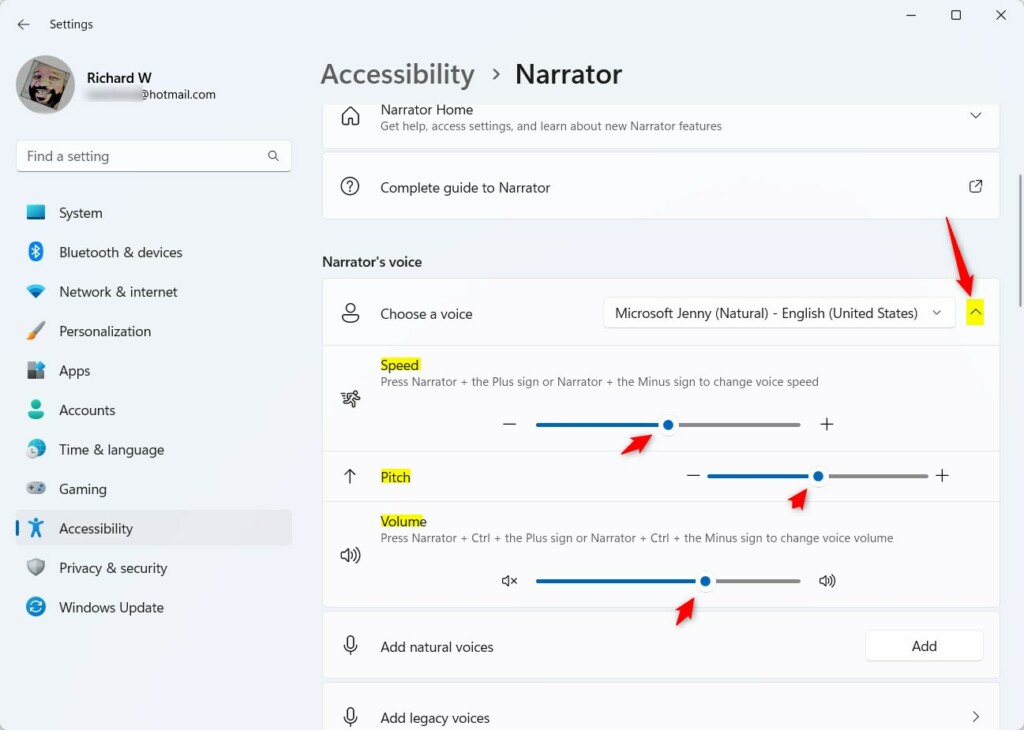
Click the arrow on the “Choose a voice” tile to see more options. You can now adjust these settings:
- Speed: Move the slider to make the voice faster or slower. You can also use the keyboard shortcut
Narrator + Plus signorNarrator + Minus sign. - Pitch: Move the slider to change how high or low the voice sounds.
- Volume: Move the slider to make the voice louder or quieter. You can also use the keyboard shortcut
Narrator + CTRL + Plus signorNarrator + CTRL + Minus sign.
Natural Voices and Language Packs
Windows 11 has natural voices that sound much more human than older robotic ones, and you can add them by downloading language packs.
Windows Narrator vs. AI Voice Generators
While Windows Narrator is a screen reader designed for accessibility, AI voice generators are tools built for content creation. Narrator is optimized for real-time interaction with your desktop, whereas AI generators are designed to convert written scripts into high-quality audio files for videos or podcasts.
Troubleshooting Narrator Voice Issues
If your Narrator voice isn’t working, first check that your audio output device is set up correctly in Windows Sound settings.
Related Topics
Summary
You have successfully customized your Narrator voice settings. By adjusting the speed, pitch, and volume, you have made your Windows 11 experience more personal and accessible. These settings do not require admin privileges to change, so any user can adjust them to fit their personal preferences.
How do I change the Narrator voice speed in 🪟 Windows 11?
Open Settings, navigate to Accessibility, and select Narrator. Under the Choose a voice section, locate the Speed slider. Drag it to the left to slow down the speech or to the right to speed it up. You can also use the Narrator + Plus or Minus keys on your keyboard.
Can I add new voices to Windows Narrator?
Yes. In the Narrator settings menu, click the Add button next to the natural voices option. This will open a list of available language packs. Select the voice you want, and Windows will download and install it automatically, making it available in your voice selection dropdown menu.
Was this guide helpful?

About the Author
Richard
Tech Writer, IT Professional
Richard, a writer for Geek Rewind, is a tech enthusiast who loves breaking down complex IT topics into simple, easy-to-understand ideas. With years of hands-on experience in system administration and enterprise IT operations, he’s developed a knack for offering practical tips and solutions. Richard aims to make technology more accessible and actionable. He's deeply committed to the Geek Rewind community, always ready to answer questions and engage in discussions.


[…] app, you can turn on or off its keyboard shortcuts, launch it automatically, adjust the voice, speed, and volume, manage natural voices, and […]
[…] use the Narrator app, you can turn on or off its keyboard shortcuts, launch it automatically, adjust the voice, speed, and volume, manage natural voices, lower other apps volume when Narrator is speaking, and […]
[…] use the Narrator app, you can turn on or off its keyboard shortcuts, launch it automatically, adjust the voice, speed, and volume, manage natural voices, lower other apps volume when Narrator is speaking, change Narrator audio […]
[…] use the Narrator app, you can turn on or off its keyboard shortcuts, launch it automatically, adjust the voice, speed, and volume, manage natural voices, lower other apps volume when Narrator is speaking, change Narrator audio […]
[…] use the Narrator app, you can turn on or off its keyboard shortcuts, launch it automatically, adjust the voice, speed, and volume, manage natural voices, lower other apps volume when Narrator is speaking, change Narrator audio […]
[…] use the Narrator app, you can turn on or off its keyboard shortcuts, launch it automatically, adjust the voice, speed, and volume, manage natural voices, lower other apps volume when Narrator is speaking, change Narrator audio […]
[…] use the Narrator app, you can turn on or off its keyboard shortcuts, launch it automatically, adjust the voice, speed, and volume, manage natural voices, lower other apps volume when Narrator is speaking, change Narrator audio […]
[…] use the Narrator app, you can turn on or off its keyboard shortcuts, launch it automatically, adjust the voice, speed, and volume, manage natural voices, lower other apps volume when Narrator is speaking, change Narrator audio […]
[…] use the Narrator app, you can turn on or off its keyboard shortcuts, launch it automatically, adjust the voice, speed, and volume, manage natural voices, lower other apps volume when Narrator is speaking, change Narrator audio […]
[…] use the Narrator app, you can turn on or off its keyboard shortcuts, launch it automatically, adjust the voice, speed, and volume, manage natural voices, lower other apps volume when Narrator is speaking, change Narrator audio […]
[…] use the Narrator app, you can turn on or off its keyboard shortcuts, launch it automatically, adjust the voice, speed, and volume, manage natural voices, lower other apps volume when Narrator is speaking, change Narrator audio […]
[…] use the Narrator app, you can turn on or off its keyboard shortcuts, launch it automatically, adjust the voice, speed, and volume, manage natural voices, lower other apps volume when Narrator is speaking, change Narrator audio […]
[…] app, you can turn on or off its keyboard shortcuts, launch it automatically, adjust the voice, speed, and volume, manage natural voices, lower other apps volume when Narrator is speaking, change […]
[…] Change the voice, speed, and volume […]
[…] Change the voice, speed, and volume […]
[…] Change the voice, speed, and volume […]
[…] Change the voice, speed, and volume […]
[…] Change voice, speed, and volume […]
[…] Change how fast or loud the Narrator’s voice sounds […]