

Sleeping tabs in Microsoft Edge put idle tabs into a low-resource state after a set period of inactivity. This stops pages you are not using from tying up memory and CPU. By default, Edge puts idle tabs to sleep after 5 minutes of inactivity.
You can change that timer in either direction. A longer timer lets you keep tabs open without waiting for them to reload. A shorter timer frees memory sooner, which helps on laptops running on battery and on PCs with limited RAM.
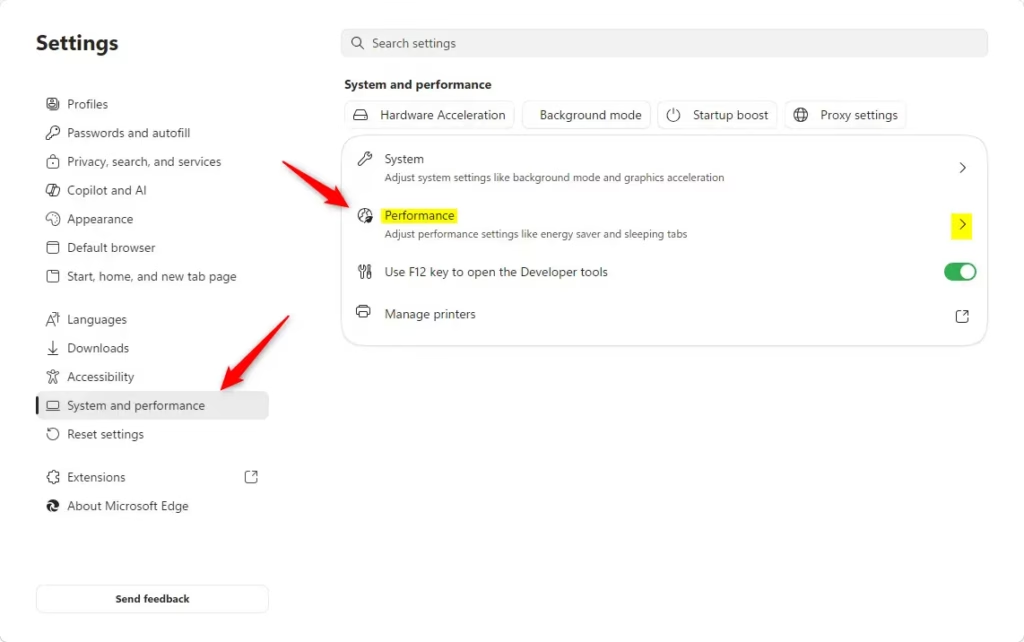
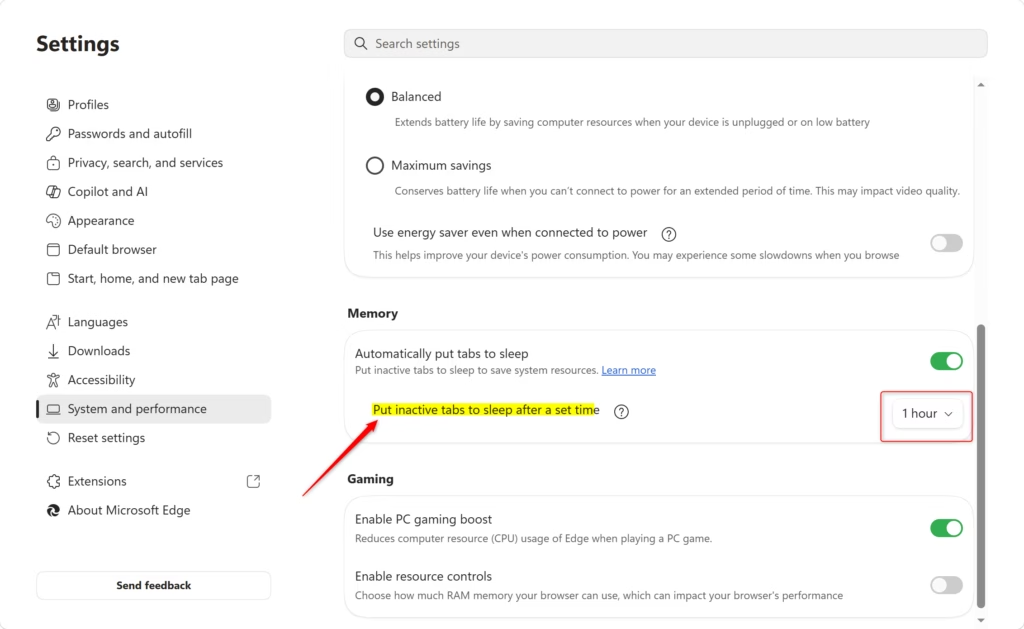
Open Microsoft Edge, click the three dots and select Settings, then go to System and performance. Under Sleeping tabs, turn on Automatically put tabs to sleep, click the box next to Put inactive tabs to sleep after, and select your desired time from the list.
Why change this setting?
The timer is a trade-off between battery life and convenience. A sleeping tab stays in the tab strip, but Edge has to reload it when you click it. A short timer saves more power. A long timer keeps heavy web apps ready to switch to straight away.
What happens when you change this setting?
You do not need admin rights to change it on a personal PC. If the option is greyed out or says your browser is managed by your organization, a policy from your employer or school controls it, and you will need to ask your IT department.
Adjusting Your Tabs’ Sleep Time
The steps below change how long Edge waits before putting inactive tabs to sleep. The menu names here match current Edge on Windows 11. Some Edge versions word the options slightly differently, for example “Save resources with sleeping tabs” instead of “Automatically put tabs to sleep”. The layout is the same.
- Open Microsoft Edge Settings. Open Microsoft Edge and click the three dots in the top-right corner. This is the “Settings and more” button. In the menu that appears, click Settings. A Settings page opens in a new tab.
- Go to System and performance. In the list on the left side of the Settings page, click System and performance. If the list is hidden because the window is narrow, click the menu icon at the top left of the Settings page to show it.
- Find the sleeping tabs options. Look for the Performance category on this page and scroll down to the “Sleeping tabs” options. You should see a switch labeled Automatically put tabs to sleep.
- Turn the switch On. Make sure Automatically put tabs to sleep is set to On. If it is off, your tabs will never go to sleep, and you cannot change the time. When it is on, the timer option appears below it. If that option is missing or greyed out, the main switch is probably off.
- Set your desired inactivity time. Right below the switch, find Put inactive tabs to sleep after. Click the box next to it. A list of times appears, such as 30 minutes, 1 hour, or 2 hours. Click the one you want. Edge saves it immediately, so there is no Save button and no restart is needed. The new timer applies to tabs that go idle from then on.
How to choose a time:
- Shorter times (like 30 minutes or 1 hour): These suit you if you open many tabs and want to save power and memory quickly. This is especially helpful if your computer is older, has little RAM, or runs many programs at once.
- Longer times (like 2 hours): These suit you if you switch between many tabs often and want them ready right away.
Find the time that works best for how you use the internet.
To undo the change, repeat the steps and pick a different time. Choosing 5 minutes, if your version lists it, returns the timer to Edge's default. Edge does not put to sleep a tab that is playing audio or video or is in an active call, so you do not need to worry about those being interrupted.

Reference:
https://support.microsoft.com/en-us/edge/learn-about-performance-features-in-microsoft-edge
Summary
Setting the sleep timer under Performance in Microsoft Edge helps conserve computer power. Start with a middle value, use the browser for a few days, and adjust the timer if tabs reload too often or if memory use stays high.
Have a question about this guide?
Answered by AI from this guide. Good questions may be added to this page — please don't include personal details.
Did this guide fix your problem?

About the Author
Richard
Tech Writer, IT Professional
Richard is a writer at Geek Rewind who turns complex IT tasks into clear, step-by-step guides. He draws on years of hands-on experience in system administration and enterprise IT operations, focusing on Windows, Linux and WordPress: the problems people actually run into, and the fixes that work. His server and WordPress guides come from systems he runs himself. Richard builds and maintains the platform behind Geek Rewind, from its Ubuntu servers and Nginx configuration to its custom WordPress plugins. Many new tutorials start with readers' questions, and he's always glad to answer them in the comments.
No comments yet — be the first to share your thoughts!