How to Change the Text Cursor Blink Rate in Windows 11

The text cursor is the blinking vertical line that shows where your next character will appear when you type in Windows. You see it in Notepad, Word, browser address bars, and any other text box.
The cursor blink rate is how fast or slow that line flashes. By default it blinks about every half a second (the stored default is 530 milliseconds). You can make it blink faster or slower, or stop it blinking. This can help if a fast blink distracts you or a slow blink makes the cursor hard to find.
This tutorial covers three ways to change it: the Settings app, Control Panel , and the Registry Editor. Try them in that order.
Open Settings Accessibility Text cursor and move the Cursor blink rate slider between 200 (fast) and 1300 (slow) milliseconds. Click Apply to save. If the slider is missing, use Control Panel Keyboard Speed tab instead.
Option 1Change the Cursor Blink Rate Using Settings
The Settings app is the safest and easiest way to change the blink rate. You don’t need any advanced tools. The slider only appears on recent builds of Windows 11. If you don’t see it, skip to the Control Panel method below, which works on every build.
- Press Windows key + I on your keyboard. Settings opens.
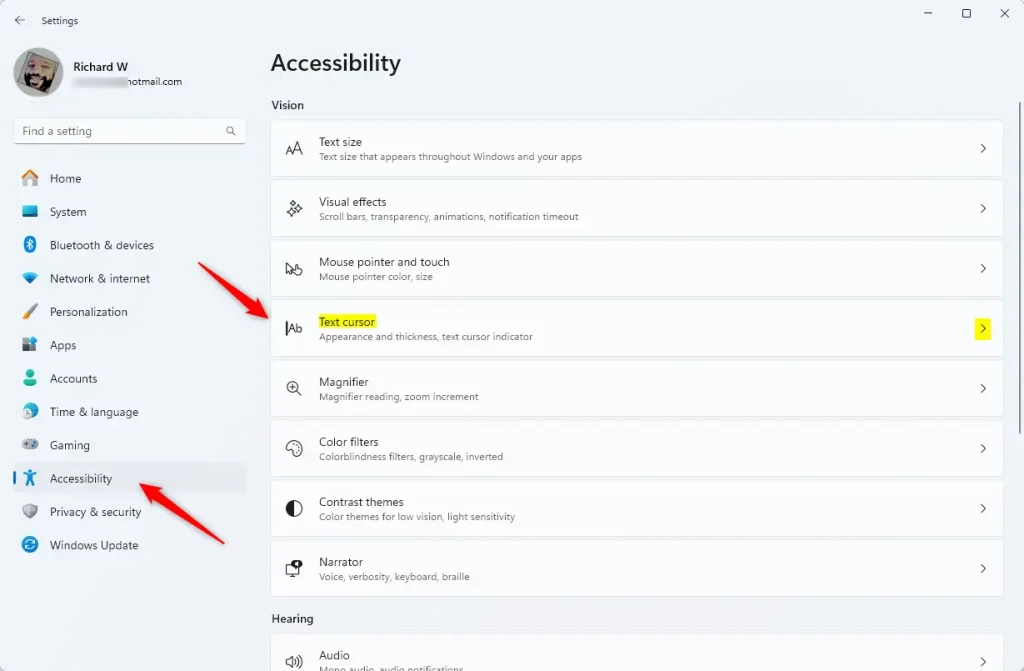
- On the left side, click Accessibility.
- On the right, scroll down and click Text cursor. The text cursor options for your PC appear.
- Find the slider under Cursor blink rate. If there is no such slider on the page, your build doesn’t include it. Use the Control Panel method instead.
- Move the slider left or right to choose a blink speed between 200 (fast) and 1300 (slow) milliseconds.
- Click Apply to save your changes. If your build shows no Apply button, the change is applied as soon as you move the slider.
- Close the Settings window when done.
To check the result, click into any text box, such as Notepad, and watch the cursor. If the speed isn’t right, reopen the page and move the slider again. To undo your change, put the slider back where it was.
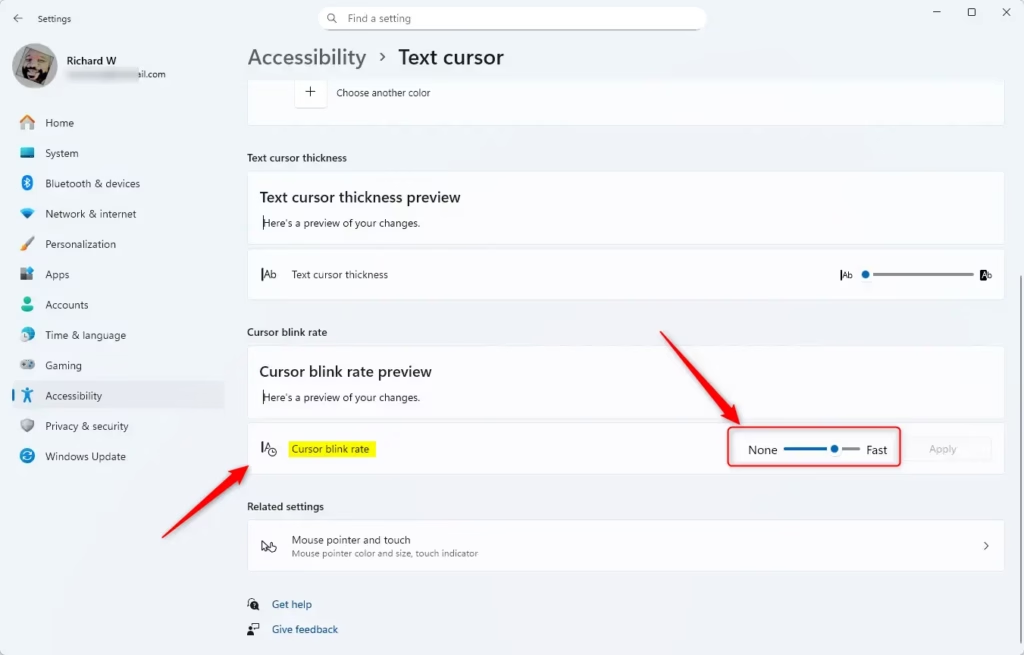
That is where the slider sat on the test PC. The stored Windows default is about 530 milliseconds, so don’t worry if your slider starts in a different place.
Option 2Change the Cursor Blink Rate Using Control Panel
The classic Control Panel still has a cursor blink setting. It works the same way on Home and Pro, and it is useful when the Settings slider is missing.
- Open Control Panel by typing it in the Start menu search and clicking it.
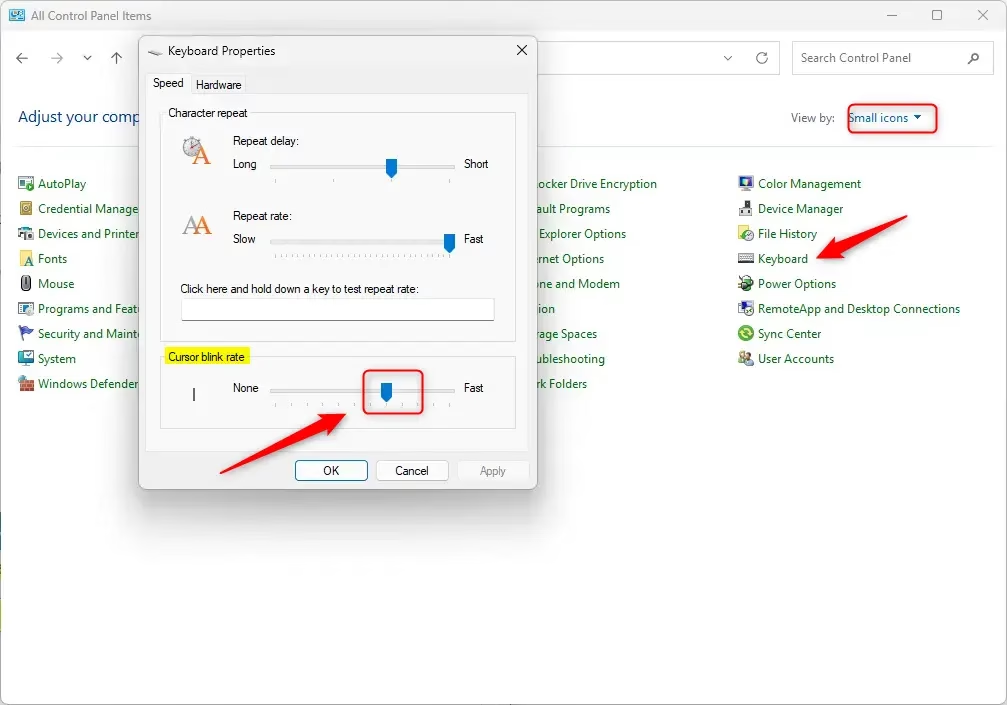
- Make sure the view is set to Icons (not Category). Use the View by drop-down in the top-right corner to switch to large or small icons. The full list of Control Panel items appears.
- Click on the Keyboard icon. The Keyboard Properties window opens.
- Click the Speed tab.
- Under Cursor blink rate, move the slider to your preferred speed. A sample cursor next to the slider blinks at the speed you choose, so you can preview it before saving.
- Click OK to save.
To undo the change, open the same window and move the slider back.
Option 3Change the Cursor Blink Rate Using Registry Editor (Advanced)
This advanced method lets you type a specific value for the blink speed. Follow the steps carefully, because a wrong change in the registry can cause system errors. Before you start, you can back up the registry by clicking File and then Export in the Registry Editor.
- Press Windows key + R, type
regedit, and press Enter to open the Registry Editor. If a User Account Control prompt appears, click Yes. - Use the panel on the left to go to this folder:
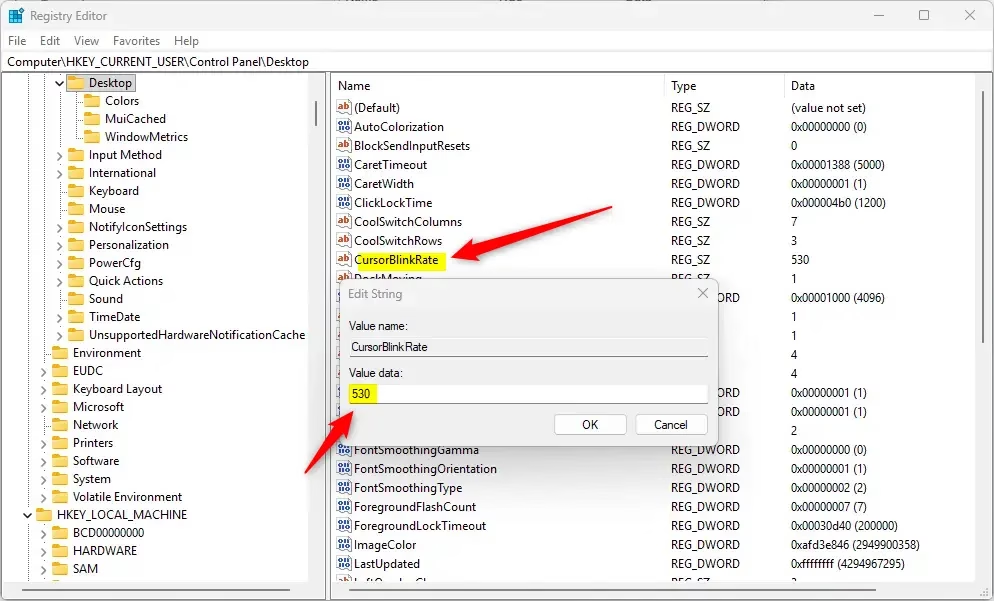
HKEY_CURRENT_USER\Control Panel\Desktop
- On the right side, find CursorBlinkRate and double-click it. An edit window opens showing the current value.
- Type a number between 200 (fast) and 1200 (slow) to set the blink rate in milliseconds.
- Type -1 if you want to stop the cursor from blinking completely.
- Click OK to save.
- Close the Registry Editor.
- Sign out and sign back in, or restart your computer for the change to take effect. Until you do, the cursor may keep blinking at the old speed.
To undo the change, open the same value again and enter your old number. If you exported the registry first, you can also double-click the saved file to restore it.
Summary
- The text cursor blink rate controls how fast the blinking line flashes while you type.
- The default blink speed is about 530 milliseconds but can be changed.
- You can change the blink rate using Settings (if your Windows version supports it), Control Panel, or Registry Editor (for advanced users).
- The blink rate can be set between 200 (fast) and 1300 milliseconds (slow), or set to -1 to stop blinking. In the Registry Editor, use values from 200 to 1200.
- Remember to sign out or restart your PC if you use the Registry Editor method.
The text cursor blink rate in Windows 11 controls how fast the vertical typing line flashes on your screen. You can speed up or slow down this line using the Settings app, Control Panel, or Registry Editor. Which one you use depends on your version of Windows and how you like to work.
Was this guide helpful?

About the Author
Richard
Tech Writer, IT Professional
Richard is a writer at Geek Rewind who turns complex IT tasks into clear, step-by-step guides. He draws on years of hands-on experience in system administration and enterprise IT operations, focusing on Windows, Linux and WordPress: the problems people actually run into, and the fixes that work. His server and WordPress guides come from systems he runs himself. Richard builds and maintains the platform behind Geek Rewind, from its Ubuntu servers and Nginx configuration to its custom WordPress plugins. Many new tutorials start with readers' questions, and he's always glad to answer them in the comments.




No comments yet — be the first to share your thoughts!