How to Add or Remove Protected Folders for Controlled Folder Access in Windows 11
This tutorial will show you how to add and remove protected folders for Controlled Folder Access in Microsoft Defender Antivirus in Windows 11.
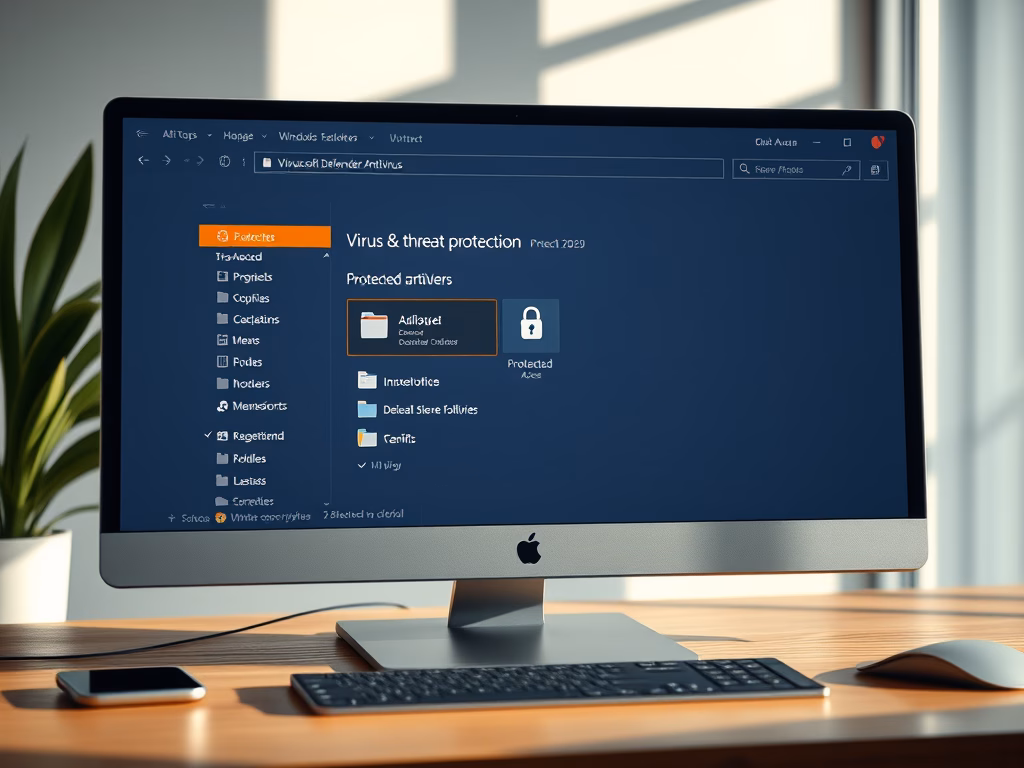
Go to Windows Security > Virus & threat protection > Manage ransomware protection. Click Protected folders, then Add a protected folder to select new locations or click a listed folder and Remove to delete it.
Microsoft Defender Antivirus is antivirus software that comes built into Windows 11. It helps protect your device from viruses, malware, and other threats.
Controlled folder access helps protect your important data from bad apps and threats, such as ransomware. In a ransomware attack, hackers can lock up your files and demand money to unlock them.
Controlled folder access protects your data by checking apps against a list of trusted apps. When an app tries to change a file in a protected folder, you get a notification on your computer.
Controlled folder access only allows trusted apps to access protected folders. You decide which folders get protected when you set up controlled folder access. Usually, common folders like Documents, Pictures, and Downloads are included in the protected list.
Windows protects system folders by default. It also protects several other folders:
- 📁C:\Users\<username>\Documents
- 📁C:\Users\Public\Documents
- 📁C:\Users\<username>\Pictures
- 📁C:\Users\Public\Pictures
- 📁C:\Users\Public\Videos
- 📁C:\Users\<username>\Videos
- 📁C:\Users\<username>\Music
- 📁C:\Users\Public\Music
- 📁C:\Users\<username>\Favorites
You can add other folders to protect. But you cannot remove the default folders listed above. You can protect folders, drives, network shares, and mapped drives. Environment variables and wildcards are supported.
Reference:
Customize controlled folder access – Microsoft Defender for Endpoint
Add other folders that should be protected by controlled folder access, or allow apps that are incorrectly blocking changes to important files.
What You Need to Know:
You must be signed in as an administrator to add or remove protected folders for Controlled Folder Access. Controlled Folder Access must be turned on before you can add and remove protected folders.
Option 1Add or Remove Protected Folders Using Windows Security
- Open Windows Security.
- Click on Virus & threat protection.

- Do one of the following:
- Click on the Manage ransomware protection link under Ransomware protection.
- Click on the Manage settings link under Virus & threat protection settings. Then click on the Manage Controlled folder access link under Controlled folder access.


- Click on the Protected folders link.

Add Protected Folders to Controlled Folder Access
- Click on Add a protected folder.

- Go to and select the drive or folder you want to add. Click on Select Folder.
Remove Protected Folders from Controlled Folder Access
- Click on the protected folder you want to remove to open it.
- Click on Remove.
- Click on OK to confirm. (See screenshot below)
When you finish adding or removing protected folders, you can close Windows Security.
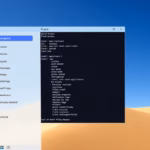
Option 2Add or Remove Protected Folders Using Command
- Type the command below into Windows Terminal (Admin). Press Enter.
To add a protected folder:
PowerShell Add-MpPreference -ControlledFolderAccessProtectedFolders "<full path>"OR
To remove a protected folder:
PowerShell Remove-MpPreference -ControlledFolderAccessProtectedFolders "<full path>"Example:
PowerShell Add-MpPreference -ControlledFolderAccessProtectedFolders "Z:\"PowerShell Remove-MpPreference -ControlledFolderAccessProtectedFolders "Z:\"- When finished, you can close Windows Terminal (Admin).
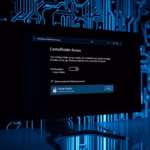
Option 3Configure Protected Folders Using Local Group Policy Editor
- REQUIRES ADMIN: Open the Local Group Policy Editor (gpedit.msc).
- In the left pane, go to this location: (See screenshot below)
- Computer Configuration > Administrative Templates > Windows Components > Microsoft Defender Antivirus > Microsoft Defender Exploit Guard > Controlled folder access

- In the right pane under Controlled folder access, double-click on the Configure protected folders policy.
Add Protected Folders
- Select the Enabled radio button.
- Click on the Show button next to Enter the folders that should be guarded under Options.
- In the Value name column, type the full path of the drive or folder you want to add. Example:
"Z:\"- Double-click in the field to enter the full path.
- In the Value column to the right, type the number 0.
- Double-click in the field to enter the number.
- When finished adding drives or folders, click on OK.
- Click on OK again.


Remove Protected Folders
- Select the Enabled radio button.
- Click on the Show button next to Enter the folders that should be guarded under Options.
- Delete the Value name and Value columns for the drives or folders you want to remove.
- When finished removing drives or folders, click on OK.
- Click on OK again.
Undo These Changes
To go back to the default setting:
- Select the Not Configured radio button.
- Click on OK.
- You can now close the Local Group Policy Editor.
Option 4Configure Protected Folders Using Registry Editor
Add Protected Folder to Controlled Folder Access
- REQUIRES ADMIN: Click on the Download button below to download the registry file that adds the needed registry keys and values.
- REQUIRES ADMIN: Open Registry Editor (regedit.exe).
- In the left pane, go to this key:
HKEY_LOCAL_MACHINE\SOFTWARE\Policies\Microsoft\Windows Defender\Windows Defender Exploit Guard\Controlled Folder Access\ProtectedFolders
- In the right pane of the ProtectedFolders key, right-click on an empty space. Click on New. Click on String Value.
- Type the full path of the drive or folder you want to add as the name. Example:
"Z:\"Press Enter. - Double-click on this string value to change it.
- Type the number 0. Click on OK.
Remove Protected Folder from Controlled Folder Access
- REQUIRES ADMIN: Open Registry Editor (regedit.exe).
- In the left pane, go to this key:
HKEY_LOCAL_MACHINE\SOFTWARE\Policies\Microsoft\Windows Defender\Windows Defender Exploit Guard\Controlled Folder Access\ProtectedFolders
- In the right pane of the ProtectedFolders key, right-click on the string value (REG_SZ) of the drive or folder you want to remove. Example:
"Z:\"Click on Delete. - Click on Yes to confirm.
- When finished removing drives or folders, you can close Registry Editor.
Summary
Controlled Folder Access in Microsoft Defender Antivirus is an important way to protect your sensitive data from threats like ransomware. Here are the key points to remember:
- Why Use It: Controlled Folder Access protects important files by allowing only trusted apps to access protected folders.
- Default Protection: Several system and user folders are protected by default. This gives you a basic level of security right away.
- Add Your Own Folders: You can add extra folders for protection. But you cannot remove the default folders.
- How to Configure It: You can set up the feature through Windows Security, Command Prompt, Local Group Policy Editor, or Registry Editor.
- Admin Rights Required: You must be signed in as an administrator to add or remove protected folders.
- Watch for Notifications: Pay attention to notifications that show when an untrusted app tries to access protected folders.
By following these steps, you can make your device more secure. You will prevent unauthorized apps from accessing your important files.
Was this guide helpful?

About the Author
Richard
Tech Writer, IT Professional
Richard, a writer for Geek Rewind, is a tech enthusiast who loves breaking down complex IT topics into simple, easy-to-understand ideas. With years of hands-on experience in system administration and enterprise IT operations, he’s developed a knack for offering practical tips and solutions. Richard aims to make technology more accessible and actionable. He's deeply committed to the Geek Rewind community, always ready to answer questions and engage in discussions.

No comments yet — be the first to share your thoughts!