Adjust Screen for Eye Comfort in Windows 11

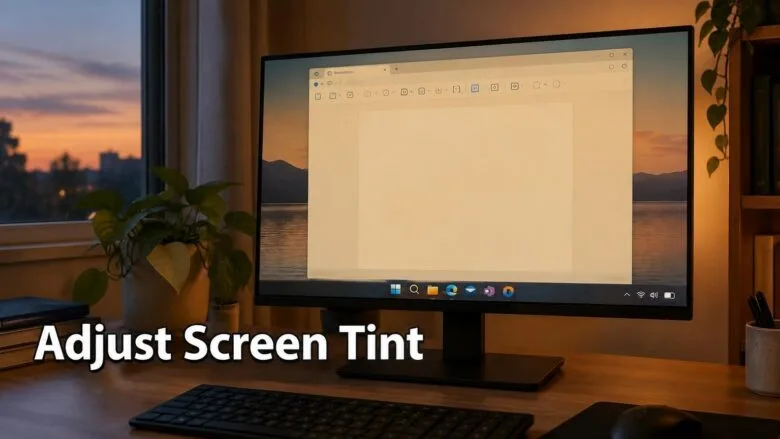
Night light is a built-in Windows 11 feature that shifts your screen toward warmer colors by cutting down blue light. Warmer colors are easier on the eyes in the evening, especially when white backgrounds look harsh.
To turn it on, open Settings System Display, then switch on Night light. Drag the Strength slider until the screen looks comfortable to you.
This guide also shows how to set a schedule so Night light turns on by itself at night. It covers what to do when the Night light option is greyed out or missing. Most steps don’t need administrator rights. The one exception is a driver update in the troubleshooting section, and that step is flagged where it appears.
Turn on Night light in Windows 11 by opening Settings, then selecting System and Display. Click the Night light row, select Turn on now, and drag the Strength slider until white backgrounds look comfortable. You can also press Win+R, type ms-settings:nightlight, and press Enter to open the page directly. Night light does not change brightness or text size.
What Night Light Changes (and What It Doesn’t)
Night light changes the color temperature (how warm or cool the light looks) of the whole display. White becomes cream or amber, and the effect gets stronger as you raise the strength. It does not change brightness, text size or contrast. Those are separate settings, covered further down.
Two limits matter before you start:
- It affects color accuracy. Skip it, or turn it off, when you edit photos or video, or do any work where colors must be correct.
- It is not a substitute for breaks. A warmer tint can make a screen feel gentler at night, but it does not stop eye strain from long sessions.
Night light is part of Windows 11 on both Home and Pro. There is no edition difference. The menu labels below match current Windows 11. A label may differ slightly on an older or newer build.
Turn on Night light and set the tint
You have two ways to switch Night light on. The Settings app gives you every option, including strength and schedule. Quick Settings is the panel of tiles that opens from the right side of the taskbar. It is faster for a quick on or off switch, but you cannot change the strength there.
Method 1Use the Settings App
Use this method the first time. It opens the full Night light page, with every option in one place.
- Press Windows key + I to open Settings.
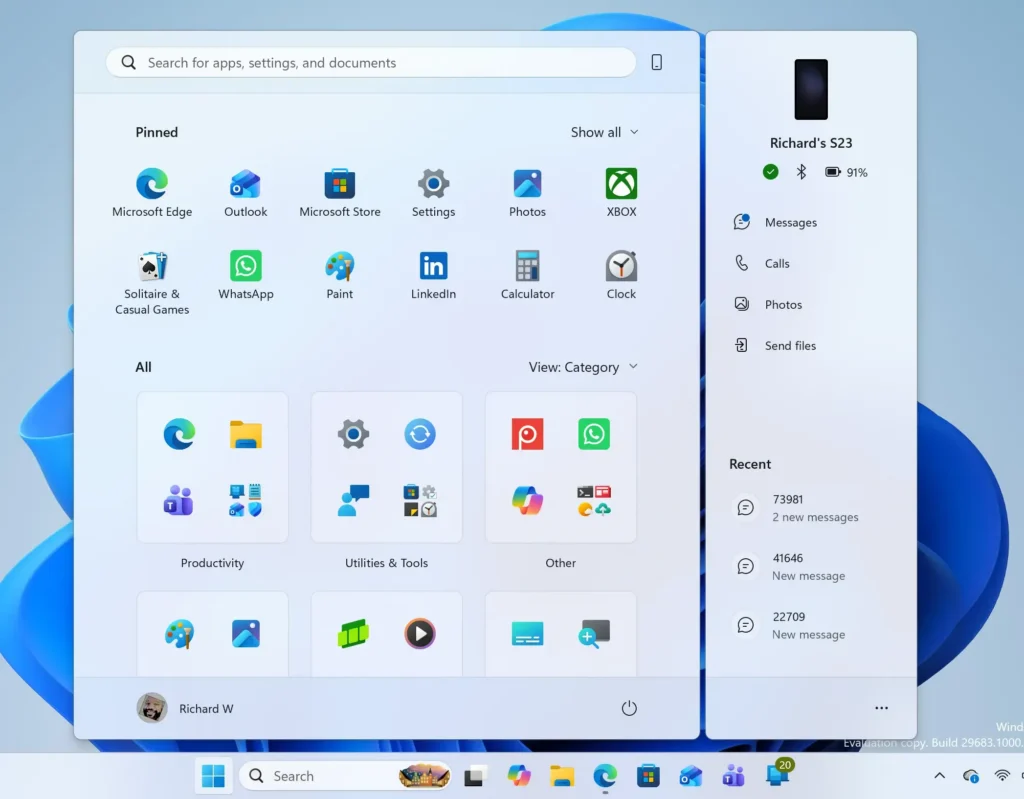
- Click System in the left pane.
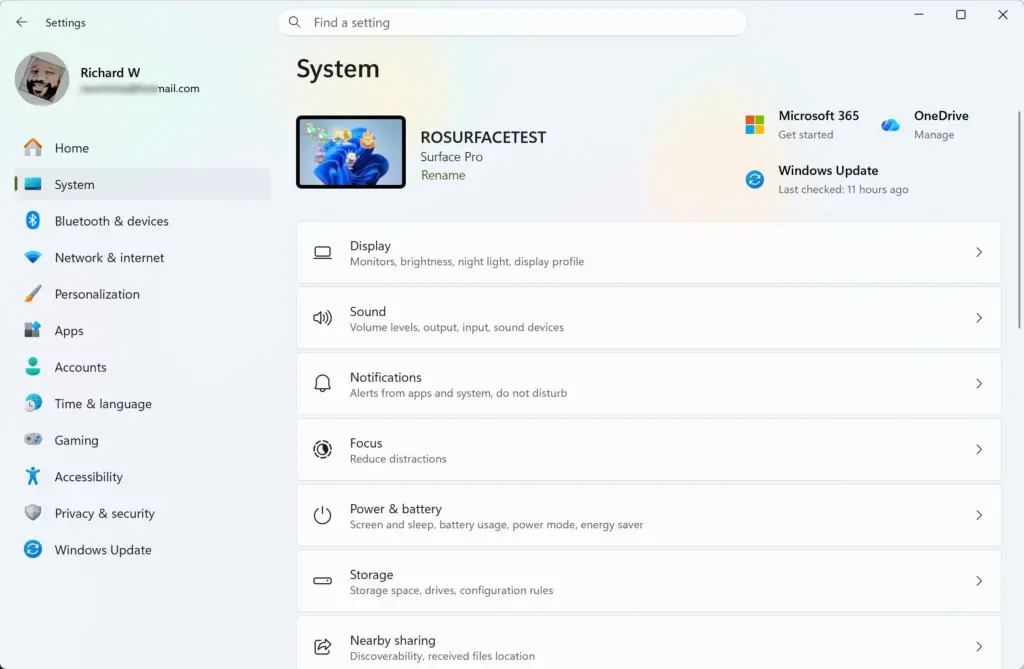
Settings › System - Click Display. The page opens with a Brightness & color section near the top.
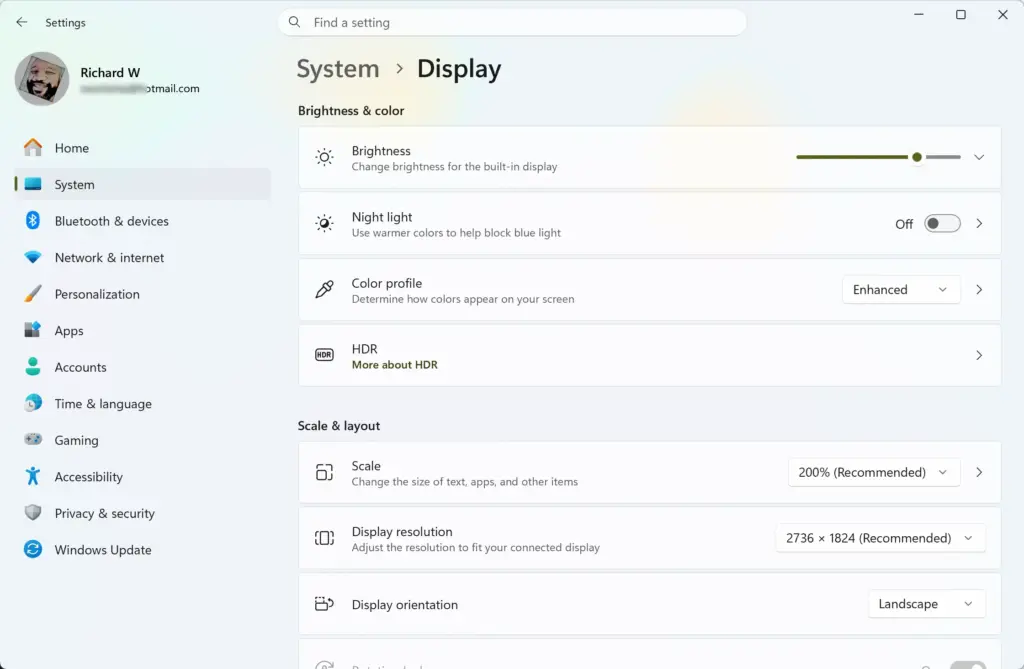
Settings › System › Display - Click the Night light row, not only its toggle. Clicking the row opens the Night light settings page. The toggle on the row switches the feature on or off without opening the page.
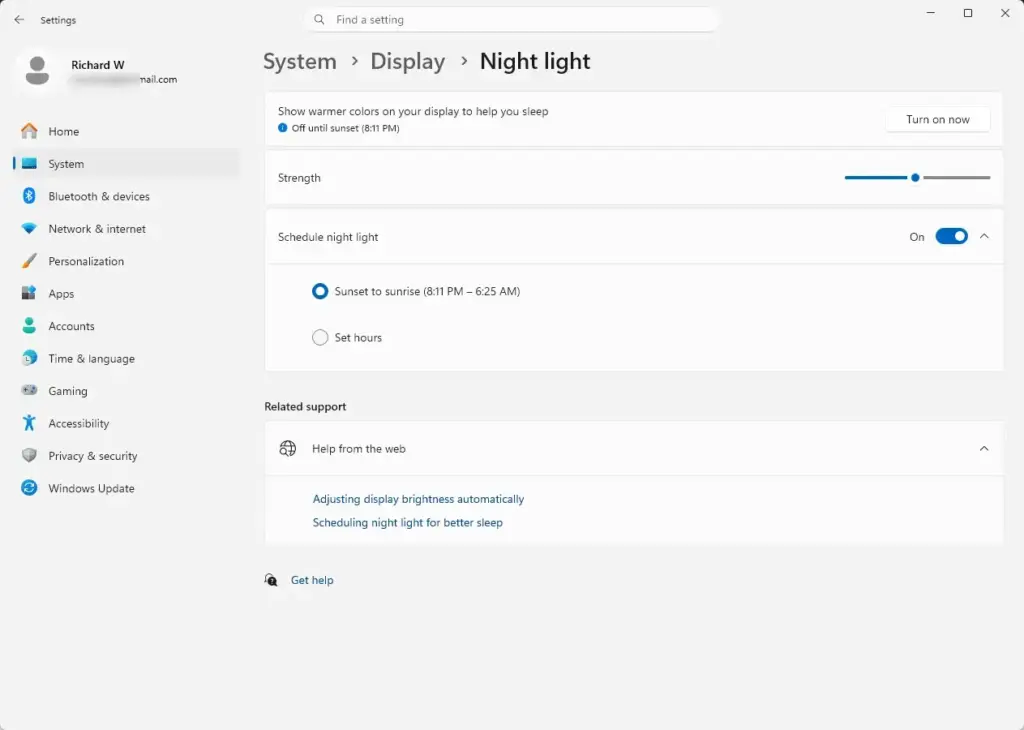
Settings › System › Display › Night light - Click Turn on now. The screen shifts to a warmer tint straight away, and the button changes to Turn off now.
- Drag the Strength slider. Moving it right makes the tint warmer, and moving it left makes it milder. The screen updates as you drag, so you can judge the result on a white window.
If the screen does not change color after step 5, go to the section on Night light being greyed out or missing, further down.
Press Windows key + R, type ms-settings:nightlight, and press Enter. This skips steps 1 to 4.
Method 2Use the Quick Settings Panel
This method toggles the tint with two clicks. Use it after you have set the strength in Settings, since the tile uses your saved strength.
- Press Windows key + A, or click the network, speaker and battery icons at the right end of the taskbar. The Quick Settings panel opens.
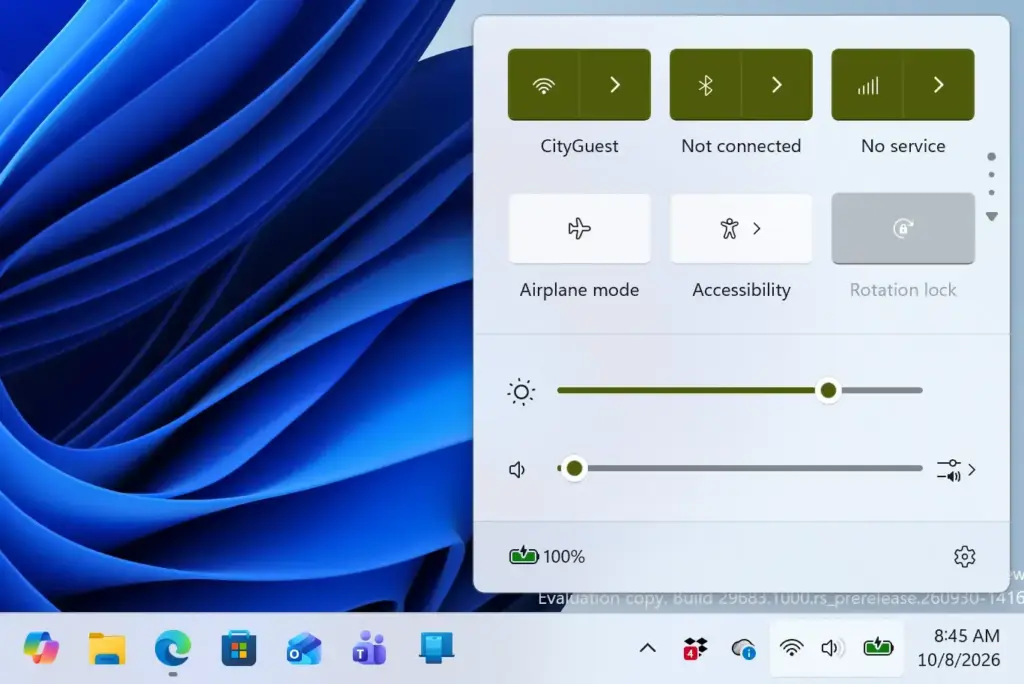
- Click the Night light tile. The tile turns highlighted and the screen turns warmer.
If you do not see the tile, add it:
- In the Quick Settings panel, click the pencil icon (Edit quick settings).
- Click Add.
- Choose Night light from the list.
- Click Done.
If Night light is not in the list at all, Windows does not see a display that supports it. See the troubleshooting section.
Schedule Night Light So It Turns On by Itself
A schedule is the best way to use Night light. You get the warm tint in the evening without remembering to switch it on. The schedule settings live on the same Night light page as the strength slider.
- Open Settings System Display Night light
Settings › System › Display › Night light - Switch on Schedule night light. Two choices appear: Sunset to sunrise and Set hours.
- Pick one of them, then follow the matching section below.
A manual choice of Turn on now or Turn off now overrides the schedule. In most cases it holds until the next scheduled change, and the schedule then takes over again.
Use Sunset to Sunrise
This choice follows daylight where you are. The tint comes on at sunset and goes off at sunrise, and the times shift through the year. Windows works out the times from your location, so Location services must be on and your time zone must be correct.
- Select Sunset to sunrise.
- If Windows shows a notice that location services are off, open Settings Privacy & security Location and switch on Location services. Return to the Night light page afterward.
If the tint comes on at the wrong time, check that the time zone is right in Settings Time & language Date & time An incorrect time zone is the usual cause of sunset times that look wrong.
Use Set Hours
This choice gives you fixed times. Use it if you want the tint on from a set hour regardless of daylight, for example from 8:00 PM until 7:00 AM.
- Select Set hours.
- Click the time under Turn on. A time picker opens.
- Scroll to the hour and minute you want, then click the check mark to confirm.
- Click the time under Turn off and repeat the process.
The new times save as soon as you confirm them. There is no Apply button.
Choose a Comfortable Strength
The strength is a personal choice, and there is no single correct value. A good way to set it is to open a blank document or a white web page in a room with the lighting you normally have in the evening. Move the Strength slider until the white looks like warm paper instead of a lamp.
These points help you pick:
- Start in the middle of the slider and adjust from there. A very strong setting makes everything look orange, and many people turn it off after a day.
- Judge the tint at the time of day you will use it. A setting that looks right at 9 PM can look too strong in a bright room.
- Your eyes adjust within a few minutes. Give a new setting a short time before changing it again.
Screenshots and screen recordings do not capture the tint, so the images you save keep their normal colors.
If Night Light Is Greyed Out or Missing
Night light depends on your display and its driver (the software that lets Windows control your graphics hardware). If the toggle is greyed out, Turn on now does nothing, or the tile is not in Quick Settings, work through these checks in order.
Check the Basics First
- Restart the computer. A display driver that has stopped responding often recovers after a restart.
- Open Settings Windows Update and click Check for updates. Install what is offered, then restart if asked.
- If you use an adapter, dock or USB display, try a direct cable connection to the monitor. Some adapters do not pass on the color adjustments that Night light uses, so the feature can be unavailable on those screens.
Update the Display Driver
A missing, outdated or generic display driver is a common cause. This step requires administrator privileges. Windows may ask you to confirm or enter an administrator password.
- Right-click the Start button and click Device Manager. Device Manager is a tool that lists your hardware and its drivers.
- Double-click Display adapters to expand it.
- Right-click your graphics adapter and click Update driver.
- Click Search automatically for drivers, then follow the prompts.
- Restart the computer and open Settings System Display again.
If the adapter is listed as Microsoft Basic Display Adapter, Windows is using a generic driver. Night light is often unavailable with it. Install the driver from your PC or graphics card maker, or check Settings Windows Update Advanced options Optional updates for a driver update.
This guide cannot confirm a specific fix for this case. Avoid registry changes and third-party tweaks from unverified sources, because they can make Windows harder to repair.
Check the Location Setting
If Night light works when you turn it on by hand but the Sunset to sunrise schedule never starts, the problem is location, not the display. Open Settings Privacy & security Location, switch on Location services, and check the time zone as described earlier. Or switch to Set hours, which needs no location.
Multiple Monitors, Games and Remote Sessions
Night light applies to every connected display that supports it. Windows 11 has no setting to warm one monitor and leave another unchanged. If one screen stays cool while another warms up, that screen or its connection does not support the adjustment.
Some full-screen games and video players skip Windows color adjustments, so the tint may disappear while they run. This is normal. It returns when you leave the program. If you want it in a game, check whether the game has a windowed or borderless mode.
Other Settings That Help With Eye Comfort
A warmer tint works best together with a sensible brightness and a comfortable layout. These settings sit close to Night light and are quick to check.
- Brightness: On the same Settings System Display page, drag the Brightness slider so the screen is not much brighter than the room around you. On a laptop, you can also use the brightness tile in Quick Settings.
- Dark mode: Open Settings Personalization Colors and set Choose your mode to Dark. Dark mode changes the app and window backgrounds, which reduces the amount of white on screen. It does not change the color temperature, so it combines well with Night light.
- Text size: If you lean toward the screen to read, open Settings Accessibility Text size and increase the size. This is a layout fix, not a tint change.
You may also see Color filters in Settings Accessibility. Color filters mainly help people with color vision differences or those who need easier reading. They do not replace Night light. Leave them off unless you need them.
Turn Night Light Off or Change It Later
You can reverse Night light at any time, and nothing about it is permanent. Use whichever of these fits:
- To turn it off for now, press Windows key + A and click the Night light tile, or open Settings System Display Night light and click Turn off now. The screen returns to normal colors straight away.
- To stop it from coming on automatically, open Settings System Display Night light and switch off Schedule night light.
- To change the tint, open the same page and drag the Strength slider.
What to Do Next
If the tint is still too harsh or too weak after you have tried different strengths, change the schedule start time before changing the strength again. Many people find that a later or earlier start matters more than the slider. If you want less white on screen as well, switch Windows to dark mode in Settings Personalization Colors To make the warm tint easier to read against, check your brightness setting on the Display page.
Have a question about this guide?
Answered by AI from this guide. Good questions may be added to this page — please don't include personal details.
Did this guide fix your problem?

About the Author
Richard
Tech Writer, IT Professional
Richard is a writer at Geek Rewind who turns complex IT tasks into clear, step-by-step guides. He draws on years of hands-on experience in system administration and enterprise IT operations, focusing on Windows, Linux and WordPress: the problems people actually run into, and the fixes that work. His server and WordPress guides come from systems he runs himself. Richard builds and maintains the platform behind Geek Rewind, from its Ubuntu servers and Nginx configuration to its custom WordPress plugins. Many new tutorials start with readers' questions, and he's always glad to answer them in the comments.
No comments yet — be the first to share your thoughts!