How to Improve Recall Snapshots Filtering on Windows 11
This guide explains how to manage the “Help improve Recall snapshots filtering” feature in Windows 11.
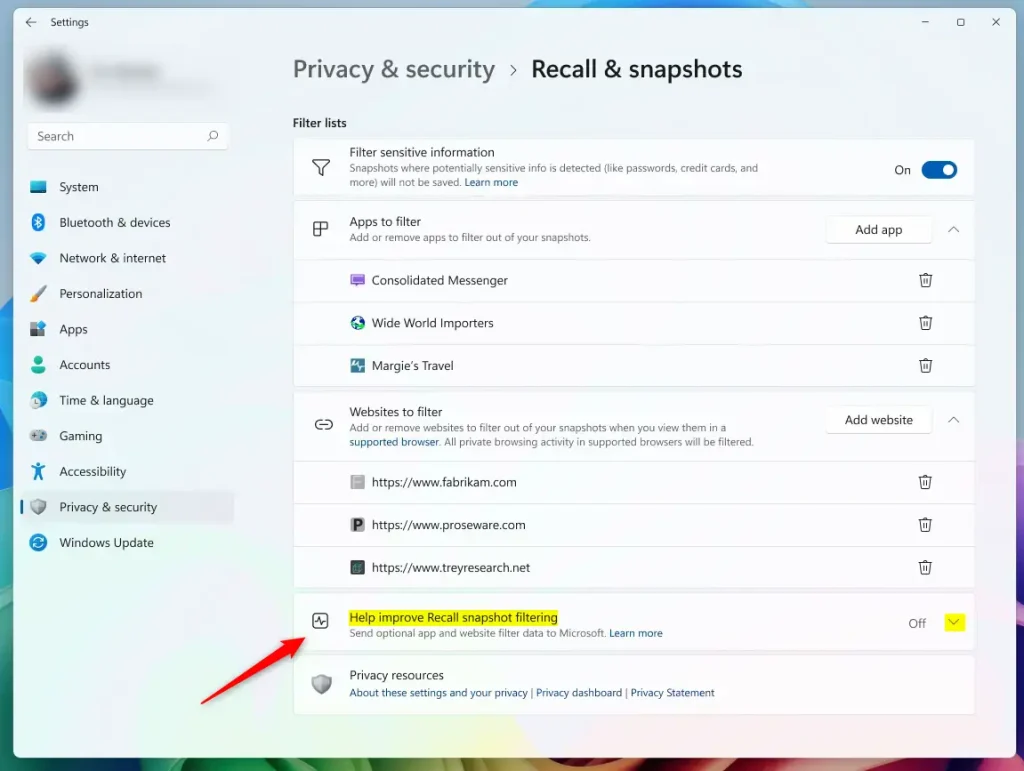
You can help improve Recall snapshots filtering by anonymously sharing your excluded apps and websites with Microsoft. To enable or disable this, go to Settings > Privacy & security > Recall & snapshots and toggle “Help improve Recall snapshots filtering” on or off.
What is Recall?
Windows 11 Recall is a new AI feature that acts like a computer’s memory, taking automatic screenshots of your screen so you can search your past activity.
To use this, you need to agree to save snapshots, which are visual records of your computer use.
When Recall is active, you can temporarily pause it, filter apps and websites, delete your snapshots, and manage your history.
How is your data kept safe?
Your Recall snapshots are kept safe because they are stored only on your computer, protected by features like BitLocker that are usually on by default.
When you use filtering, Windows 11 asks if you want to “Help improve Recall snapshots filtering.” This lets you anonymously share a list of the apps and sites you have blocked from Recall with Microsoft.
Why help improve Recall snapshots filtering?
By sharing this information, you help Microsoft learn which apps and websites people prefer to exclude. This makes the AI tool smarter and more useful for everyone.
What happens when you are done?
Once you finish these steps, your preference for sharing anonymous filtering data will be saved. Microsoft will receive or stop receiving your exclusion list based on the setting you chose.
How to change this in Settings
You can easily change your Recall and snapshots settings by opening the Windows Settings app and navigating to the Privacy & security section.
- Open the Windows Settings app by clicking the Start menu and selecting Settings, or press the Windows key + I to open Settings app.
- Click on Privacy & security in the left menu.

- On the right side, click the Recall & snapshots tile to see its settings.
- Turn on the “Save snapshots” feature.
- Select the “Help improve Recall snapshots filtering” tile to see more options.
- Toggle the switch to On or Off depending on your preference.
Close the Settings window when finished.
How to change this using the Windows Registry
For advanced users, you can change Recall settings using the Windows Registry editor, but you’ll need administrator rights to do so.
You can also use the Windows Registry editor to change this setting:
- Open the Windows Registry and go to this path:
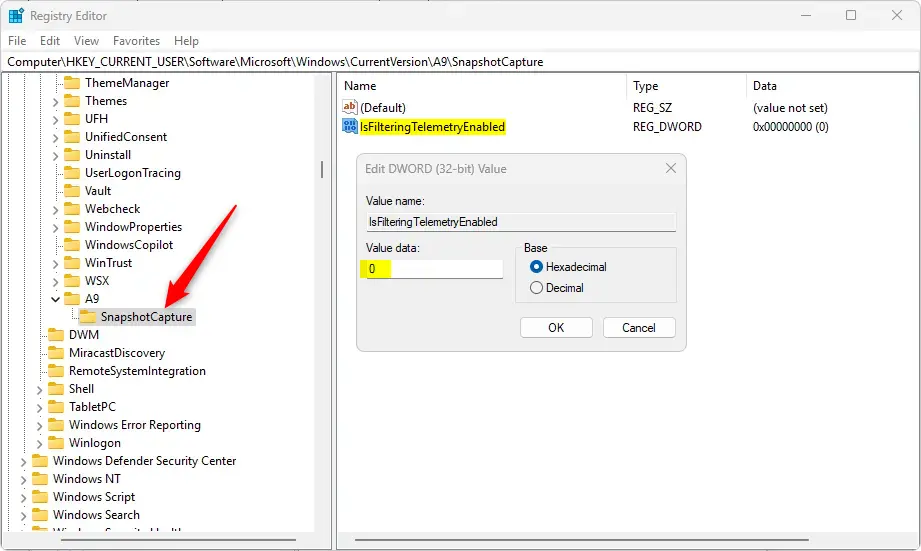
HKEY_CURRENT_USER\Software\Microsoft\Windows\CurrentVersion\A9SnapshotCapture - Right-click on the SnapshotCapture folder.
- Select New, then select DWORD (32-bit) Value.
- Name the new file
IsFilteringTelemetryEnabled. - Double-click
IsFilteringTelemetryEnabledand set the value to 1 to turn it on, or 0 to turn it off.
Summary
The ‘Help improve Recall snapshots filtering’ option lets you anonymously share which apps and sites you’ve blocked with Microsoft to make Recall better for everyone.
- What it does: It sends a list of apps and sites you blocked from being recorded to Microsoft.
- How to change it: You can use the Settings app or the Windows Registry.
- Your privacy: All snapshots stay on your device, and any data shared for improvement is anonymous.
Reference: Microsoft.com
What are Recall snapshots?
Recall snapshots are periodic screenshots taken by Windows 11’s AI feature on Copilot+ PCs, creating a searchable timeline of your computer activity that’s stored locally.
How do I disable Recall snapshots?
You can turn on or off saving snapshots at any time by going to Settings > Privacy & security > Recall & snapshots.
How often does Recall take snapshots?
If you opt in to the feature, then as you use your PC, a snapshot of your active screen will be saved every few seconds and when the content of your active window changes.
Was this guide helpful?

About the Author
Richard
Tech Writer, IT Professional
Richard, a writer for Geek Rewind, is a tech enthusiast who loves breaking down complex IT topics into simple, easy-to-understand ideas. With years of hands-on experience in system administration and enterprise IT operations, he’s developed a knack for offering practical tips and solutions. Richard aims to make technology more accessible and actionable. He's deeply committed to the Geek Rewind community, always ready to answer questions and engage in discussions.


No comments yet — be the first to share your thoughts!