How to Enforce BitLocker Encryption on Removable Drives

You enforce BitLocker encryption on removable drives in Windows 11 using Group Policy or PowerShell.
Enforcing BitLocker means you require users to encrypt any USB flash drive or external hard drive they connect to a specific computer or group of computers. This ensures sensitive data remains protected, even if the drive is lost or stolen.
You can achieve this enforcement through the Local Group Policy Editor (gpedit.msc) on Windows 11 Pro, Enterprise, and Education editions, or via PowerShell commands for broader deployment. This policy typically targets removable data drives and allows you to specify encryption requirements.
Enforce BitLocker encryption for removable drives by opening Group Policy Editor and navigating to Computer Configuration > Windows Components > BitLocker Drive Encryption > Removable Data Drives. Double-click “Enforce drive encryption type on removable data drives” and select your desired encryption method. Save the changes and restart your computer.
What Is BitLocker and Why Use It?
BitLocker is a built-in Windows tool that helps keep your files safe by scrambling them, so only you can get to them.
You can protect external, fixed drives, and operating system drives using BitLocker. When you enable BitLocker on your main Windows drive, it automatically unlocks the drive at startup using a TPM chip (Trusted Platform Module, a security chip that helps with encryption).
Understanding Encryption Types
When you turn on BitLocker for removable data drives, Windows will ask you to pick an encryption type.
Full encryption locks down your entire drive.
Used space only encryption, on the other hand, only protects the areas of the drive where your data is actually stored.
Why Enforce an Encryption Type?
The ‘Enforce drive encryption type on removable data drives’ policy setting lets you control how BitLocker functions on removable drives. This lets you pick one encryption type for your whole organization or computer.
Method 1Using Group Policy Editor
You can enforce BitLocker encryption on removable drives using the Group Policy Editor, which is a handy tool for managing Windows settings.
Search for “Edit group policy” in your Start menu. Click on ‘Local Group Policy Editor’ to open the tool.
Step 2: Navigate to BitLocker Settings
Follow this path in the left panel:
- Computer Configuration
- Administrative Templates
- Windows Components
- BitLocker Drive Encryption
- Removable Data Drives
Step 3: Find the Encryption Policy
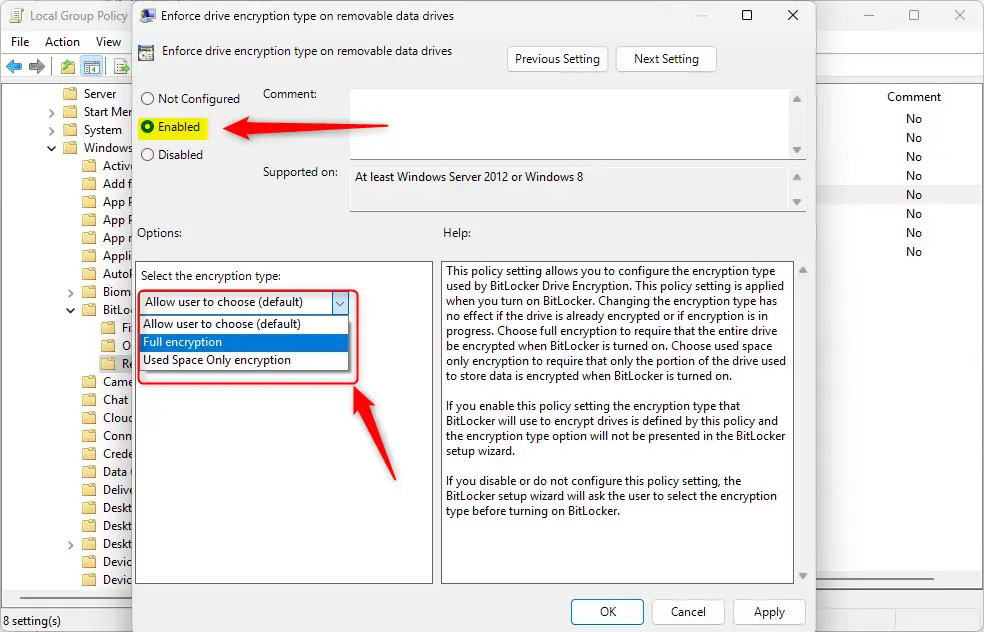
Look in the right panel for “Enforce drive encryption type on removable data drives.” Double-click it.

Step 4: Choose Your Encryption Type
A window opens with three choices:
- Not Configured (default) – Works like Disabled. BitLocker will ask users which encryption type to use.
- Enabled – BitLocker uses the type you choose below. Users won’t see the option to pick a type in the wizard. Choose either “Full encryption” or “Use Space Only encryption.”
- Disabled – BitLocker setup will keep asking users to pick the encryption type.
Step 5: Save and Restart
Click OK to save. Your computer may need to restart to apply these changes.
Method 2Using Registry Editor %📂%FLAG_ADMIN%copy%
For those comfortable with more advanced settings, you can enforce BitLocker encryption on removable drives by making changes in the Windows Registry Editor.
Right-click on the Windows Registry editor and select “Run as administrator.”
Step 2: Navigate to the BitLocker Key
Navigate to this location within the Windows Registry, which is like a central database for settings:
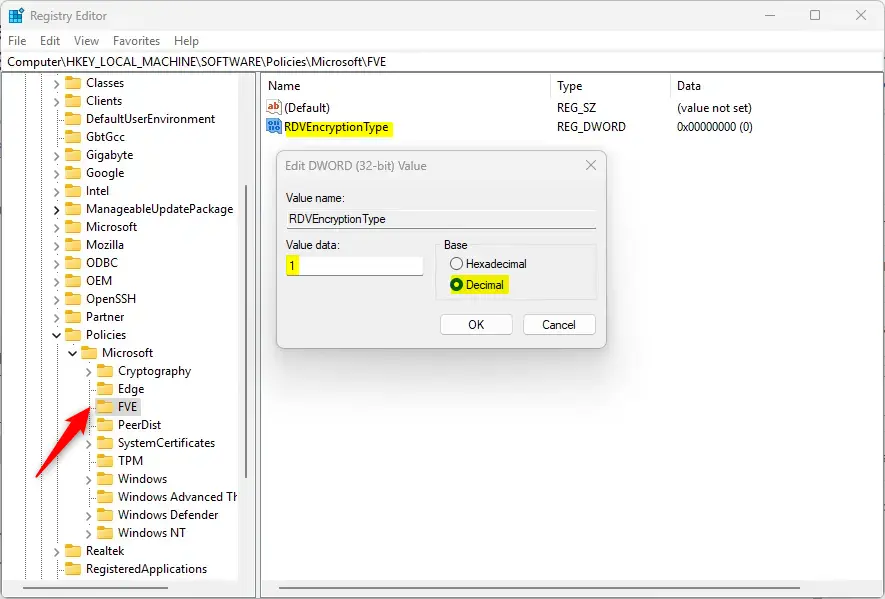
Computer\HKEY_LOCAL_MACHINE\SOFTWARE\Policies\Microsoft\FVEStep 3: Find or Create the Encryption Type Setting
In the right-hand pane, look for a setting named ‘RDVEncryptionType’. Double-click it to open its properties.
If you don’t see it, right-click in an empty space and select ‘New’ > ‘DWORD (32-bit) Value.’ Then, name this new value ‘RDVEncryptionType.’
Step 4: Set the Encryption Value
Enter one of these values:
- 1 – Enforces full encryption on removable drives
- 2 – Enforces used space only encryption on removable drives
Step 5: Save and Restart
Click OK to save your changes. Restart your computer to apply them.
How to Undo These Changes
To revert to letting users choose their own encryption type, delete the RDVEncryptionType item you created and restart your computer.
Summary
Enforcing BitLocker encryption on removable drives adds a strong security layer to your data, and you can do this using either the Group Policy Editor or the Registry Editor.
- Group Policy Editor – Best for everyday users who prefer a visual interface
- Registry Editor – A direct way to change settings in Windows’ database
Both methods let you pick between full encryption or used space only encryption. Once set, BitLocker will use your choice without asking users. Remember to restart your computer after making changes.
Can you remove BitLocker encryption from a USB drive?
Turn off Standard BitLocker encryption Type and search [Manage BitLocker] in the Windows search bar①, then click [Open]②. Click [Turn off BitLocker]③ on the drive that you want to decrypt. If the drive is under locked status, you need to click [Unlock drive] and type the password to turn off BitLocker.
How to encrypt a removable drive?
Insert the USB drive into the computer and find the file or folder you want to encrypt. Right-click the file or folder and select "Properties". In the "General" tab, click "Advanced". Check "Encrypt contents to protect data" and click "OK".
Was this guide helpful?

About the Author
Richard
Tech Writer, IT Professional
Richard, a writer for Geek Rewind, is a tech enthusiast who loves breaking down complex IT topics into simple, easy-to-understand ideas. With years of hands-on experience in system administration and enterprise IT operations, he’s developed a knack for offering practical tips and solutions. Richard aims to make technology more accessible and actionable. He's deeply committed to the Geek Rewind community, always ready to answer questions and engage in discussions.


No comments yet — be the first to share your thoughts!