Turn On Bluetooth from Quick Settings in Windows 11

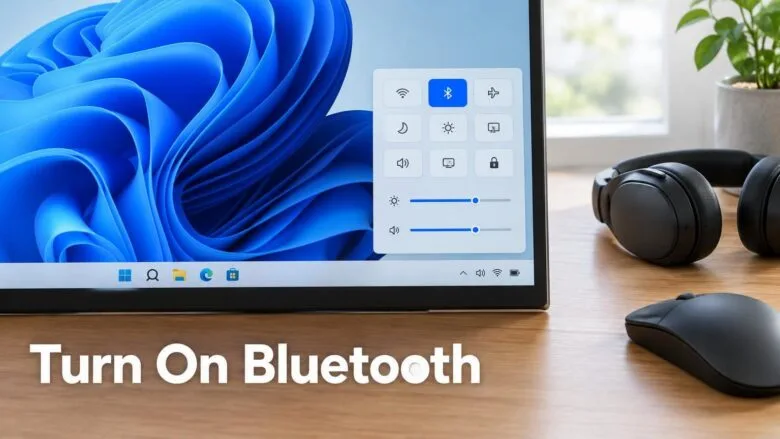
Quick Settings in Windows 11 includes a Bluetooth tile that switches your PC’s Bluetooth radio on or off with one click. Bluetooth connects headphones, mice, keyboards and speakers to your PC without a cable. To open the panel, press the Win+A, then select the Bluetooth tile.
The same steps work on Windows 11 Home and Pro. Turn Bluetooth on from Quick Settings in a few seconds. If the tile is missing or will not stay on, the troubleshooting sections below show what to check.
To turn on Bluetooth from Quick Settings in Windows 11, press the Win+A to open the Quick Settings panel, then select the Bluetooth tile. A blue tile means Bluetooth is on. The steps work on Windows 11 Home and Pro and need no administrator rights. Paired devices such as headphones or a mouse usually reconnect within a few seconds.
Turn On Bluetooth from Quick Settings
These steps open Quick Settings and switch Bluetooth on, so your PC can find and connect to Bluetooth devices. The Quick Settings steps do not need administrator rights. Later sections, such as Device Manager and the Bluetooth Support Service, do need them, and those steps are flagged.
- Press the Win+A. The Quick Settings panel (the small control panel for Wi-Fi , volume, brightness and similar toggles) opens above the right end of the taskbar . You can also click the network, speaker or battery icon in the taskbar to open the same panel.
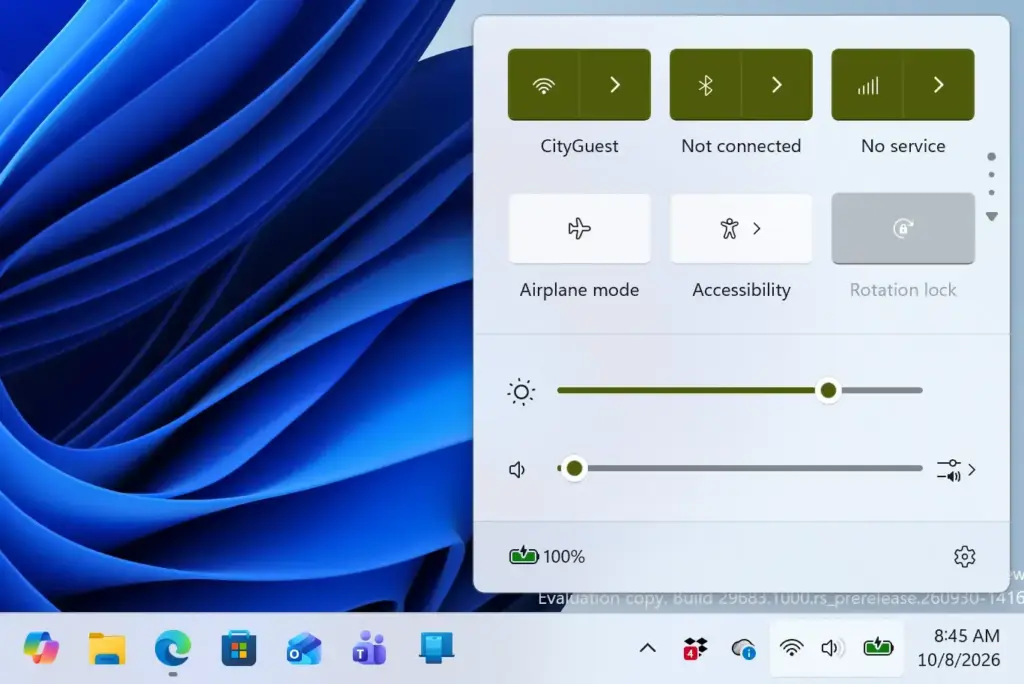
- Find the Bluetooth tile. It sits in the grid of rounded tiles with Wi-Fi and Airplane mode. If you cannot see it, go to the section on adding the tile below, then return to this step.
- Select the Bluetooth tile once. The tile fills with your accent color (blue by default). A tile with a plain grey or dark background is off.
- Read the label under the tile name. It shows Not connected if no device is linked, or the name of a connected device such as your headphones.
- Close the panel by pressing Esc or clicking anywhere on the desktop. Bluetooth stays on after the panel closes.
- Open Settings Bluetooth & devices to confirm the change. The Bluetooth toggle at the top of the page now reads On.
Step 6 is optional. Skip it if you only want to switch Bluetooth on. Keep it if you want to see which devices are already paired, because Quick Settings only shows a short summary.
Other Ways to Open Quick Settings
The keyboard shortcut is the fastest route, but it is not the only one. On a touchscreen, tap the network, volume or battery icons in the system tray . The system tray is the group of icons at the right end of the taskbar .
If the taskbar is hidden or set to auto-hide, move the pointer to the bottom edge of the screen first. The Win+A shortcut works whether or not the taskbar is hidden, so it is the most reliable option.
What You Should See After Bluetooth Is On
Once the tile turns on, Windows turns on the Bluetooth hardware and reconnects to devices it has paired before. Headphones or a mouse you paired before usually connect within a few seconds, as long as the device is switched on and in range.
A new device will not appear on its own. Pair it once through Settings before it connects. Turning Bluetooth on only makes your PC ready to pair or reconnect.
No restart is needed. Windows applies the change the moment you select the tile. If a restart seems to be required, something else is wrong, and the troubleshooting sections below cover the likely causes.
Check Paired Devices from the Tile
On current Windows 11 builds, the Bluetooth tile has a small arrow on its right edge. Select the arrow to see a list of nearby and paired devices without leaving Quick Settings. Select a device in the list to connect to it.
Right-click the tile and choose Go to Settings to jump straight to the Bluetooth & devices page. The arrow and the right-click menu may look different on an older Windows 11 build, so run Windows Update if yours does not match.
Add the Bluetooth Tile If It Is Missing
Quick Settings lets you choose which tiles appear, and the Bluetooth tile may have been removed or never added. The steps below add the tile back from the Quick Settings editor, and then you can turn on Bluetooth from the panel.
- Press the Windows key + A. Quick Settings opens.
- Select the pencil icon at the bottom of the panel. The tooltip reads Edit quick settings. Each tile now shows a small pin icon in its corner, and an Add button appears.
- Select Add. A list of tiles that are not currently shown opens.
- Select Bluetooth in the list. The tile joins the grid straight away.
- Drag the tile to the position you want. Dragging is optional, but a tile in the first row is quicker to reach.
- Select Done. The panel leaves edit mode, and the Bluetooth tile is ready to use.
If Bluetooth is not in the Add list, Windows does not detect a Bluetooth radio on this PC. The next section covers why.
Remove the Tile Later
To hide the tile again, open Quick Settings, select the pencil icon, then select the unpin icon on the Bluetooth tile. Select Done to save the layout. Removing the tile does not turn Bluetooth off or uninstall anything.
Why the Bluetooth Tile Is Missing or Will Not Turn On
Most failures come down to one of five causes. Work through them in this order, because the early checks take seconds and the later ones take longer.
The PC Has No Bluetooth Adapter
Many desktop PCs ship without Bluetooth. If Windows finds no Bluetooth hardware, the tile never appears, and the Add list has no Bluetooth entry. Settings Bluetooth & devices also lacks a Bluetooth toggle in that case.
The fix is to plug in a USB Bluetooth adapter. Windows 11 normally installs the driver (the software that lets Windows talk to a piece of hardware) automatically. After a short pause, the tile should become available. If it does not appear, restart the PC once.
Airplane Mode Is On
Airplane mode turns off all wireless connections, including Bluetooth. Look at the Airplane mode tile in Quick Settings. If it is highlighted, select it to turn it off, then select the Bluetooth tile.
This is useful on a flight when you want wireless headphones but no Wi-Fi. Windows usually remembers that choice the next time you use Airplane mode.
The Bluetooth Adapter Is Disabled in Device Manager
Device Manager is the Windows tool that lists every piece of hardware and its driver. A disabled adapter makes the tile vanish or fail to switch on. Enabling it needs administrator rights, so sign in with an administrator account first.
- Right-click the Start button. The Power User menu opens.
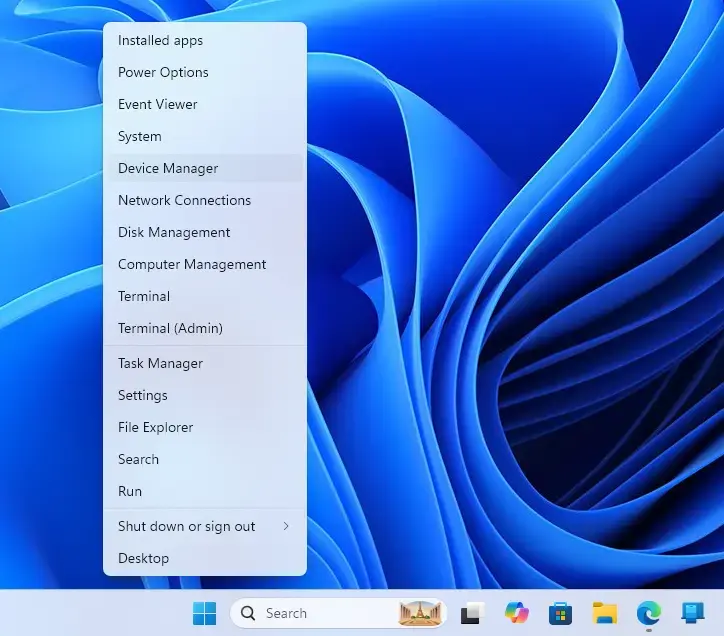
- Select Device Manager. The Device Manager window opens.
- Expand the Bluetooth category by selecting the arrow next to it. Your adapter appears in the list. A small down-arrow on its icon means it is disabled.
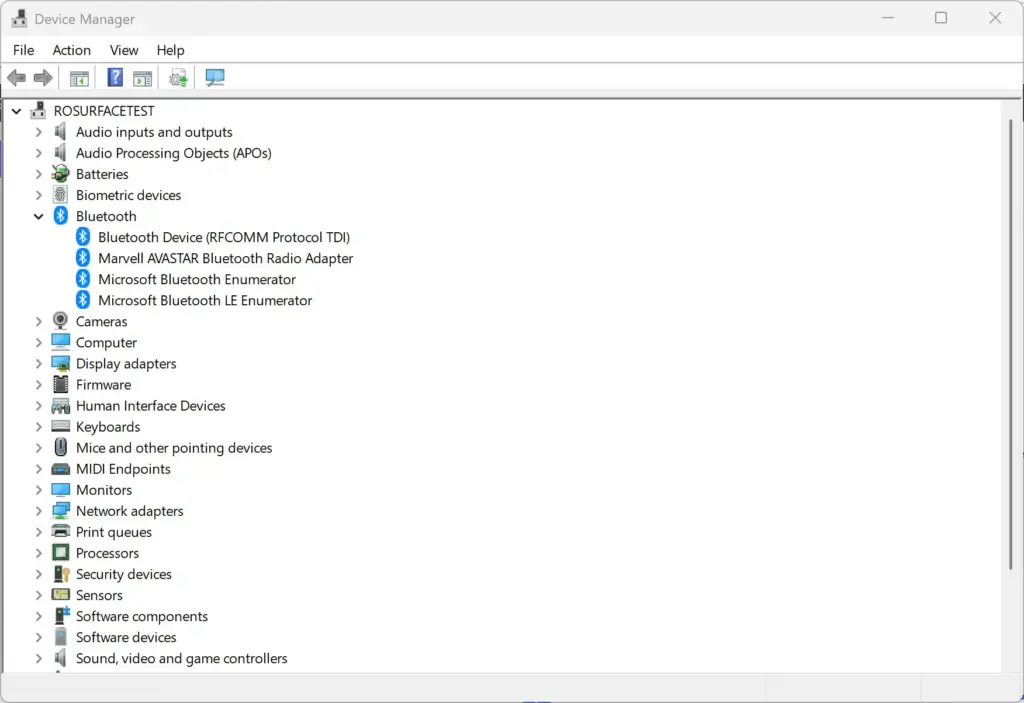
- Right-click the adapter and select Enable device. The down-arrow disappears. Administrator rights are required for this step.
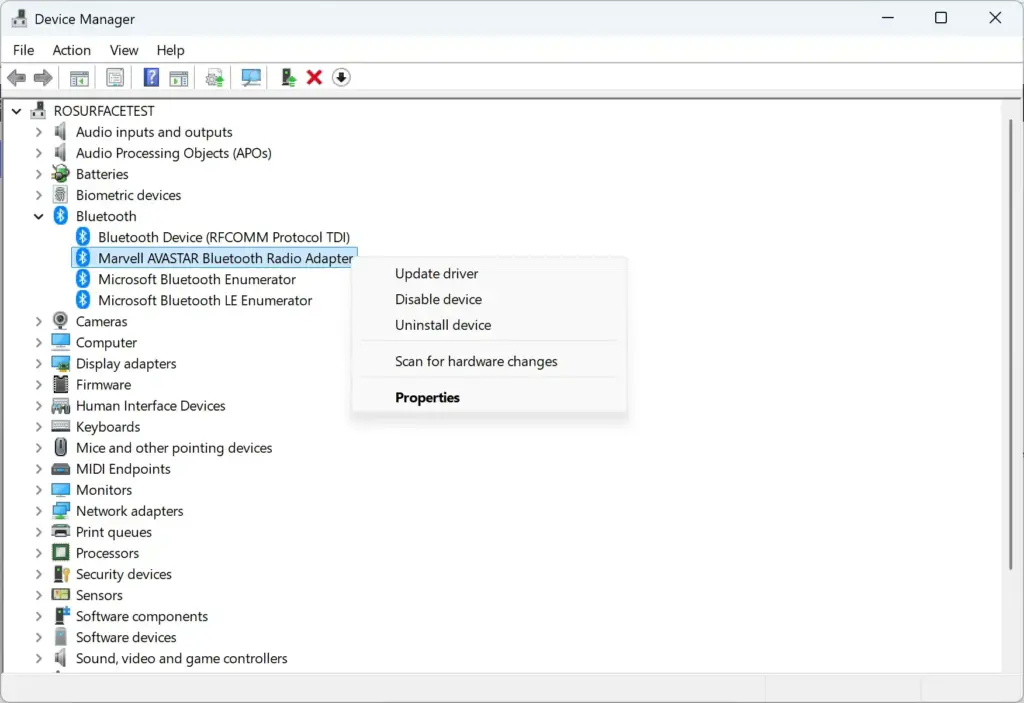
- Open Quick Settings again and check for the Bluetooth tile.
If the Bluetooth category is missing entirely, look for an entry with a yellow warning triangle under Other devices. That means Windows sees the hardware but has no working driver for it. Right-click the entry, select Update driver, then choose Search automatically for drivers.
Use the model number printed on the PC. Avoid driver packs from unknown sites.
The Bluetooth Support Service Is Stopped
The Bluetooth Support Service is a background Windows service. It finds nearby devices and manages connections to them. If it is stopped, Bluetooth can fail to switch on even though the adapter looks healthy. Restarting it needs administrator rights.
- Press the Windows key + R. The Run dialog opens.

Run dialog - Type
services.msc, then press Enter. The Services window opens. If a User Account Control prompt appears (the box that asks you to confirm an admin action), select Yes. - Scroll to Bluetooth Support Service and double-click it. Its properties window opens.
- Select Start if the service status reads Stopped. If it is already running, select Stop, then Start to restart it.
- Select OK, then try the Bluetooth tile again.
Leave the startup type alone unless a PC maker or support article tells you to change it. The default setting works on a standard Windows 11 install.
The PC Is Managed by an Organization
A work or school PC can have Bluetooth restricted by the people who manage it. In that case the tile may be absent or may refuse to switch on, and none of the fixes above will change it. Windows does not always say that a restriction is the cause. Ask your IT team before you try anything else on a managed PC.
Run the Bluetooth Troubleshooter
If the tile exists but Bluetooth still fails to turn on, the built-in troubleshooter checks the usual causes for you. It can restart services and report a driver problem.
- Open Settings System Troubleshoot Other troubleshooters A list of troubleshooters appears.
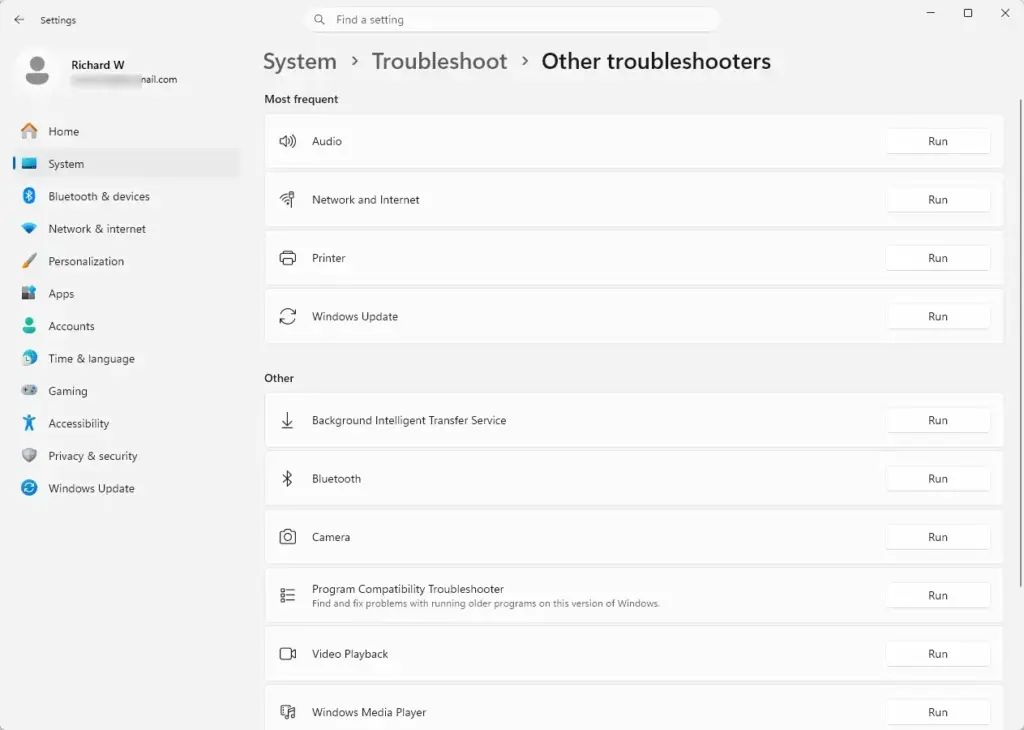
Settings › System › Troubleshoot › Other troubleshooters - Find Bluetooth in the list and select Run. The troubleshooter scans the adapter and the service.
- Follow any prompt it shows. Select Apply this fix if it offers one.
- Open Quick Settings and select the Bluetooth tile again.
The troubleshooter reports Troubleshooting couldn't identify the problem when it finds nothing. That result usually points to a missing driver or a disabled adapter, so go back to the Device Manager steps.
Turn On Bluetooth from Settings Instead
The Settings app offers the same switch if you cannot reach Quick Settings. It also works when the tile is missing but the adapter is working.
- Open Settings by pressing the Windows key + I.
- Select Bluetooth & devices in the left pane.
- Switch the Bluetooth toggle at the top of the page to On. The toggle slides right and changes color.
The Quick Settings tile and this toggle control the same setting. Change one, and the other follows within a moment.
Turn Bluetooth Off Again
To reverse the change, open Quick Settings with the Windows key + A and select the Bluetooth tile once more. The tile loses its highlight when Bluetooth is off. Paired devices stay paired, and Windows reconnects them when you switch Bluetooth back on.
Leaving Bluetooth on draws a small amount of battery power on a laptop. If you rarely use it, turning it off between sessions is a reasonable habit.
What to Do Next
With Bluetooth on, open Settings Bluetooth & devices and select Add device, then choose Bluetooth to pair a new headset, mouse or speaker. Put the device in pairing mode first, which usually means holding its power or Bluetooth button until a light flashes. If the tile still vanishes after a Windows feature update, repeat the add-the-tile steps above, and check Device Manager for a driver that needs reinstalling.
Have a question about this guide?
Answered by AI from this guide. Good questions may be added to this page — please don't include personal details.
Did this guide fix your problem?

About the Author
Richard
Tech Writer, IT Professional
Richard is a writer at Geek Rewind who turns complex IT tasks into clear, step-by-step guides. He draws on years of hands-on experience in system administration and enterprise IT operations, focusing on Windows, Linux and WordPress: the problems people actually run into, and the fixes that work. His server and WordPress guides come from systems he runs himself. Richard builds and maintains the platform behind Geek Rewind, from its Ubuntu servers and Nginx configuration to its custom WordPress plugins. Many new tutorials start with readers' questions, and he's always glad to answer them in the comments.
No comments yet — be the first to share your thoughts!