Turn Off the Camera Privacy Switch In Windows 11

Windows 11 can block your camera in two places: a physical switch on the laptop, and a Camera access toggle in Settings. Turning the block off means fixing both, and the toggle is the one that trips people up.
A hardware shutter, slider or function key cuts power to the camera or covers the lens. Slide it open or press the camera key before you change anything in Windows. If the camera still does not work, the Camera access setting in Settings is the next place to check.
In Settings, the setting is called Camera access. It sits under Privacy & security Camera. Turning it On lets Windows 11 share the camera with apps. It sounds like the wrong way round, but On is the setting you want when the camera is blocked.
Some cameras are turned off in a different way, through Settings or Device Manager. These look the same as a blocked camera inside an app, so the steps below cover those too.
To turn off the camera privacy switch in Windows 11, first move any physical shutter or slider over the lens to the open position, or press the camera key on your keyboard (hold Fn if needed). Then open Settings Privacy & security Camera and set Camera access to On. The Camera app should show a live image afterward.
What the camera privacy switch is
Windows 11 and your laptop’s manufacturer each have a way to cut off the camera. They work independently. If either one is blocking the camera, apps see a black image, a “can’t find your camera” message, or no camera at all. Work out which one you have before you change anything.
Hardware: shutter, slider or keyboard key
A hardware privacy control physically covers the lens or cuts power to the camera. You will find it in one of these forms:
- A small sliding cover above the screen that you move over the lens.
- A switch on the side or edge of the laptop, sometimes marked with a camera icon.
- A function key with a camera icon, usually with a line through it. On many laptops it sits in the top row of keys and needs the Fn key held down.
- A shutter built into the lens housing that closes when you press a key, as on some business laptops.
If the shutter is closed or the switch is in the off position, no setting in Windows will bring the camera back.
Software: Camera access in 🪟 Windows 11
Windows 11 has its own privacy controls under Settings Privacy & security Camera. They include a master switch called Camera access, a switch called Let apps access your camera, a per-app list, and a switch called Let desktop apps access your camera. When these are off, the camera hardware is fine but Windows refuses to hand it to apps.
Tell which one is blocking your camera
Use this quick test. Look at the lens. If it is covered, or you can see a shutter in front of it, the block is physical. If the lens is clear, open Settings and check Camera access. If that is already On and the camera still fails, skip ahead to the sections on a disabled camera and other blockers.
Open a physical camera privacy switch
This step reopens the lens or restores power to the camera. The exact control depends on your laptop model.
- Look at the top bezel (the frame around the screen) and the edges of the laptop. Find a sliding cover, a switch, or a shutter over the lens.
- Move the cover or switch to the open position. On a slider, the lens should now be visible. On a side switch, the position without the camera-off icon is usually the open one, but check your laptop's manual if the markings are unclear.
- If there is no physical cover, check the top row of keys for a camera icon, often with a line through it. Press that key. If the key needs Fn, hold Fn and press the camera key together.
- Watch the screen for an on-screen message from the manufacturer. Many laptops show a small camera-on or camera-off banner when you press the key. Press the key again if the banner says the camera is off.
- Open the Camera app. Select Start, type Camera, and press Enter. You should see a live image, and the indicator light next to the lens usually turns on.
If the Camera app still shows a black image or the message "We can't find your camera" (error code 0xA00F4244), the hardware block is not the whole problem. Continue to the next section.
Turn off the camera privacy switch in Settings
This step sets the Windows-level switch so that apps are allowed to use the camera. The change applies immediately and does not need a restart. Apps that were already open may need to be closed and reopened before they see the camera.
- Press Win + I to open Settings.

Windows 11 Start menu with Settings gear icon highlighted. - Select Privacy & security in the left pane.

- Scroll down to the App permissions section and select Camera. You should see a page with Camera access at the top.
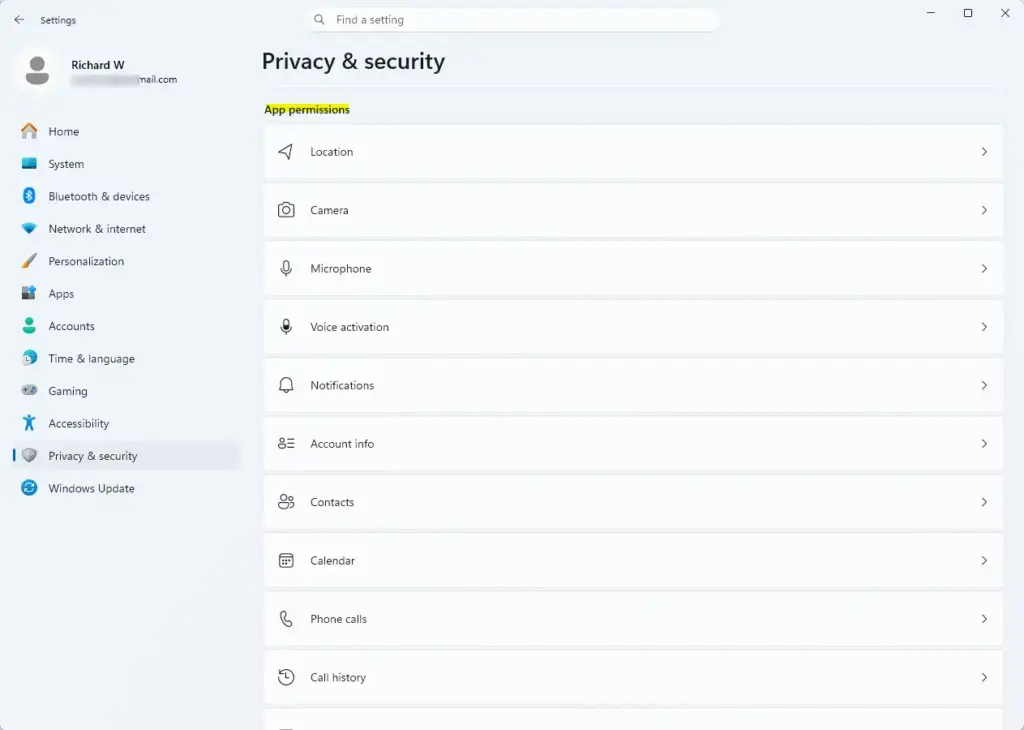
Settings › Privacy & security › App permissions - Set Camera access to On. This is the master switch. While it is Off, no app on this device can use the camera, and the options below it are unavailable.
- Set Let apps access your camera to On. The list of apps below it should now be usable.
- Scroll to the bottom and set Let desktop apps access your camera to On. This covers traditional programs such as Zoom, Teams and OBS Studio. Browsers also rely on this setting.
- Open the Camera app again to test. You should see a live image.
You can jump straight to this page. Press Win + R, type ms-settings:privacy-webcam and press Enter.
Allow individual apps to use the camera
If Camera access is On but one app still can't see the camera, check its own permission. Under Let apps access your camera, find the app in the list and set its switch to On.
Desktop programs that you installed from outside the Microsoft Store do not appear in that list. They are controlled by the single Let desktop apps access your camera switch. Under it, Windows lists the desktop apps that have recently used the camera. It does not give you a switch for each one.
If the switches are greyed out or say your organization manages them
If the toggles are greyed out, or a message says some settings are managed by your organization, a policy is controlling camera access. This is common on work and school PCs. You cannot override it from Settings. Ask your IT administrator to change the policy for your device.
Go to Settings Accounts Access work or school and check whether an account is connected. Removing a work or school account may delete company data and apps from the PC, so do that only if you are sure you no longer need it.
Policies for app privacy are stored in the registry under HKEY_LOCAL_MACHINE\SOFTWARE\Policies\Microsoft\Windows\AppPrivacy. The specific value that controls the camera is not confirmed here, so [Registry method: to be verified]. Do not edit that key without checking the value name first. The Settings steps above are the safe route.
Windows 11 Home does not include the Local Group Policy Editor (a tool for setting rules that apply across the PC). So on Home, the usual cause is a management tool or a leftover work account rather than a local rule.
Re-enable a camera that was disabled
A camera can be switched off in two other places that behave like a privacy block. Neither involves the Camera access switch. Check both if the privacy settings are On and the physical cover is open.
Settings > Bluetooth & devices > Cameras
This step turns on a camera that was disabled by name. It may ask for administrator approval, so approve the prompt if you have an administrator account.
- Open Settings and select Bluetooth & devices.
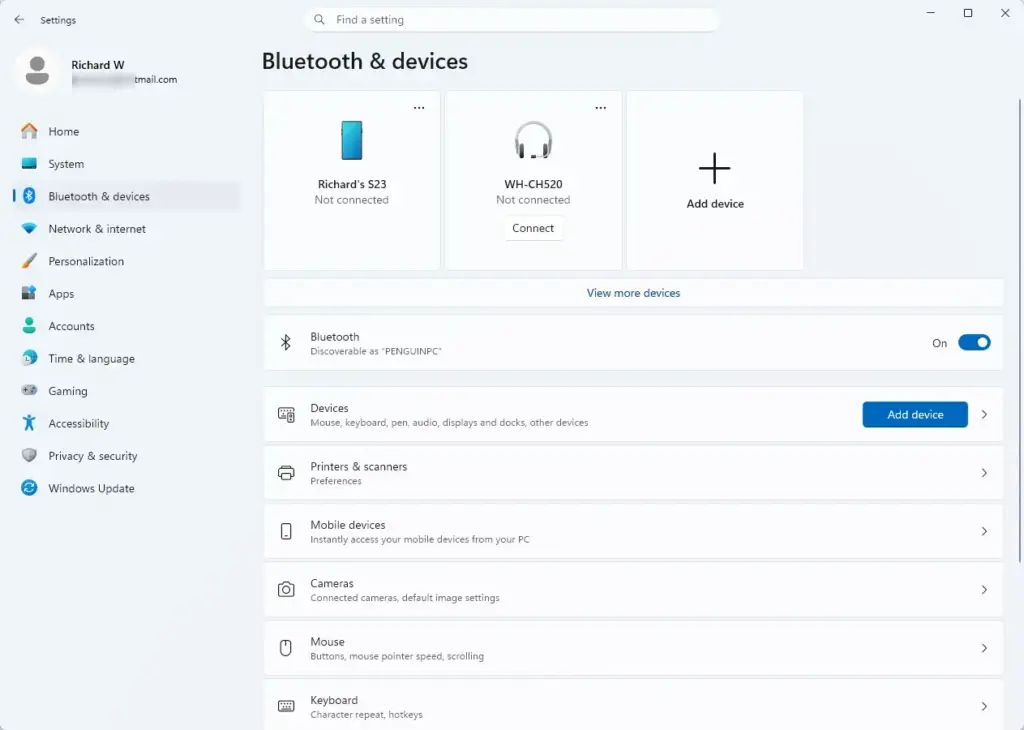
Windows Settings menu highlighting the Bluetooth and devices option for printers - Select Cameras. You should see your camera listed.
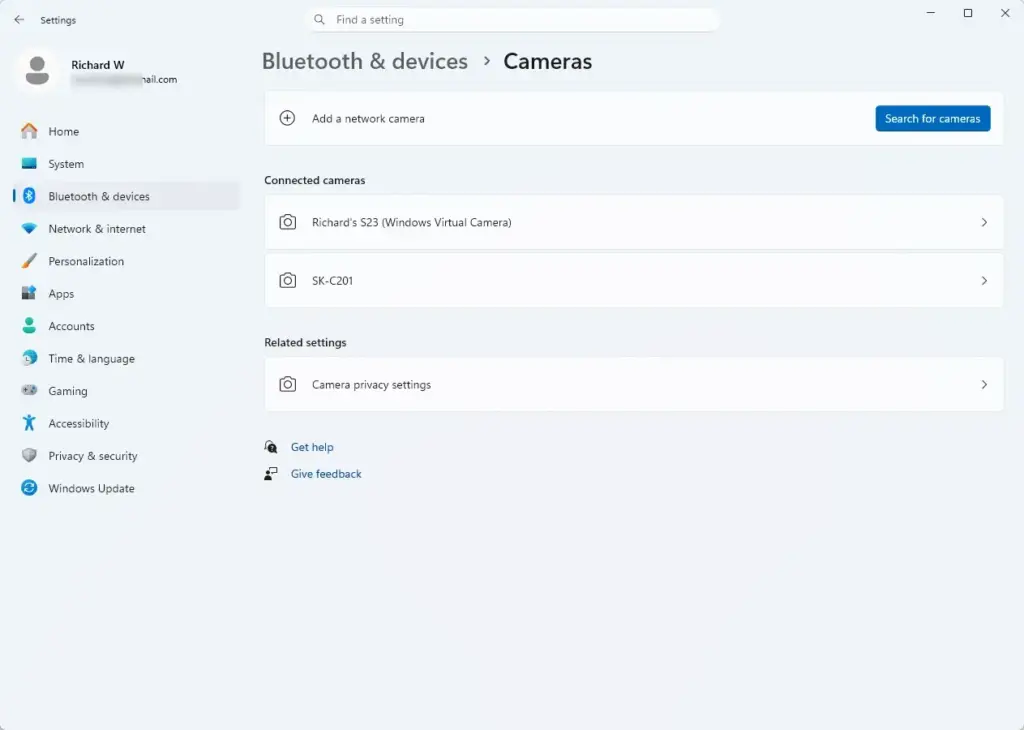
Settings › Bluetooth & devices › Cameras - Select the camera. If it is disabled, the page shows an Enable button. Select it.
- If the page shows a Disable button instead, the camera is already enabled and you can leave this page.
If your camera is not listed here at all, Windows does not detect the hardware. Go to the Device Manager steps below.
Device Manager (administrator required)
Device Manager lists each piece of hardware with its driver (the software that lets Windows control that device). Enabling a device here needs administrator rights.
- Right-click the Start button and select Device Manager.
- Expand Cameras. On some PCs the camera is under Imaging devices instead. Expand that if you don't see Cameras.
- Look at the icon next to your camera. A small down arrow means it is disabled.
- Right-click the camera and select Enable device. The arrow should disappear.
- If no camera appears anywhere, select Action in the menu bar, then Scan for hardware changes.
If the camera still does not show, the hardware switch may be cutting power to it, or the camera may be turned off in the BIOS/UEFI (the firmware settings you reach at startup). Some business laptops have a camera on/off option there. The location and name of that option differ by manufacturer, so check your laptop's support documentation.
Check other things that block the camera
Even with every privacy switch off, three other things can still stop an app from using the camera.
- Security software. Some third-party antivirus and internet security suites include a webcam protection feature. It blocks camera access until you allow it in that program's own settings. Windows Security does not need to be changed for this, so open your security software and look for a webcam or camera protection option.
- Manufacturer apps. Some laptop makers include a utility with a camera privacy mode, such as Lenovo Vantage. A mode that is On there can block the camera regardless of what Windows says. Open the utility and turn that mode off.
- Another app using the camera. Only one app can use most cameras at a time. Close video calling apps, browsers with a camera tab open, and screen recorders. If the Camera app shows error code 0xA00F4243, another app has the camera. Close the other app and try again.
In a browser, the site also needs permission. In Microsoft Edge, select the padlock or camera icon in the address bar and set Camera to Allow for that site. This is separate from the Windows setting, and you have to do it again in each browser you use.
If the camera still doesn't work
Work through these in order. They go from the least to the most disruptive.
- Restart the PC. This clears a camera held by a stuck app or driver.
- Run the Camera troubleshooter. Open Settings System Troubleshoot Other troubleshooters, find Camera, and select Run. If it is not in the list on your build, skip this step.
- Reinstall the driver. This needs administrator rights. Open Device Manager, expand Cameras, right-click your camera and select Uninstall device. Restart the PC. Windows reinstalls a driver at startup.
- If the problem began after an update, open the camera's Properties in Device Manager and select the Driver tab. Select Roll Back Driver if the button is available. If it is greyed out, no earlier driver is stored.
- If you use an external webcam, unplug it, plug it into a different USB port, and avoid USB hubs while you test.
If the camera is missing from both Settings and Device Manager after all of this, and you have confirmed the hardware switch is open, the problem may be physical or in the firmware. Contact the laptop manufacturer.
Turn the camera privacy switch back on
To block the camera again, reverse what you changed. Close the sliding cover or move the switch to the off position. Press the camera function key again if that is how yours works. In Settings Privacy & security Camera, set Camera access to Off to block every app at once, or turn off individual apps in the list.
To disable the camera hardware itself, open Settings Bluetooth & devices Cameras, select the camera and select Disable. Select Enable on the same page to bring it back.
What to do next
Open the Camera app after any change and confirm you see a live image before you test in Teams, Zoom or a browser. If the Camera app works but another app does not, the problem is that app's own permission or a security program, not the privacy switch. For a quick check of which apps have recently used your camera, return to Settings Privacy & security Camera and look at the recent activity shown under each app.
How do I stop camera access in my laptop?
To stop apps from using your laptop camera, open Settings, go to Privacy & security, select Camera, and turn off Camera access. Many laptops also have a physical camera shutter, slider, or function key with a camera icon, which cuts power to the camera. Using one of these blocks the camera at the hardware level, so no app can reach it.
My integrated camera isn't working. What can I do to fix it?
First, check for a physical camera shutter or a camera function key, and make sure it is open or switched on. Then open Settings, go to Privacy & security Camera, and turn on Camera access. If the camera still does not appear, open Device Manager, expand Cameras, and right-click your camera to enable it or update its driver.
How to set up a webcam on a PC?
Plug in an external webcam to a USB port, or make sure your built-in camera is not blocked. Windows usually installs the driver on its own. Open the Camera app from the Start menu to test the picture. If an app cannot use it, go to Settings Privacy & security Camera and turn on Camera access.
Which F key disables the camera?
No single F key turns off the camera on every laptop. Look for a key in the top row, usually F8, F10, F11, or F12, marked with a camera icon. You may need to hold the Fn key to press it. If your keyboard has no camera key, use the physical shutter or the Camera access setting in Settings instead.
Was this guide helpful?

About the Author
Richard
Tech Writer, IT Professional
Richard is a writer at Geek Rewind who turns complex IT tasks into clear, step-by-step guides. He draws on years of hands-on experience in system administration and enterprise IT operations, focusing on Windows, Linux and WordPress: the problems people actually run into, and the fixes that work. His server and WordPress guides come from systems he runs himself. Richard builds and maintains the platform behind Geek Rewind, from its Ubuntu servers and Nginx configuration to its custom WordPress plugins. Many new tutorials start with readers' questions, and he's always glad to answer them in the comments.
No comments yet — be the first to share your thoughts!